Features
Apart from inventory data, you will be able to see TeamViewer IDs and geographical locations at city level on a map.
If a computer is stolen and turned on, you will get the public IP address to give to the police, to track
through your ISP.
Each computer will consume only about 25 kilobytes of internet bandwidth per month.
If you prefer to install a server on your own network, this is also possible for Platinum customers;
see
this page for more information.
If you are a Data Center, this means that can you can
install the SkyBox server free of charge for your customers and sell
the hosting of the database and web site.
Terminology
Before we look at the details of the inventory, let's first get the terms straight.
SkyBox is the name of a cloud service that we make available to you through your FastTrack Automation Studio licensing,
which you access at
www.skyboxinventory.com.
There is no additional cost to use SkyBox as long as your executing computers are licensed and within maintenance period.
SkyBox consists of two services: Cloud Inventory and Cloud Jobs. The Inventory service (this page) can be used without using
Jobs, but not the other way around, because Jobs use inventory data to filter Job executions.
The Cloud Job part of SkyBox has its own documentation page
here.
You can opt to install your own SkyBox server on your own network instead of using our cloud service.
This is explained further down this page. This matrix shows which features are available in which edition
of FastTrack Automation Studio.
| |
Cloud Inventory
Edition |
Enterprise
Edition |
Platinum
Edition |
| Hardware inventory |
 |
|
|
| Software inventory |
|
|
|
| Geographical tracking |
|
|
|
| Custom inventory information from clients |
 |
|
|
| Ability to create and execute scripts |
|
|
|
| Cloud jobs |
|
|
|
| Push MSI files to clients using Cloud Job |
|
|
|
| SkyBox server on own network |
|
|
|
| Log events centrally (requires own server) |
|
|
|
Uploading inventory information
The inventory system uses the FastTrack engine to collect hardware, software and
user information and you can add your own script-based custom information (watch video
here).
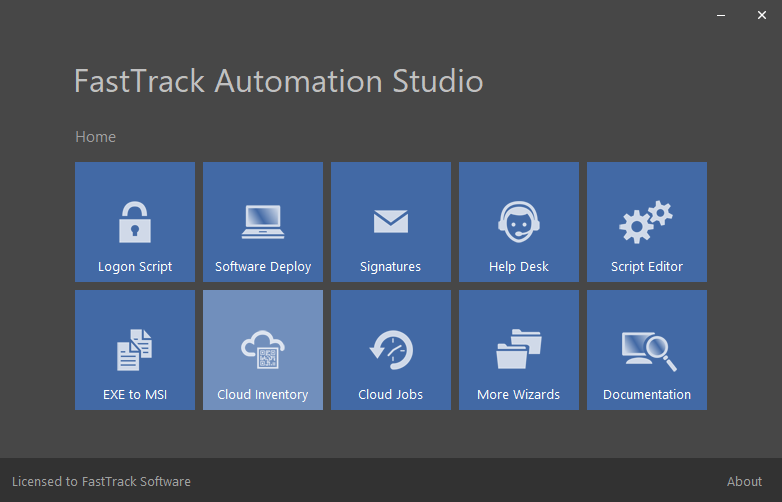
Once licensed, you can access your inventory by selecting "My Inventory" under "Login"
in the top-menu on this page or from the Home Screen Inventory icon.
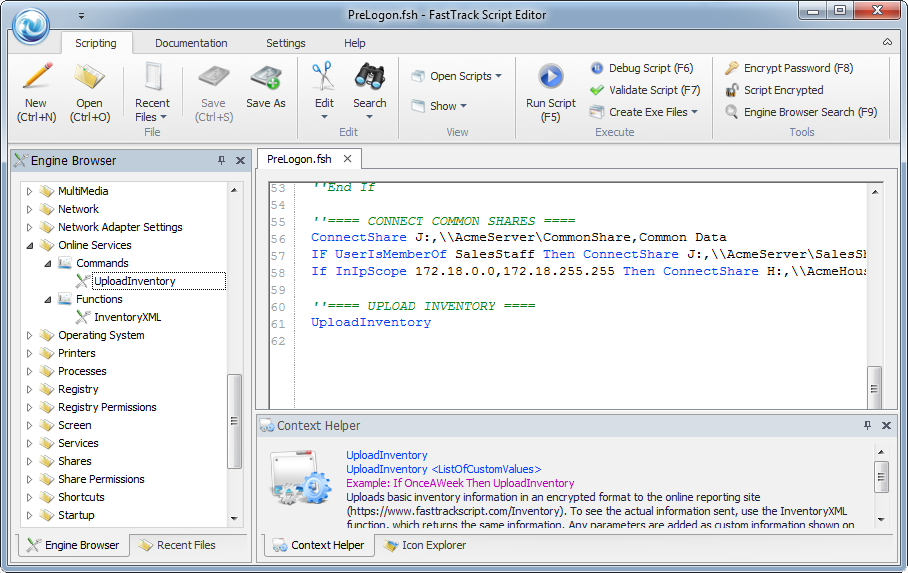
To upload inventory information, all you have to do is to issue the
UploadInventory command
from any FastTrack script - or the
SaveInventory command, if you are using a local server on your own network.
If you are using
FastTrack Logon for logon scripts,
the most obvious way would be to just include the command in for example your postlogon.fsh file and that's it.
You can also deploy an MSI file that you can generate with a couple of mouse-clicks in the script editor, as explained in the next section.
This MSI is basically just a single-line command script wrapped as a daily random time triggered scheduled task on target computers.
The UploadInventory command will upload between 500 and 2500 bytes of data on a typical computer in encrypted format.
The upload only happens when information is actually changed, which is important to know, as this means that you
do not have to be concerned that the command is called too often from your scripts in relation to network
traffic. It is not necessary to identify yourself for uploading, because your data is automatically identified from your license or trial key.
Generating a Windows Installer package
If you have not set up
FastTrack Logon, you need to generate a client to upload.
But even if you have FastTrack Logon set up, it might still be a good idea to generate
a client regardless, as anyone rarely logs on to servers and many users more or less
never logs on and off. But if the primary purpose is to inventory
laptops, desktops and tablets, the easy logon script set up is sufficient for most.
To generate an inventory msi file ("client"), click the "Cloud Inventory" icon in the Home Screen and select "Build Client".
Selecting the menu item starts a wizard and the first step after the welcome page is to decide which type of output file to generate:
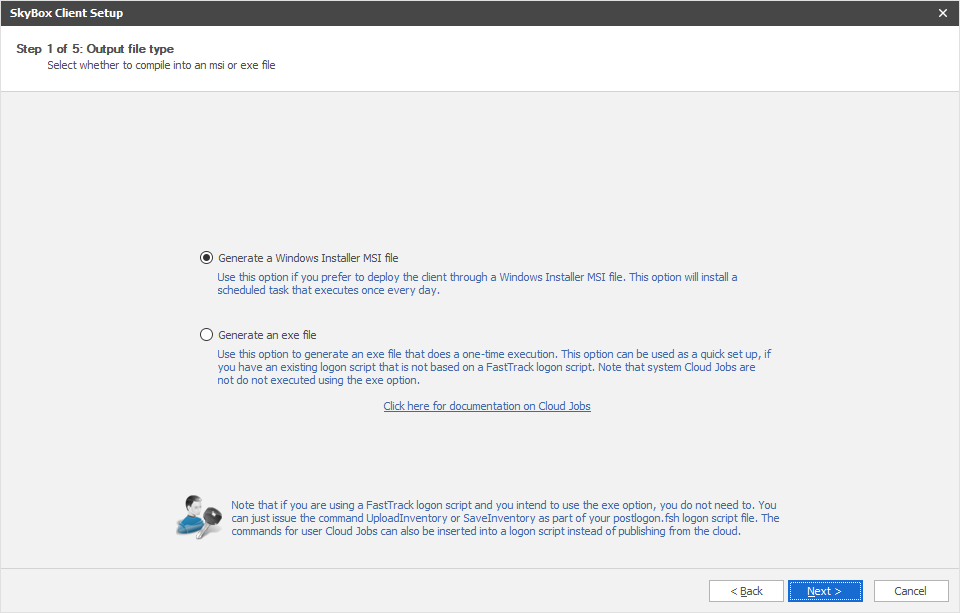
If you are going to deploy with Group Policies, MSI should be the favoured method, as this will set up a scheduled task to execute
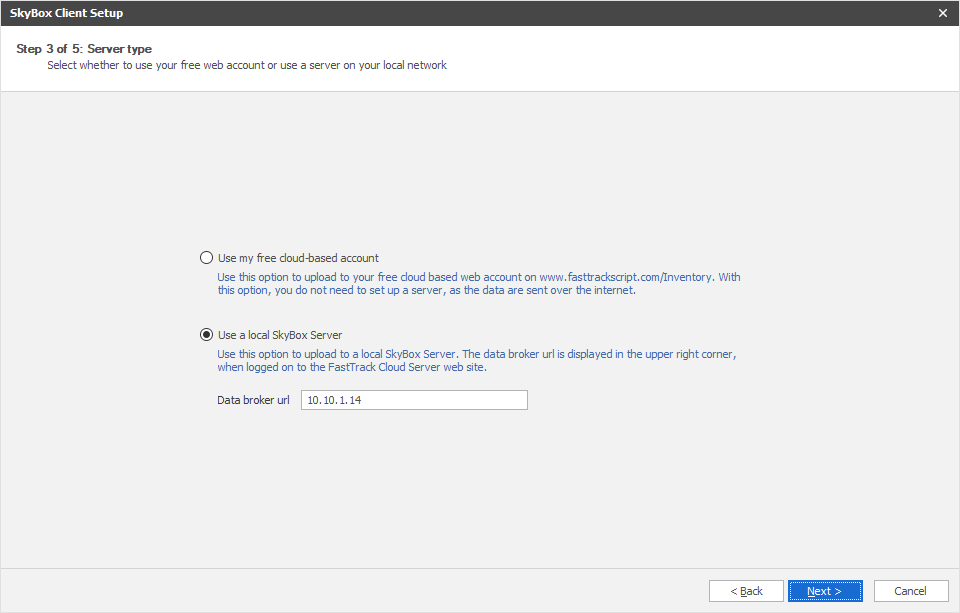
a daily upload. On the next page in the wizard, we need to decide, if the msi or exe file is going to use a cloud-based account or a
local inventory server. If you select a local inventory server, an additional page will appear offering the option to supply
credentials, if Windows authentication is enabled on the local inventory server web site.
The next pages in the wizard are used for selecting an output file and a complete screen.
Basically what this wizard does is just to build a simple script around the UploadInventory or
SaveInventory command and then it uses the exe or msi file generation features
of FastTrack Automation Studio to build the output file.
Once you have your msi file, you can deploy it through group policies, as demonstrated on the
SkyBox deployment page. On that page you
will also find alternative deployment options. Note that when you deploy an MSI, it will intentionally
not do an initial upload on install, because this would cause all computers to upload more or less at the same time.
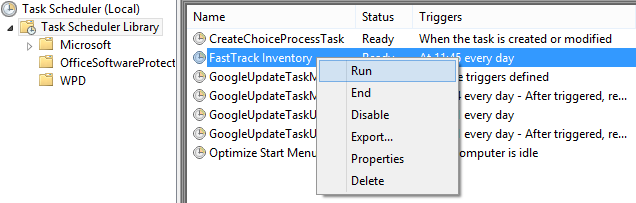
If you need to test that everything works as intended,
you can go to the scheduled task list on one or more computers and manually start the scheduled task to verify the
data upload as shown below.
Using the UploadInventory and SaveInventory commands
In the example below, the UploadInventory command is simply added to the existing FastTrack logon script.
It is safe to always issue the command, as the UploadInventory command will detect, if there are changes in what
would be uploaded. If there are no changes, nothing happens. If you are using a local inventory server, you need to
use the SaveInventory command instead.
The information uploaded is only between 500 and 2500 bytes of data on a typical computer and happens only when information is changed.
In real life this means that the upload will happen only a couple of times a month per computer.
However, if you do have concerns about how often information is uploaded, the command can be controlled through normal script logic. For example
if you want to force the upload to happen only once a month, then you could simply use the OnceAMonth condition to control
it:
If OnceAMonth Then UploadInventory
Events
The inventory pages are divided into hardware/user inventory and software inventory, which are explained in the next section.
A local inventory server has an additional area named "Events".
This feature is only available in
local servers,
because using it with a cloud-based server would involve a risk of you congesting
your internet connection in case of massive unintended events.
Events are available in local inventory servers under the "Event Log" tabs on the overview and client detail pages, and would be the equivalent
of the event log on a client, except that events are logged centrally.
When the commands LogInventoryEvent, LogInventoryWarning and LogInventoryError are used in
your scripts, the event is uploaded and you will be able to see all and filter events across all computers. If you have an important event like a server
backup script or an automated client operating system installation, it could be relevant to log results centrally, to be able to get an overview of
important events at all times from anywhere. Setting up a local inventory server is explained on
this page.
Installing a server on your network
If you prefer to install a SkyBox server on your own network instead of using the cloud-based one,
you need to generate a server, which means setting up a SQL Server database and an IIS web site.
A SkyBox server is free and the generation procedure is a simple walk-through of a wizard,
which is explained on
this page.
There are however two differences between a local inventory server and a cloud-based one. The local one includes the ability to store
central events, which is explained further down this page.
The cloud-based option does not include this functionality, because using it with a cloud-based server would involve a risk of unintentionally congesting
your internet connection. The other difference is that a local server will only include geographical information if you have the
Platinum edition of FastTrack on your clients. The reason for this is explained
here.
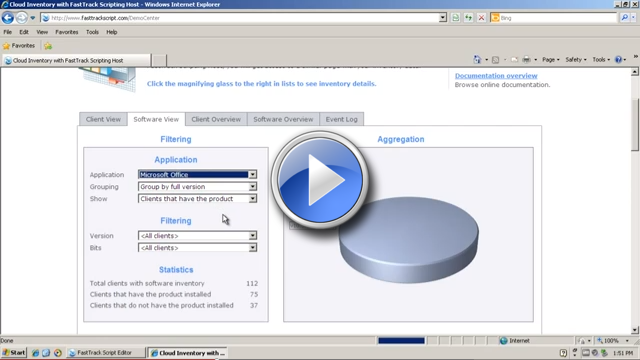
SkyBox demonstration
Before you read on, you can press play on the video below to watch Senior Technical Writer Steve Dodson from Binary Research International
walk you through a scenario of using the cloud-based inventory.
Viewing the inventory
To view the uploaded inventory data, simply log on to
your account or
go directly to the URL
https://www.fasttrackscript.com/Inventory.
You must logon with the credentials that you received when you purchased your licenses. If you are not sure what your password is,
enter the email address used for purchasing the licenses and click on the "Forgot My Password" button.
If you are using a local inventory server, you must access this web site instead. Your local web site looks and works the same as the cloud-based
one.
Once logged on, you can see and filter your own data, as you can see at the
Demo Center demo
(which uses data from the fictitious company Acme Corporation). We will use the demo center data here as an example;
when you log on to
your inventory, you will of course see your own uploaded data.
The software inventory part is a list of software that is installed on all clients. This will allow you to quickly spot illegal software and
will also allow you to get specific numbers of installations to verify if you are sufficiently licensed. Installed applications are aggregated
across all computers on the main "Software View" and "Software Overview" tabs and a list of installed applications on a specific client is
available on the client detail "Installed Software" tab.
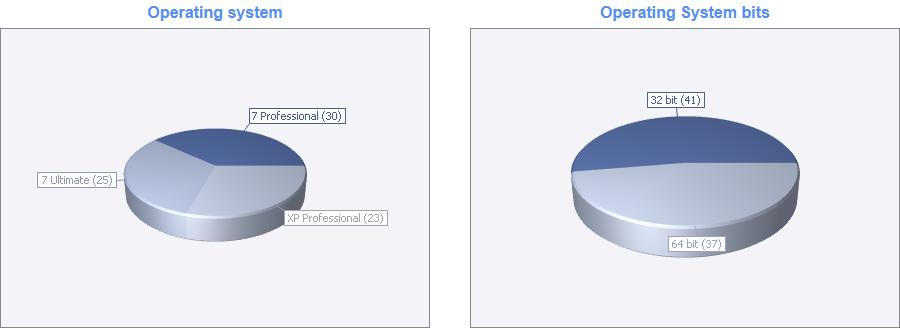
Finally, we have the hardware/user inventory. The "Client Overview" tab will give you hardware information that is
aggregated in 3D pie charts. You can copy those to your own documents by right-clicking and saving the image files.
For example the split of operating system versions and bits looks like this for the fictitious company Acme Corporation at the demo center:
The "Client View" tab is used to show and filter clients, which you would typically use to identify who has which computer or which computers
meet certain hardware criteria. The filter function here can also be used to filter across hardware and software. You can select hardware and
user criteria and you can also combine these criteria with software information such as a specific version of certain software that must be installed.
All filters are "and" filters meaning that all selected criteria must be met to display a client.
In the example below, the demo center data was filtered to show computers that are eligible for a hardware change. The criteria
used was all computers that have a 1.8 GHz or slower CPU and 50 GB or less of free disk space. Seven computers fit these criteria:
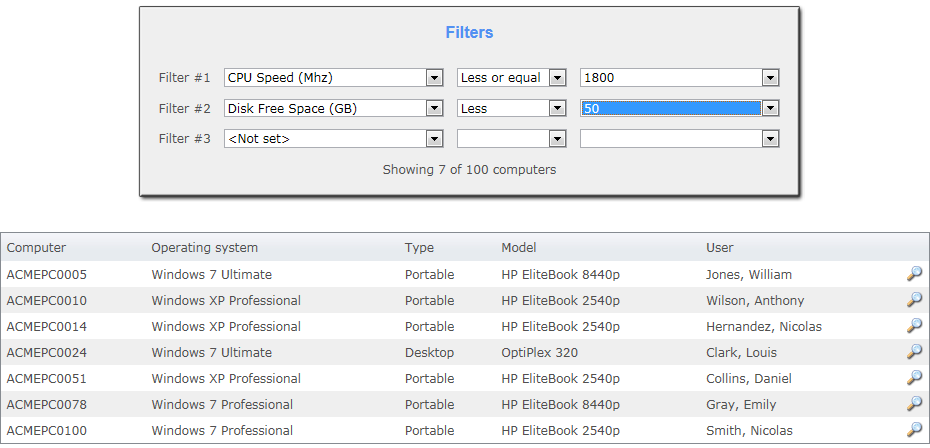
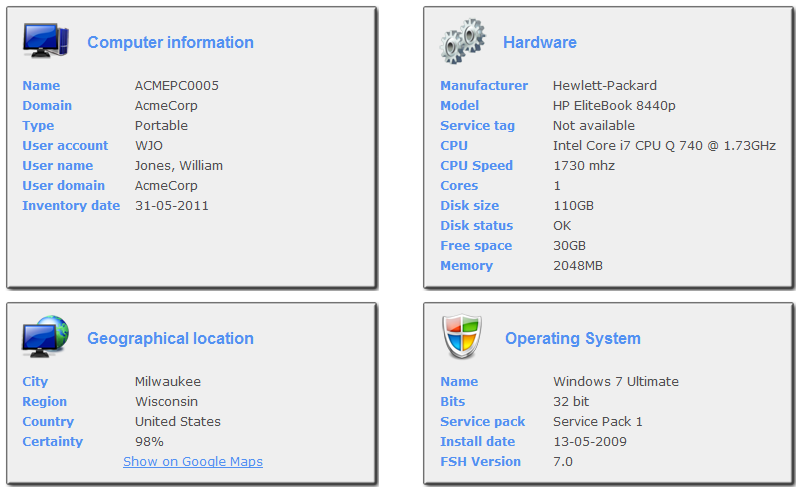
To view more-detailed information about a specific computer, click the magnifying glass to the right.
Clicking the details button on ACMEPC0005 (see above) will bring up the detail view (only the first four windows are shown here):
Adding custom information
If you take another look at the script editor screenshot at the top, you can see that it is
possible to feed the UploadInventory (and SaveInventory) a "List Of Custom Values". It is likely that you have
some information from for example your Active Directory that you would like to pair with the
web inventory. This is what the "List Of Custom Values" is for. You can use the built-in
functions or you can create your own script logic to add custom information to the inventory. For example:
UploadInventory [ComputerDescription],[UserDepartment],[UserDescription]
If the "Description" properties are indeed very descriptive for both users and computers in
your organization, you can just upload these as custom values. In the case above, we are
uploading the description of the computer and user and the department of the user. Once this is
executed on the client computers, the information is shown at the bottom of the detail views as custom information:
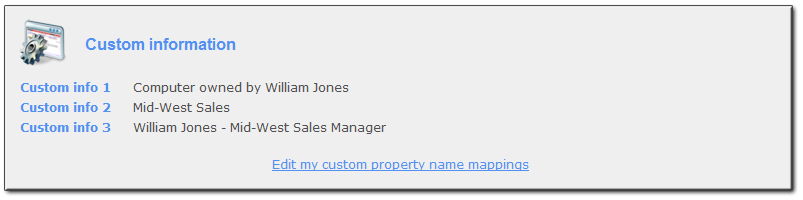
The caption of custom information is, by default, "Custom info" followed by a sequential number. To
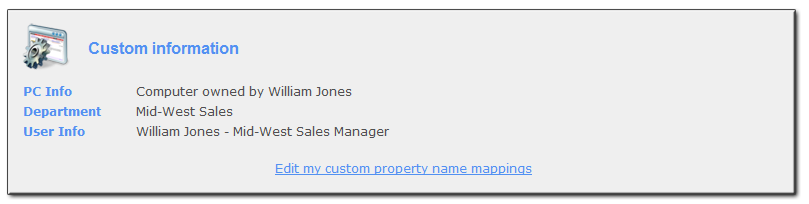
change the captions to reflect the custom information sent by
your uploading script, the "Edit my custom property name mappings"
link can be clicked to change the captions. Once this is done and saved, the view could now look like this:
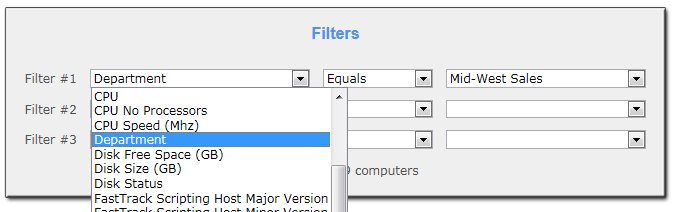
The custom mappings will also take effect in the filter list.
Our second custom field is now mapped to a caption named "Department". If we go back to the
inventory list and click the filtered search, we will find that the mapped "Department" is now a filter value:
You can press play on the video below to watch Ryan Akers from SrekaIT walk you through the process of adding custom information.