Setting up FastTrack Logon for desktop preparation
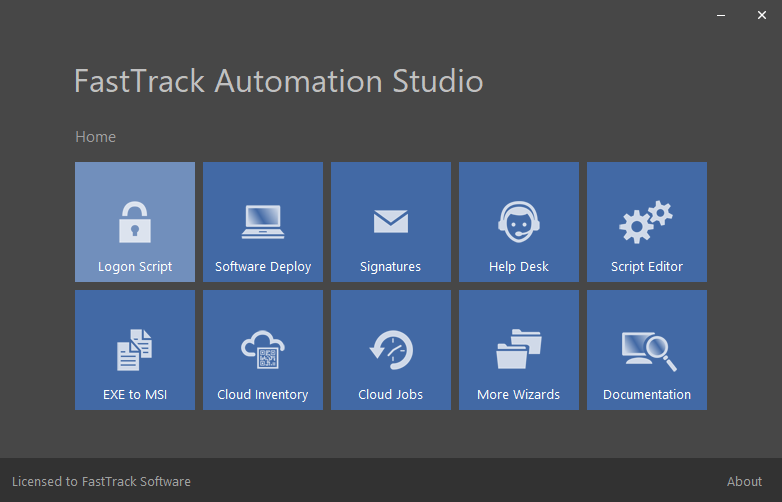
The first step is to walk through the simple FastTrack Logon Setup wizard. Click the "Logon Script" icon on the Home Screen and select "Setup New".
This is a simple process, so we will not go through the pages here - but you can watch
this video to see it done in real life.
Walking through the configuration pages
Once you completed the setup wizard, you are ready to build your configuration.
If you prefer to see a video of using the basic pages, please refer to
this video.
On the default "General" page, you define common settings,
such as splash screen text and your company name and logo that you saw in the video above.
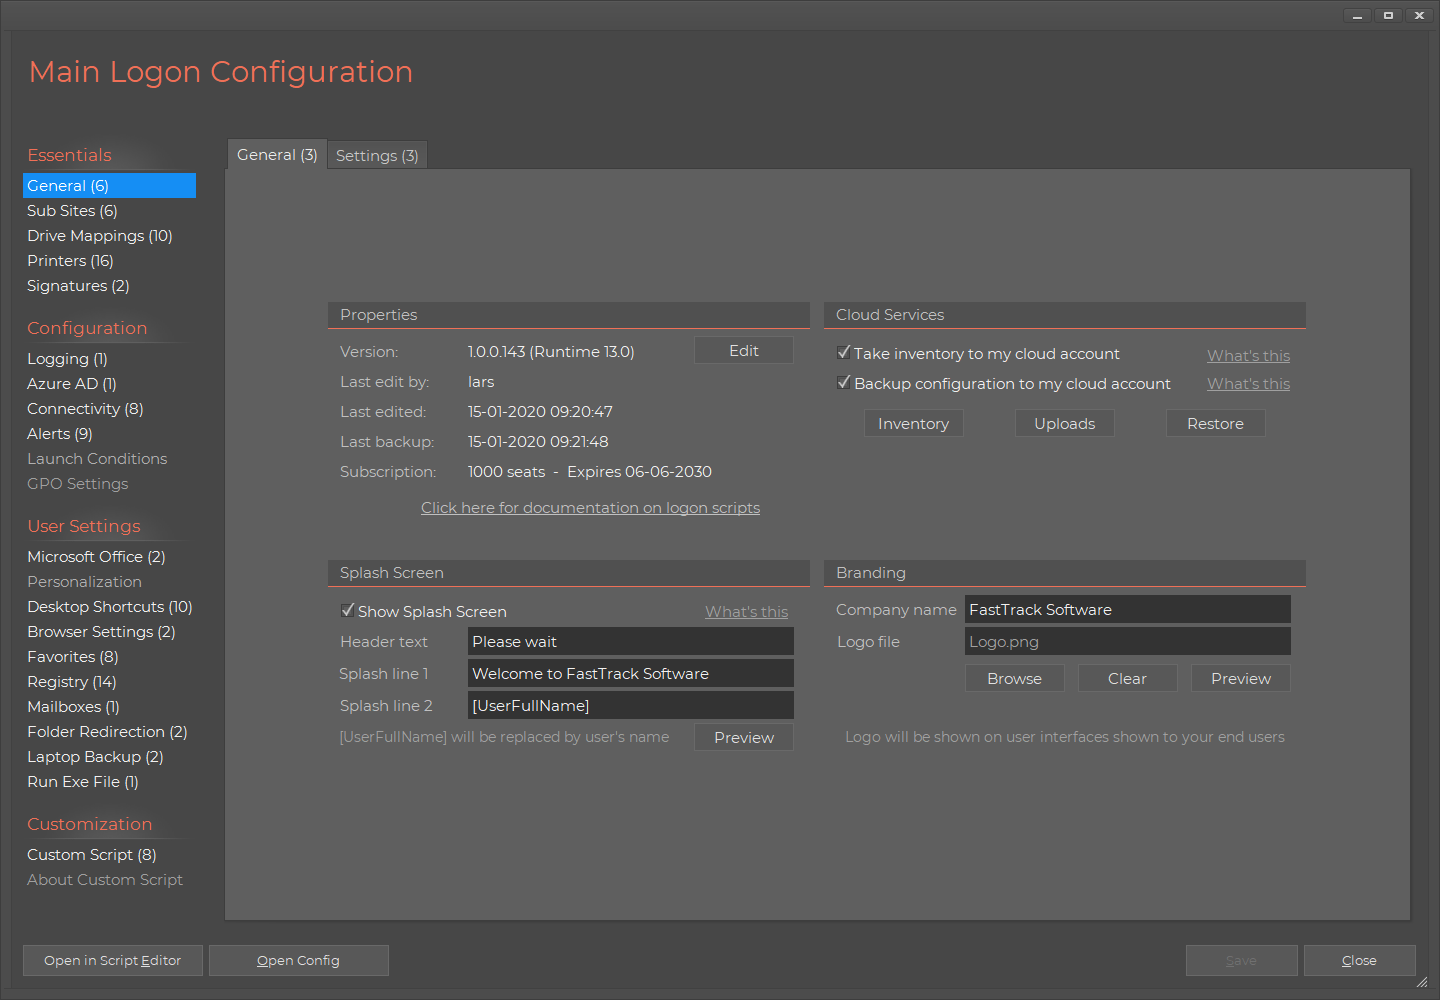
You should generally include your company logo, as this is shown on all user interfaces that the end user sees.
On the general page, you can also test-drive your logon script using the "Execute" and "Debug" buttons without actually logging on to a computer.
If you need to troubleshoot on clients, you can temporarily enable step debugging and making errors show on clients.
You can also set a user interface scaling. If your users generally have high resolution screens, you may want to make the user interfaces bigger.
User interfaces means anything the user sees, such as splash screen, printer menus, signature pop-ups and so forth.
Cloud Services
You have two cloud services that comes freely with your license, which you configure under "Cloud Services" on the "General" page shown above.
The first one is a cloud-based inventory named SkyBox, which has its separate
web site at
www.skyboxinventory.com. When you license FastTrack Automation Studio,
you automatically get a free account at this web site. All you need to do to take a hardware and software inventory of computers, is to set the checkmark.
You can read more about the inventory on
this page.
The other service you get for free with your licensing, is an automatic backup to the cloud. If you set the cloud backup checkmark, a backup of
your configuration will automatically be uploaded to the cloud for easy restore. This backup even includes previous versions, so you can restore
your configuration from a previous date in case you need to revert to a previous version. The documentation for the cloud backup can be found
here.
Sites
Note in the left menu that you have a menu called "Sub Sites". Let's say you have 4 sites in your company and you know these by IP scopes.
Then you can go two ways, either you simply merge everything into one script and use the IP scope condition - or you can use "Sub Sites" to create a logon script for each site based
on IP scopes, meaning that on a specific site, the main script is executed plus this sites' "sub logon script".
A sub site allows you to open the very same Logon Script Builder as you see here, but all settings will then only apply to the site you open.
You can also mix; for example shares could go on the main logon script and then printers could go on each sub site. As a rule of thumb, if you
have complex printer mappings that you want to handle with FastTrack, sub sites is probably the way to go, especially if you use printer menus (see further down).
Drive Mappings
On the drive mappings page, you create a list of shares to connect. You simply create a full list of all possible shares for all users
and then you set up a filter on each share, if required. You can filter on Active Directory groups and Organizations Unit of the
executing computer or logged on user. You can also filter on IP scope. If your drive mappings are complex, you use the sub sites features
to segment your list. For simplicity, here's a simple list:
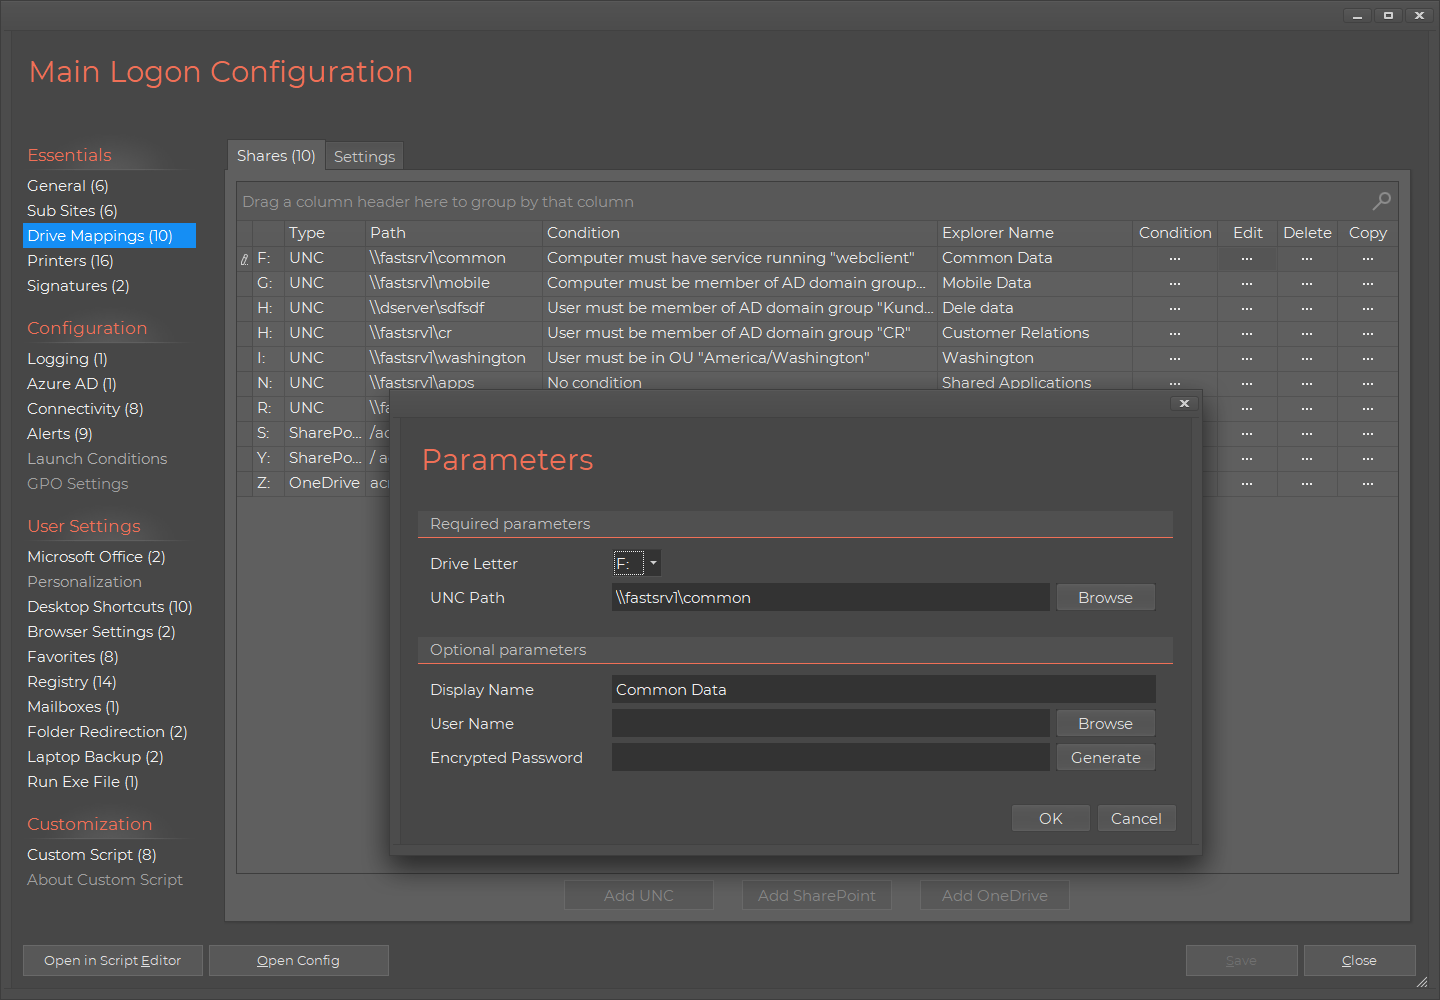
SharePoint and OneDrive
In the above share mappings, there are two buttons named "Add SharePoint" and "Add OneDrive". The first button lets you add a SharePoint folder
as a drive mapping. The way it works is that the user will be asked to log on to Office 365 as part of the logon process to establish credentials.
If you use the OneDrive button, the user's OneDrive folder will be mapped to a drive letter. Note that this is OneDrive for Business and not OneDrive
personal. If you have a fat OneDrive client installed on all computers, you should prefer this for performance reasons. The advantage of mapping to
a drive letter is that you have central control over it and also, if you have clients that do not have the OneDrive fat client, this solves the problem.
Note that under the Microsoft Office menu in the left, you can configure, if Office favors cloud storage (the fat client) or not. When mapping OneDrive
to a drive letter, Office does not see it as cloud storage.
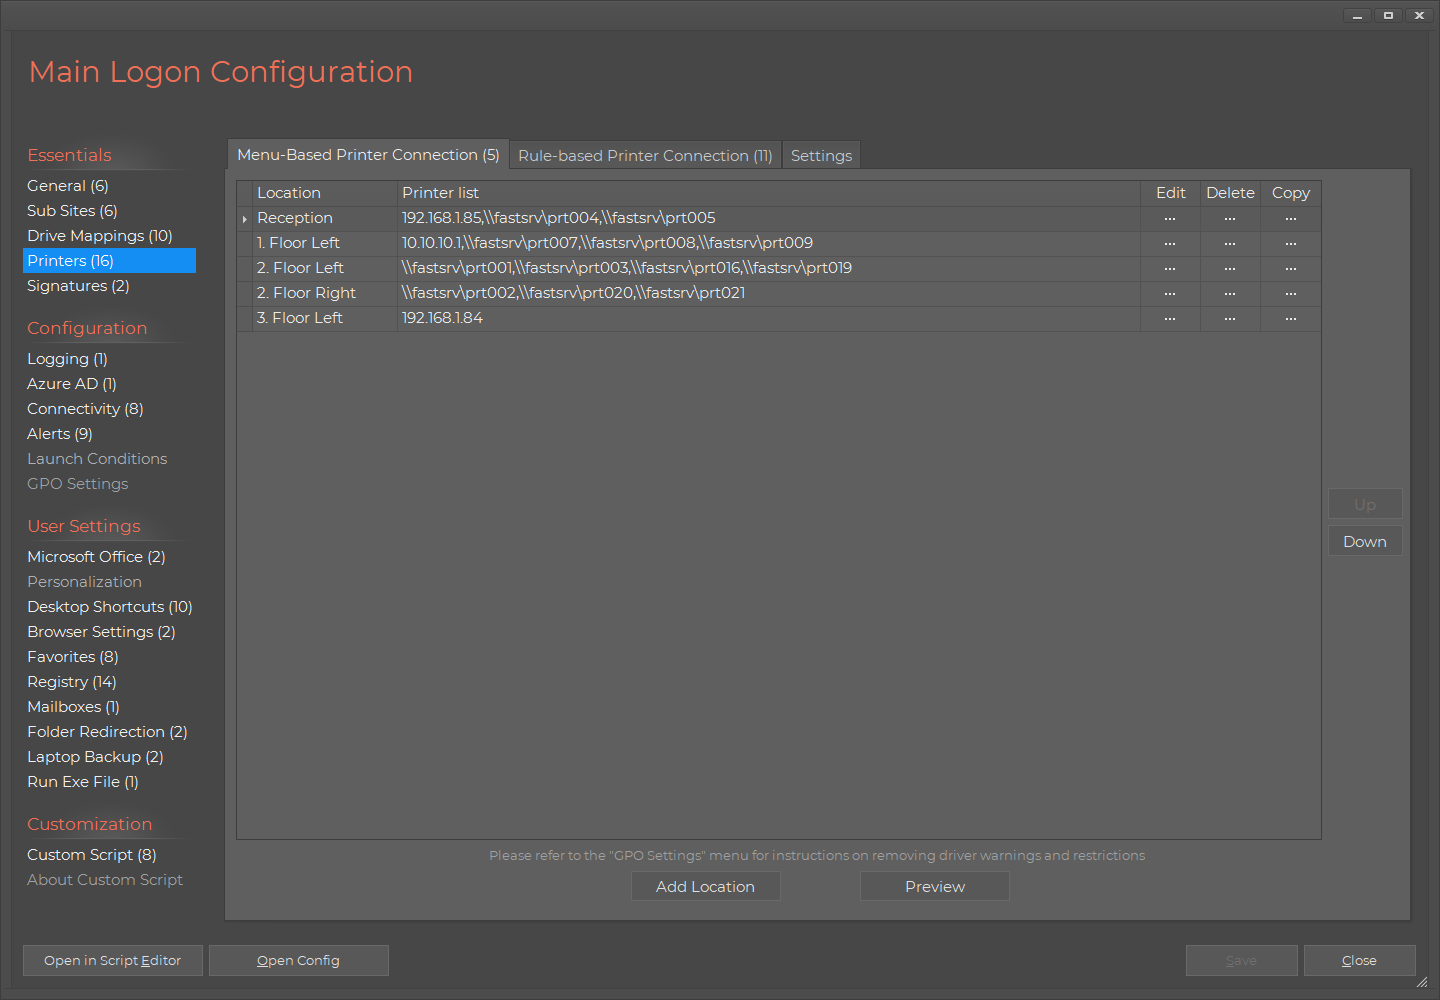
Printers
Printers you can connect in two ways. Either you can create a menu that the user will select a list of printers from,
or you can use the same logic as with shares, where you filter printers on groups, OU or IP scope. The printer menu
version is the most flexible way, because laptop users may roam around without logging on and off. And also, in many cases,
a network is not broken down to such IP scope level that it's practically possible to identify suitable printers for everyone. With the menu
version, you ask at first logon and you can create a desktop icon to show the choice of printers again. The selection will
automatically be remembered and if you change printers on a location, changes will automatically be reflected,
next time users log on.
Rule based printer connection
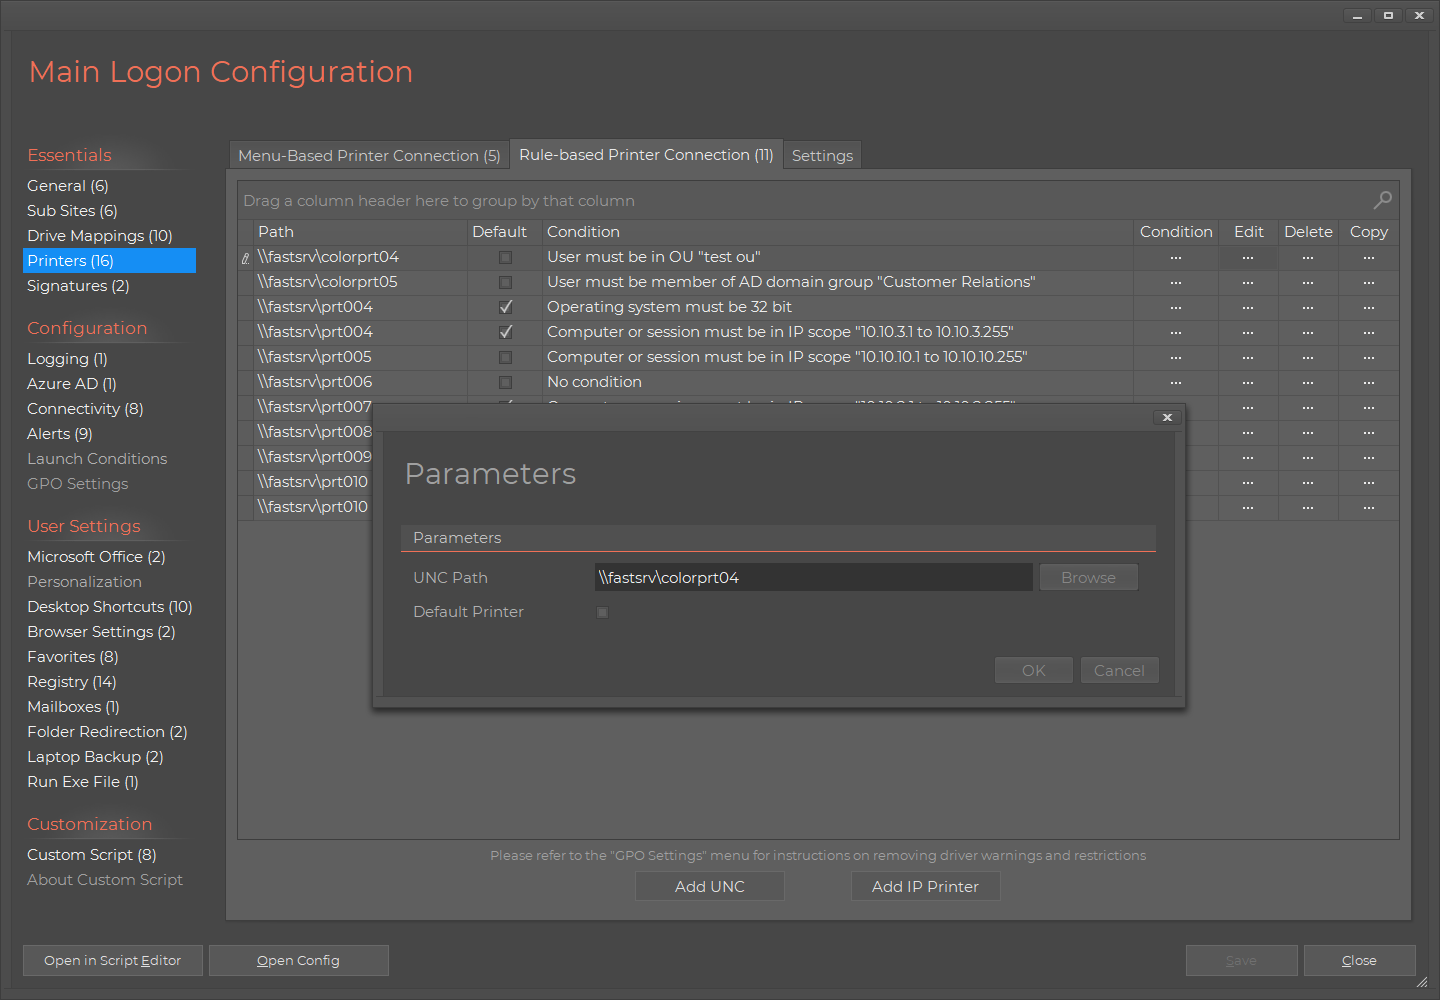
Menu based printer connection
IP Printers
In the screenshot above, you can see that there are two buttons. One for print servers (UNC) and one for IP printers. Both printer menus and AD rules
support IP printers as well as print server printers. It is just as easy to add an IP printer as it is with print server printers. Once you click the button
to add an IP printer, you will see this screen:
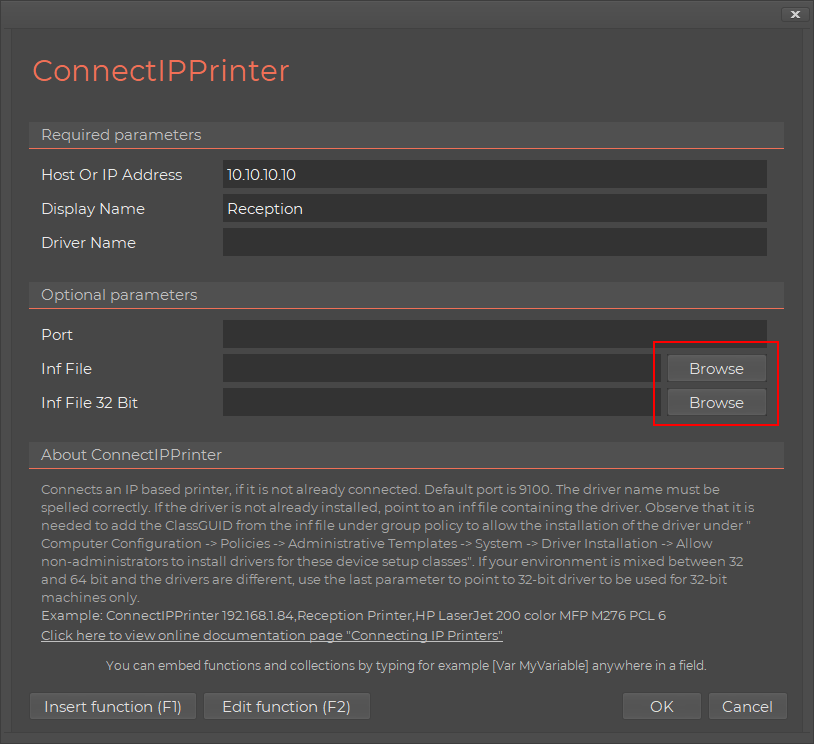
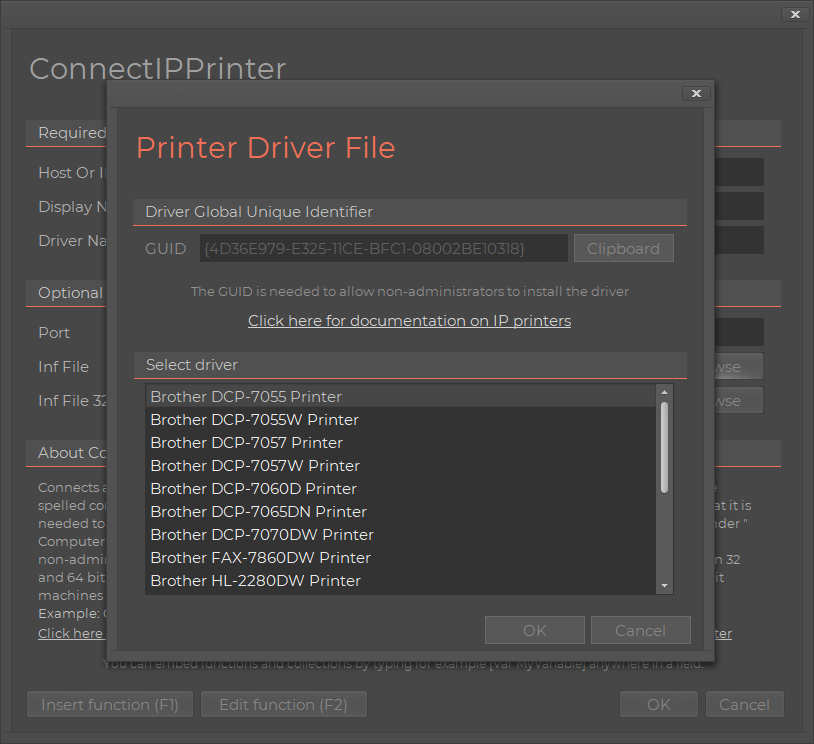
Basically you just tell the host name or IP address of the printer and then you need to say, which print driver to use, just as you would have to
on the server-side for print servers. If the printer driver is not a standard Windows driver, you need to put the driver files on a network share and point
to it. To avoid typing the driver name wrong or point to a wrong path, it is highly recommended to use the "Browse" button shown above, because this
will pop-up a pick list of driver names in the driver inf file and fill in all information automatically, as shown below.
IP printers has a separate documentation page - please refer to
this page for more information,
if you need to use IP Printers.
Outlook Signatures
If you wish to set up one or more Outlook signatures, you can point to a Microsoft Word signature file and set options on the "Outlook Signature" page.
Signatures has its own page
here. You have the same options as you have, when
you use the Outlook Signature wizard. However, installing an Outlook Signature through a logon script has one huge advantage -
you do not need
to redeploy to update signatures. You can simply replace the signature template file on netlogon or point to a network location, where
someone from marketing can update the signature. Signatures that include marketing campaigns or similar will need frequent updates. Regardless,
signatures are never static. You will do yourself a favor to deploy through a logon script, because eventually there will be changes and you
do not need to worry about redeploying an MSI file or similar.
As is the case with the Outlook Wizard, you can install signatures once, create a desktop icon for ad-hoc update and also choose to ask the user to correct Active
Directory information, before installing the signature. This will not change your Active Directory, just the user's signature.
You can install as many signatures as you like. A typical example would be that various groups in the company must have different signatures.
In such case, simply add a group or OU check and use multiple signatures.
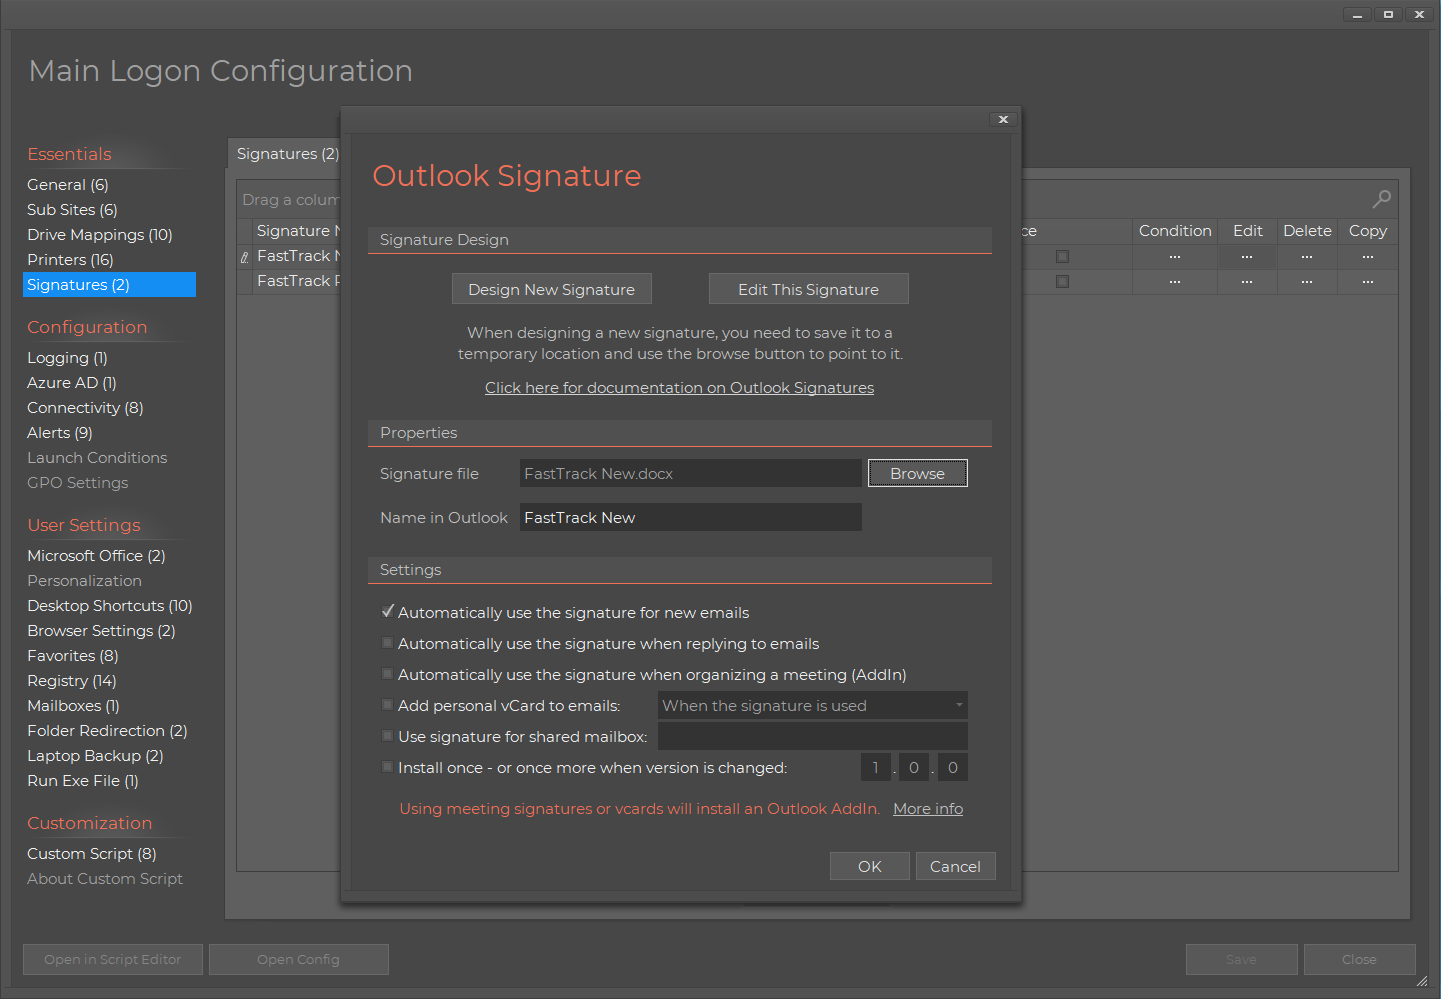
Note that you can also use a signature for meetings, meaning using a signature as a template for meetings. When the user
clicks the calendar, the signature is automatically inserted as a meeting template. You can also attach a vcard to either
all emails or new emails (versus reply emails). The vcards are much richer than the native Outlook ones and will take
the information from your Active Directory.
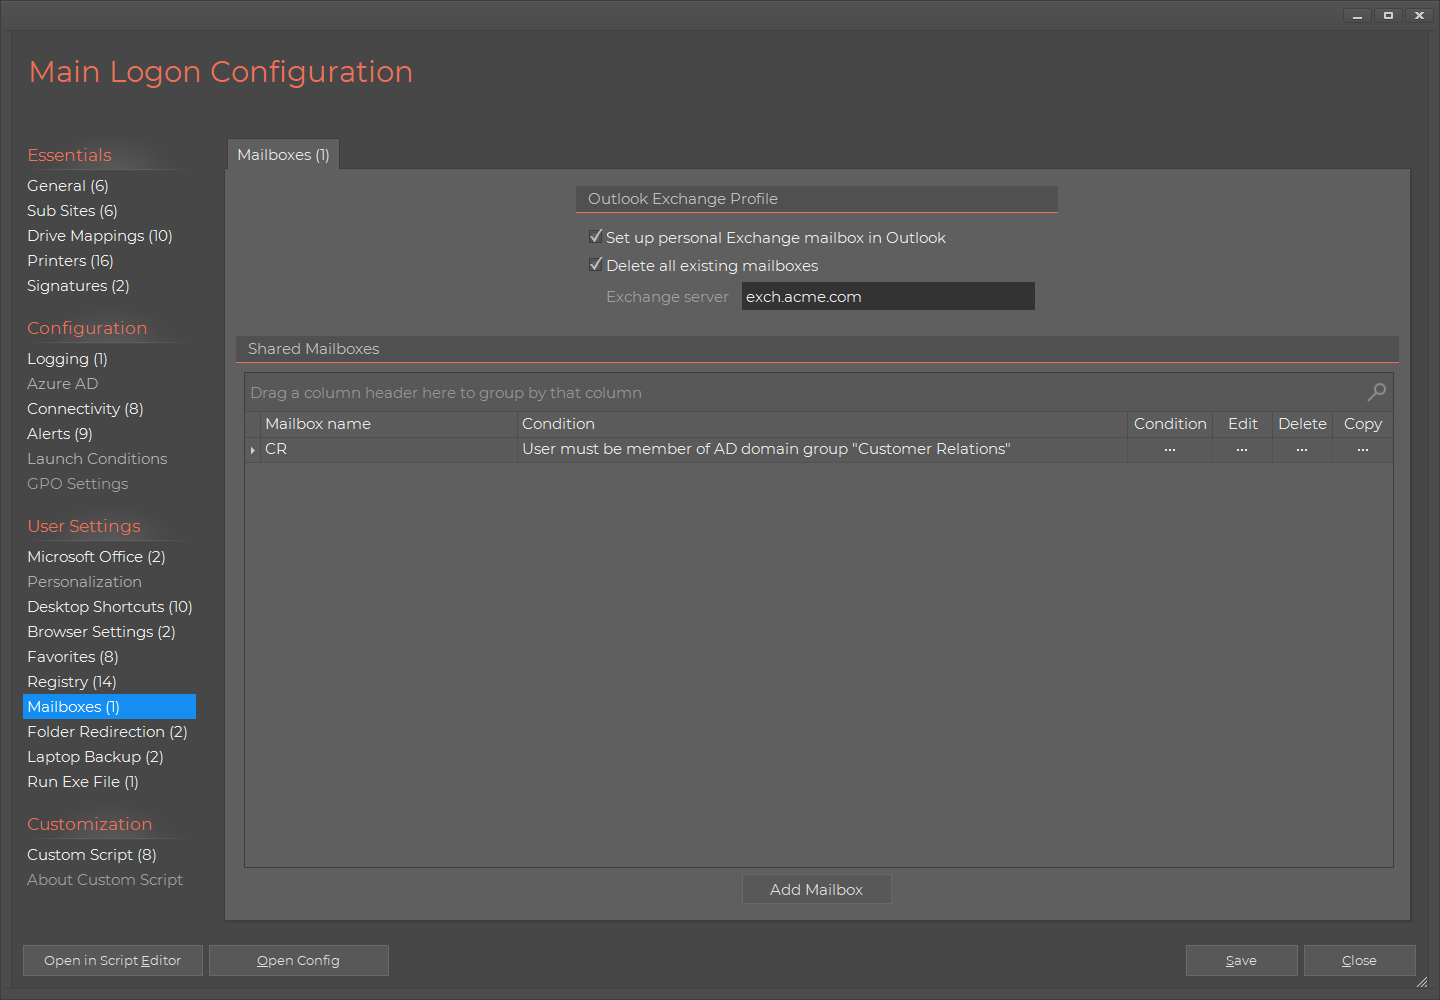
If you do not have auto-discover on or you for other reasons need to control maiboxes, you can use all the same conditions
to create
Exchange profiles:
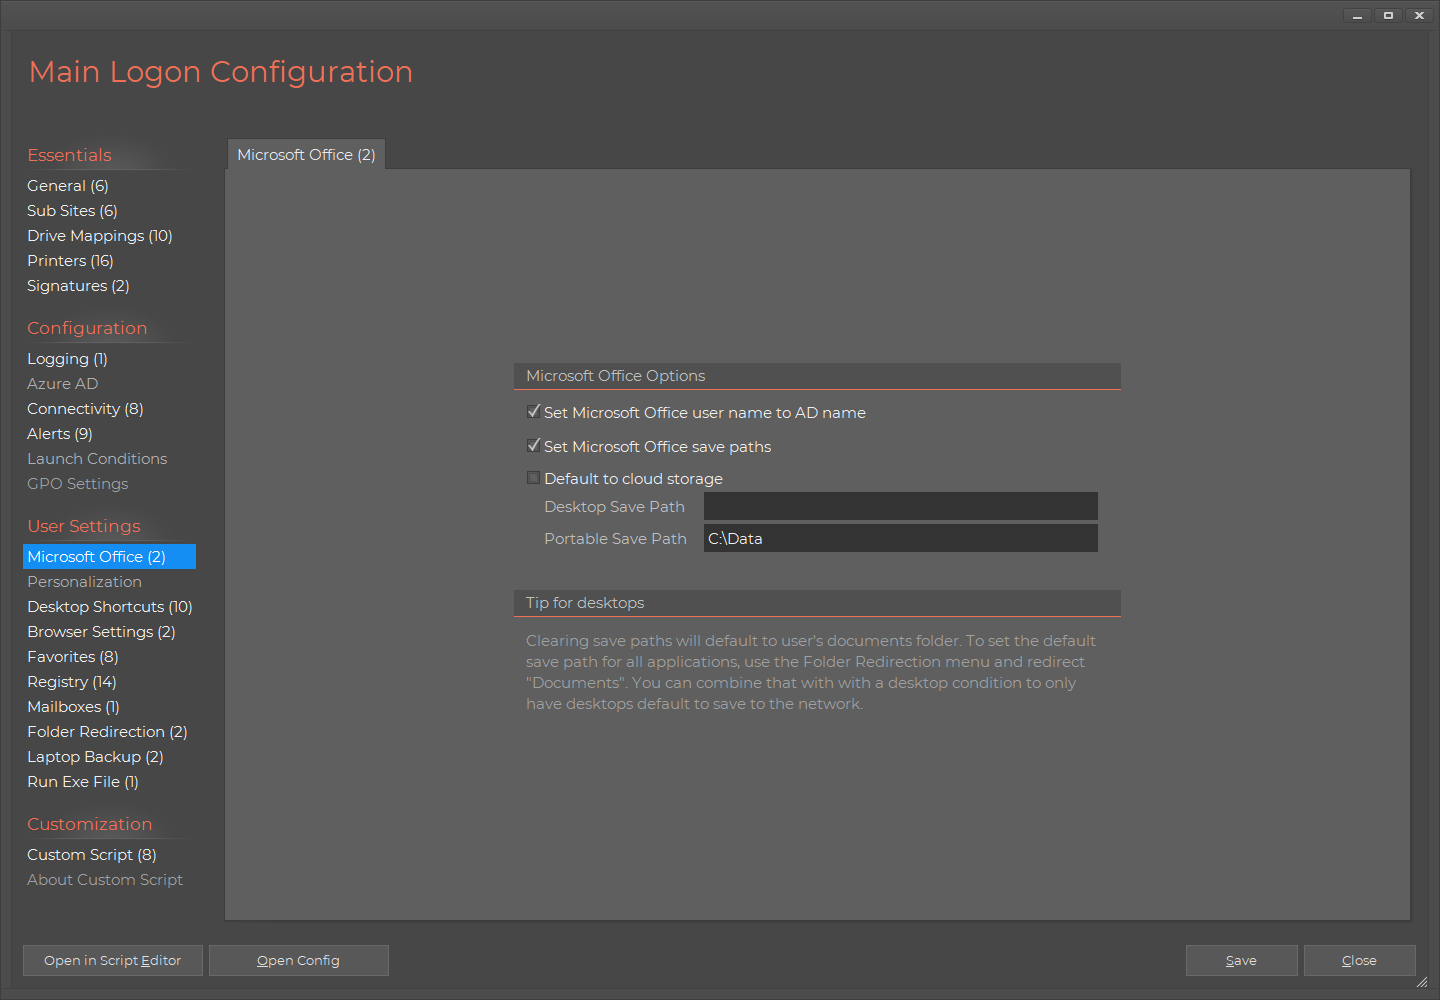
Office Settings
Under Microsoft Office in the menu, you can let the logon script set the Office user name to be the same as your
Active Directory name and initials. This is typically a good idea to avoid users being creative, ending up with
documents being stamp with names that are not recognizable. You can also overrule the default save paths for desktops
and/or laptops. If you use Folder Redirection, this option is not necessary. You can also decide, if Microsoft Office
applications default to saving to OneDrive or local disk.
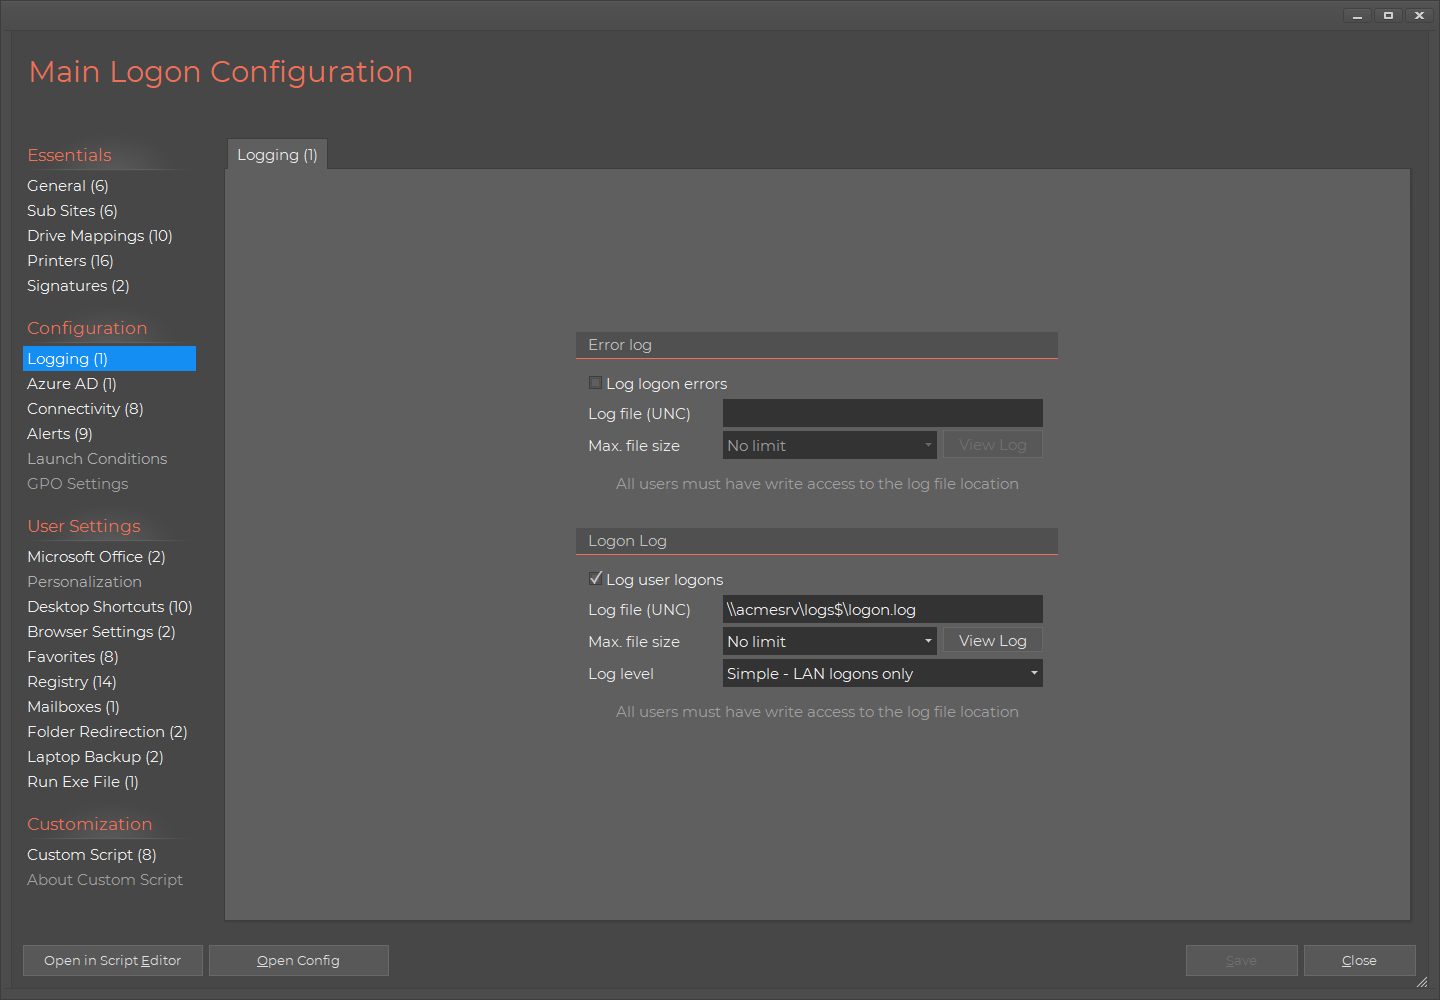
Logging
You can enable logging for user logons and errors at logon. This is a good idea to enable, as this gives you a great
overview of what's going on, especially on errors. The reason logging is not enabled by default is that you need to
provide a location on your network, where all users can write, as the logon script runs as the end user, who is typically
not domain administrator. Once you have set up logging, you can use the two log sub-menus in the Home Screen under "Logon Script".
It is highly recommended to enable the error log, as this will allow you to proactively find potential problems.
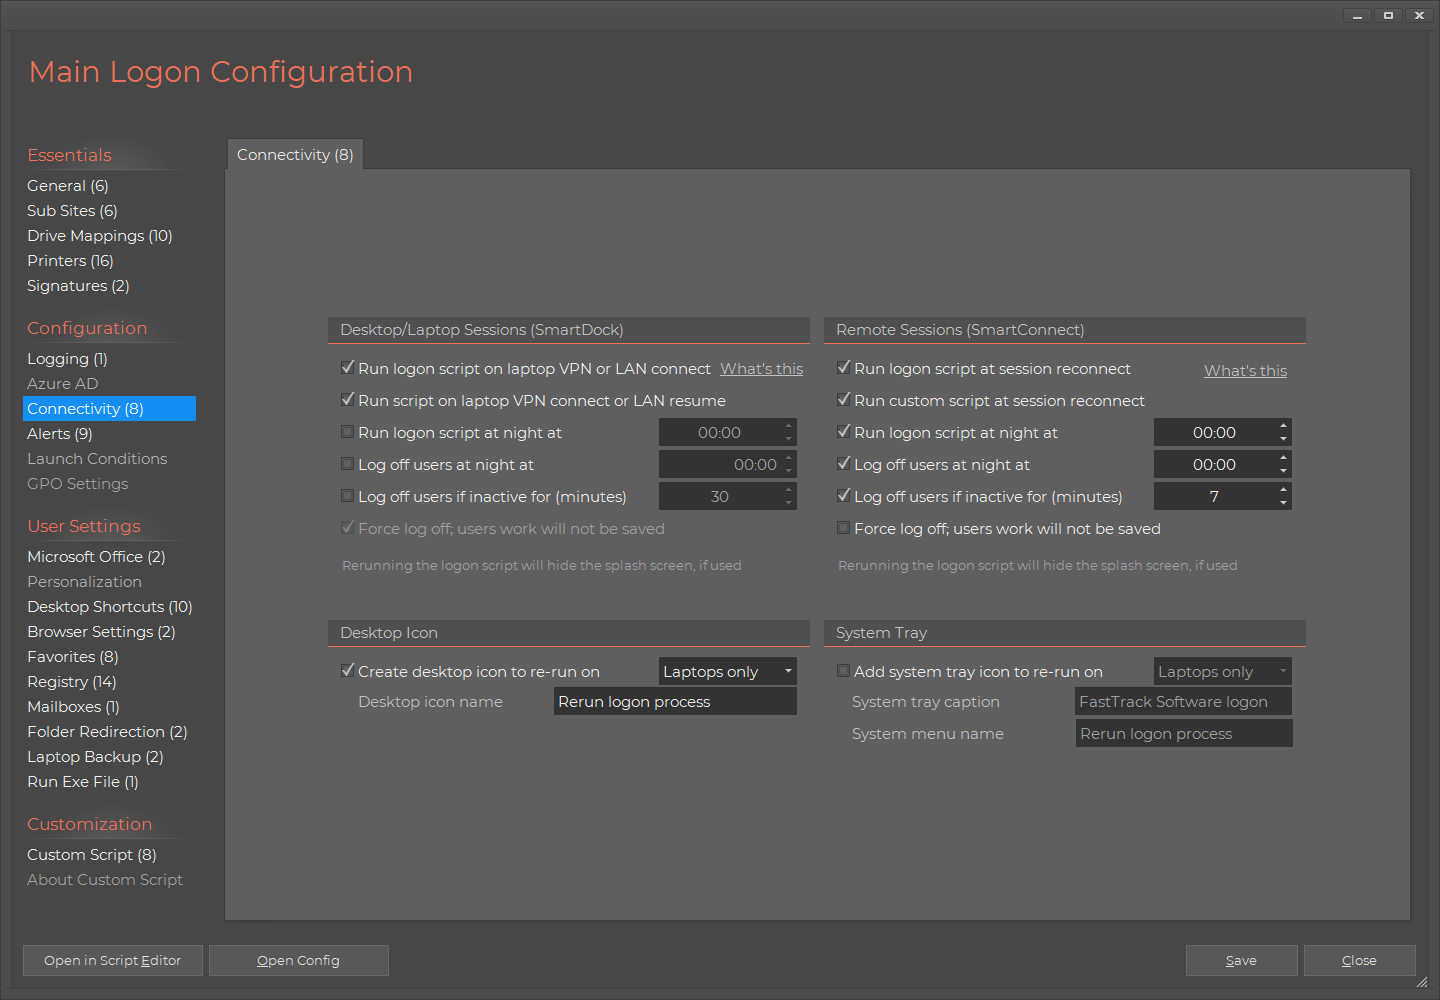
Connectivity
The connectivity menu allows you to run a background process to take some needed actions for the user to always have the
correct drivers, printers and other settings, when connecting to VPN or resuming a Citrix / Remote Desktop sessions from a different computer.
For Citrix/RDP sessions, the
SmartConnect is used and for laptops, the
SmartDock utility is used. Let us start with laptops. If you click the option to rerun the
logon script on VPN connection, the SmartDock utility will be running in the background to detect the connection. This detection
is not bound to any specific VPN software, it simply detects IP changes and executes the logon script, when it is possible. Similar,
if you enable SmartConnect for Citrix/RDS session, if the user closes the session without logoff, the SmartConnect utility will run
in the server-side user session and detect a reconnection. This way, when the user resumes a session, the logon script runs again
and as the user may now be in another subnet physically, the user may need other printers. If the printer menu is used, the user will simply
see the printer menu popup again to adjust the printers to the new client location. As a side-node, please observe the logging screenshot
above. If you enable advanced logging, the SmartDock and SmartConnect utils will run regardless, if you enable them on this page or not, as
these will be doing the actual logging other than the login.
Password and low disk space alerts
Under "User Alerts", you can set up rules for expiry warnings and optionally show a codes of conduct screen.
You can also set up a warning asking the user to clean up space or contact the IT department.
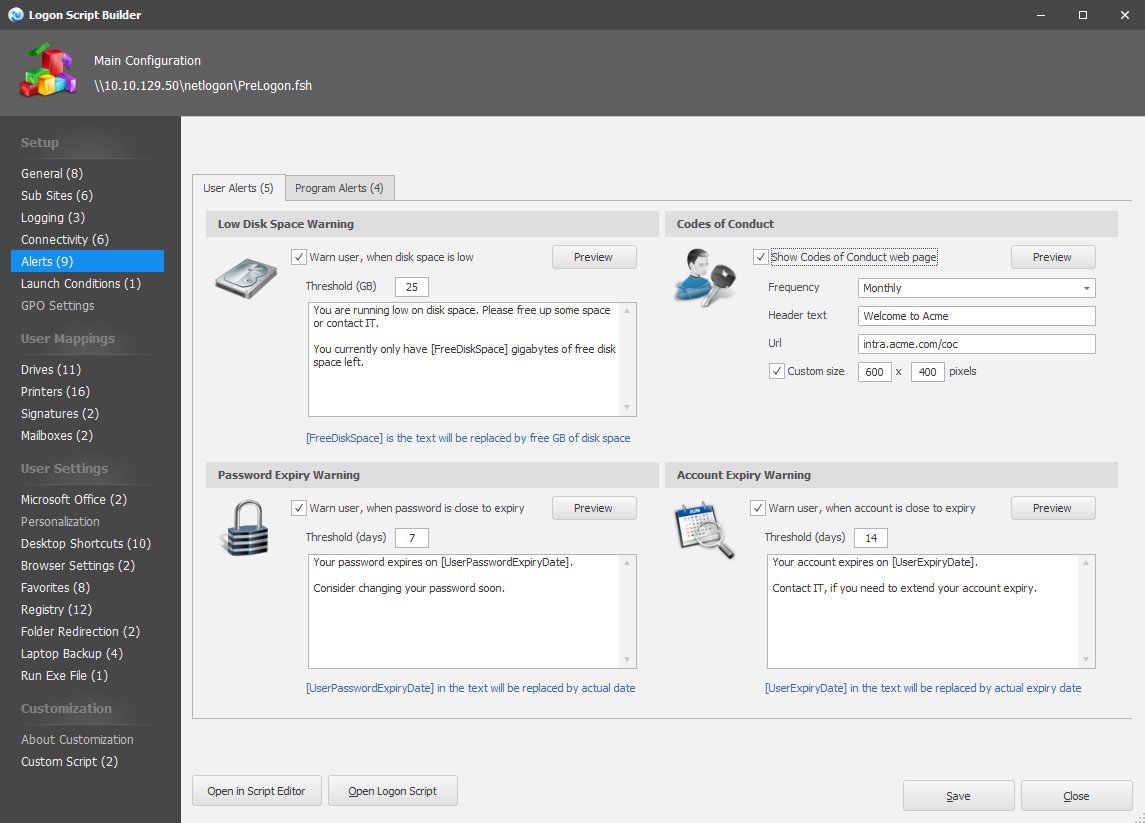
Testing for common software presence
Under "Program Alerts", you can defined logging and/or alerts to users, based on installation status
of Citrix Receiver, SCCM Client, Microsoft Office and the operating system itself:

Laptop document and PST backup
Under the "Laptop Backup" page, you can set up a backup of documents and PST files for mobile users. Note that you can use any FastTrack function in the
path, such as computer name and user's name. You can choose to take a backup at logon based on a frequency you decide, and/or you can place
a desktop icon for the user to start the backup. You can read more about backups on
this page.
Essentially backups are based on the SyncDir command of the engine that is significantly faster than any other directory synchronizer,
such as Microsoft's robocopy.

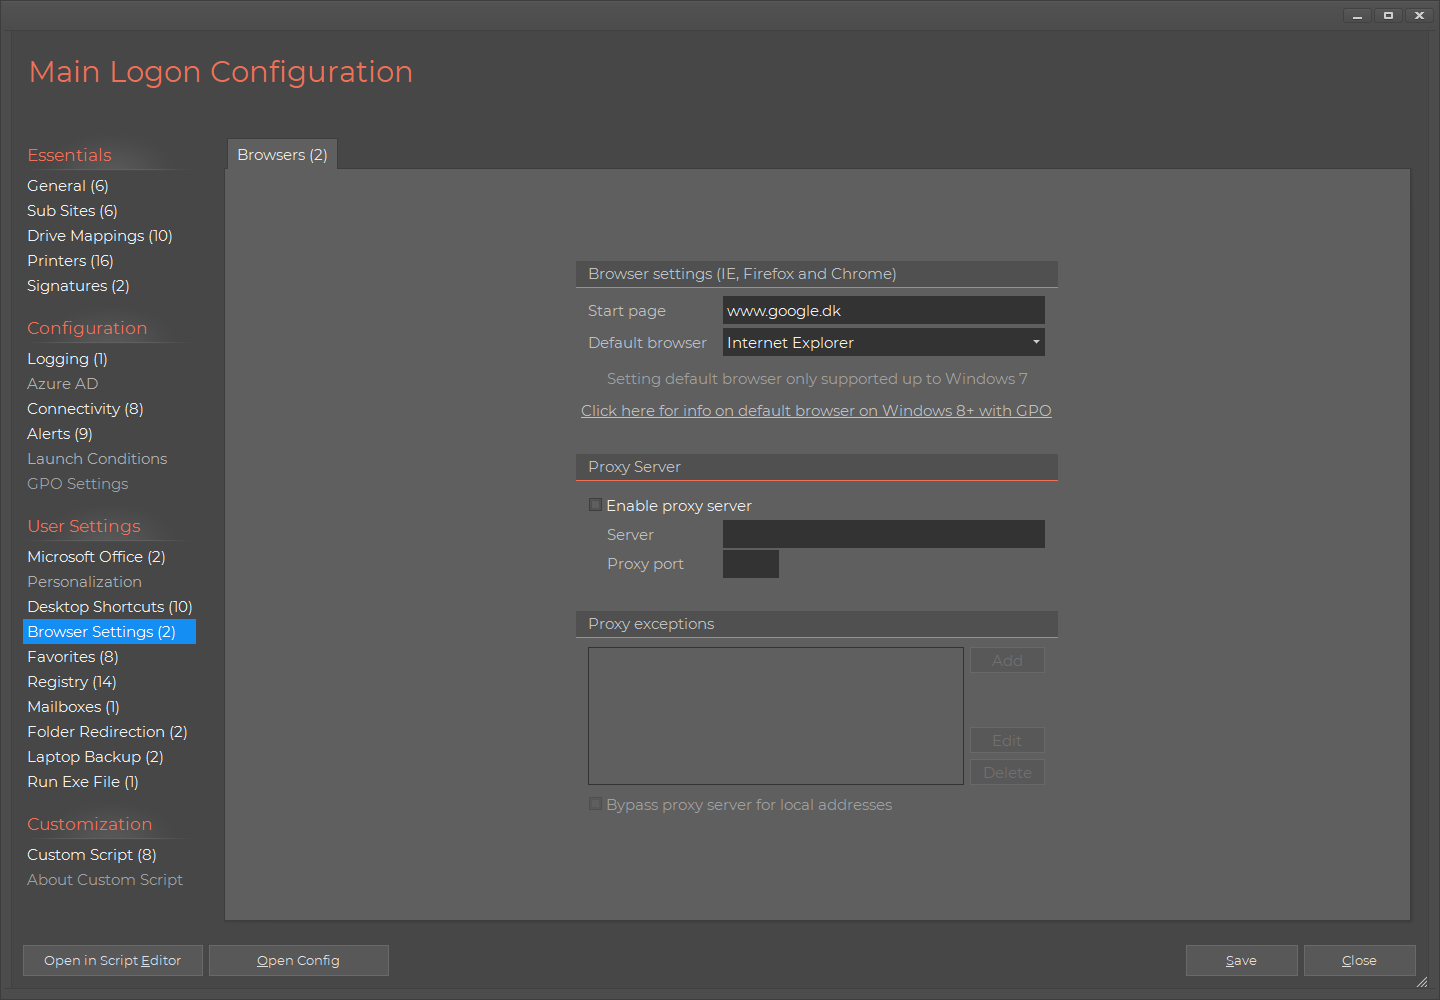
Browsers
The browsers page defines the start page of browsers and the standard browser, along with proxy settings.
Launch Conditions
Pages for "Favorites", "Desktop Shortcuts", "Favorites", "Registry Values" and "Folder Redirection" are simple and therefore not shown here,
but allow you to create favorites, desktop shortcuts, registry values and define folder redirections.
Finally, you can set up scenarios, where you do NOT want the logon script to execute. This could be relevant for virtual
machines or remote sessions.

The rest of the pages in the wizard are there to help you copy logon script files to your netlogon share
and set up group policies. Once you finished the wizard, log into any workstation in the domain as
the user, for whom you modified the login script property to test. Once the logon script is tested, you can assign the
logon script to all users; refer to the last section of this page for details.
Editing the logon script
Once you complete the wizard, you can re-open the logon script again in the Home Screen by clicking "Logon Script" and
select "Edit Logon Script". This will popup a screen that is the same as the wizard's first page. Below more shares have been added.
There is however, one difference. You will notice a "Custom Script" page. This is because the Logon Script Builder simply builds
a FastTrack script and can parse the script back into the GUI. You freely edit the script any way you want and add more script
lines to the logon script. You can also open an existing logon script that was not built using the Logon Script Builder.
Anything that the builder cannot "fit" into the GUI, it will place under the "Custom Script" page and include last in execution.
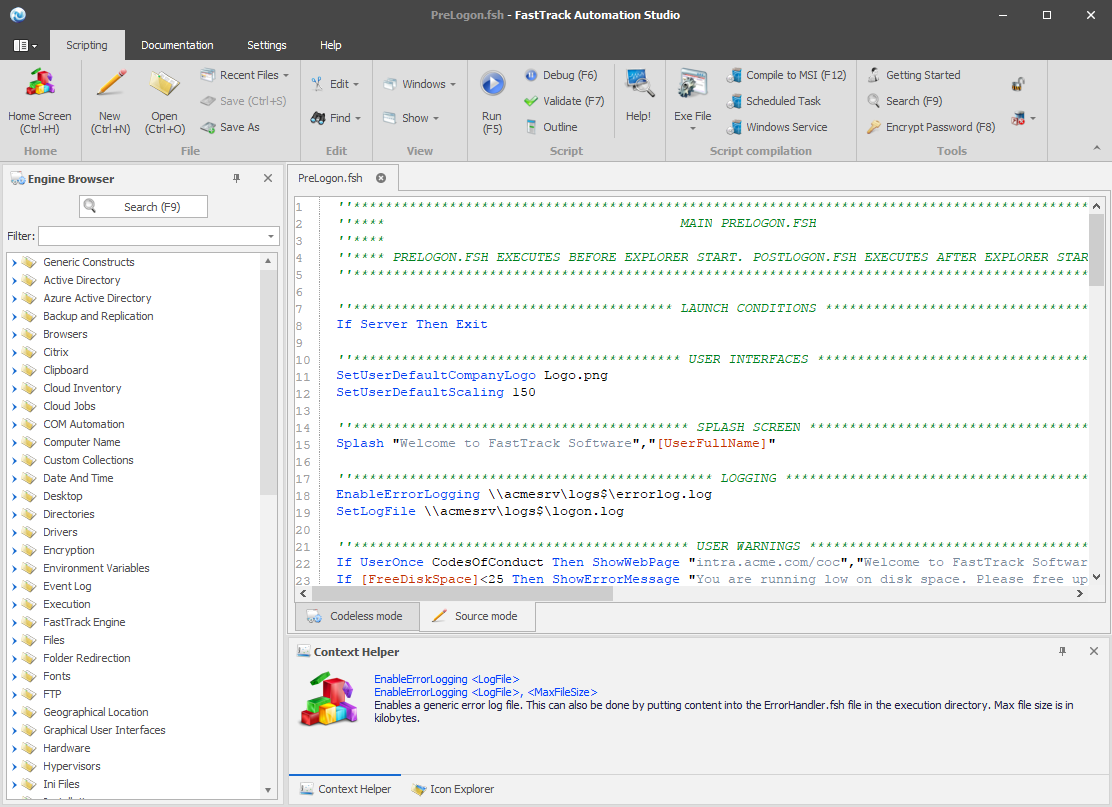
Advanced editing
Let's dig one step deeper into the Logon Script Builder. What the Logon Script Builder really does is "just" to build
a FastTrack script under the hood. The builder is able to read a FastTrack script, edit it and write it back with changes.
This means that if you need to expand what your logon script is doing, you can simply take it over and edit it.
If you click the "Open in Script Editor" button in the screenshot above, you take over the logon script entirely.
Below the script we built above is opened in the Script Editor. You now have all the 1500+ commands to use.
If you decide to go into the Script Editor, be sure to check out the
Logon Script Examples page for practical copy/pasteable snippets.
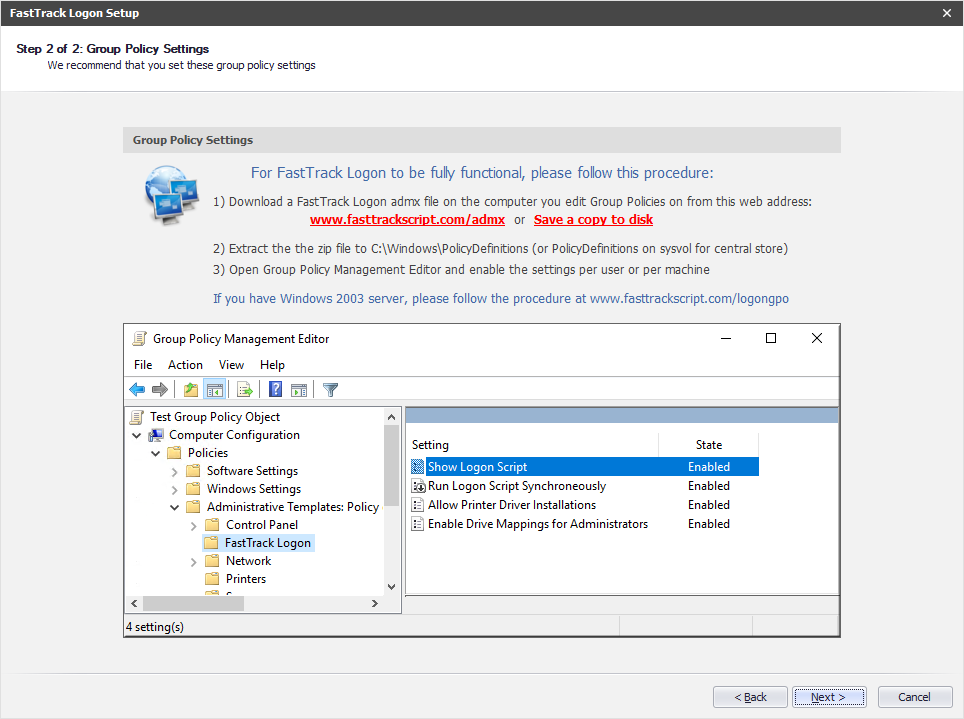
Recommended Group policy settings
As part of the Logon Script wizard to set up the logon script, a custom ADMX file was put on the computer that executed the wizard.
If this computer is a domain controller, where you edit your Group Policy settings, you will automatically have the "FastTrack Logon" item in the
Group Policy Management Editor, as shown below. If it does not appear automatically, follow the procedure under screenshot. You can get to this screen
again either by walking through the logon script wizard, or in logon script edit mode, click the left "GPO settings" menu. Once you have the "FastTrack Logon"
configuration in place, simply enable all these 4 settings. You can either enable the settings per user or per machine.
If you have concerns about using a custom ADMX file, go to
this page for an alternative.
Assigning a logon script through group policies
The logon script can be assigned with Group Polices as follows:
- Run the command gpmc.msc on your domain controller.
- Find and open your user's OU (Organizational Unit) and create a new policy (or use an existing one).
- Open User Configuration->Policies->Windows Settings->Scripts (Logon/Logoff). Double click "Logon".
- Click the add button and select the file \\%USERDOMAIN%\NETLOGON\FTLogon.exe as logon script name. You can optionally change
%USERDOMAIN% to the actual dns name of your domain. If FTLogon.exe was not put in the root of the netlogon share, the subpath must be added.