Setup execution
The SmartConnect files are automatically copied to the netlogon share as part of setting up a
FastTrack Logon Script, which means you do not even have to deploy anything, once
you have set up the general logon script on the LAN. As part of the logon process, the files are cached in a local folder and
no deployment is therefore needed. You only need to activate it in the Logon Script Builder, which looks like this:
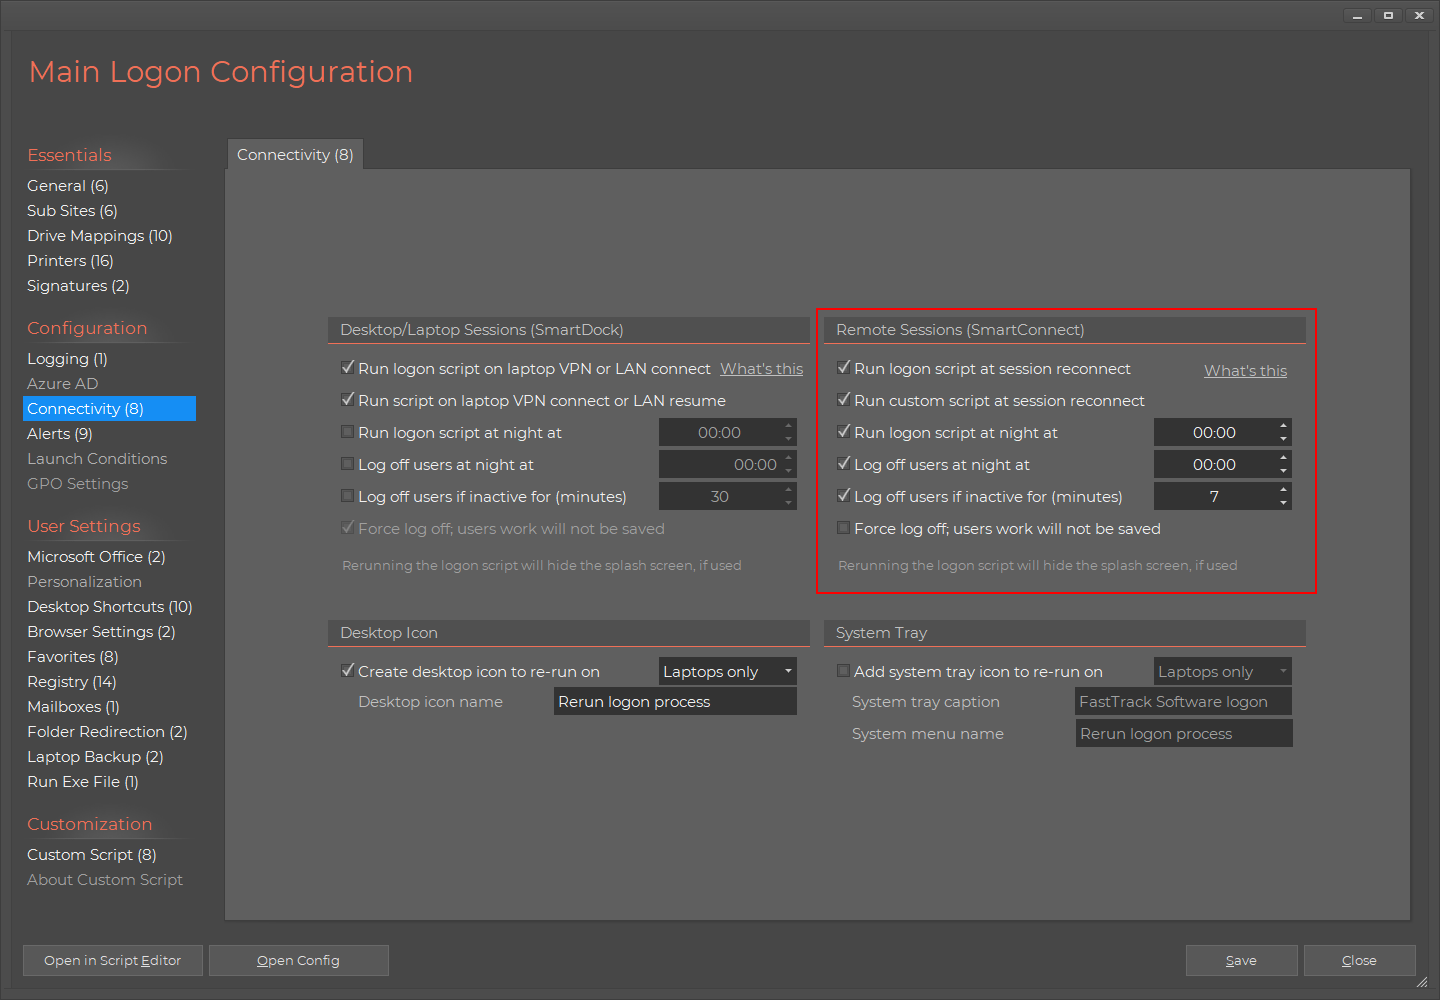
Rerun the logon script
In the simplest form, click the first option ("Rerun logon script at session reconnect") to rerun the full logon script on session reconnect.
What this does, is that whenever the user resumes a session that is already running, the full logon script executes again.
The only difference to the "normal" logon script is that the big splash screen is not shown, as this is would be
annoying to the end user. The big advantage of rerunning the logon script is that printers will be adjusted to reflect the new location
of the client running the remote session.
Custom script
If you need to do something advanced in these scenarios, you can also check the second option to run a custom script.
The reason for doing this could be that you have special custom scripting for printer reconnection.
In typical scenarios, this option is not needed. Refer to the advanced section below for more details on this.
Rerun at night
The next option is to run the logon script at night, which is a very useful feature - unless sessions are automatically terminated on a schedule or inactivity based.
The reason this is a useful feature, is that if there is not automatic termination of sessions, users' sessions may run for weeks at a time. If you change printers
for example or you need to move server storage (users' drive mappings), you would otherwise have to notify everyone to log out and on again.
Also, Office 365 has expiration of sessions. If you use the SharePoint and/or OneDrive drive letter mapping, the user needs to logon again
after 5 days' inactivity. With this setting on, the user will be prompted to logon again, when this applies. So when the user makes a reconnection to a session,
they will be prompted to logon to Office 365 again, instead of having drive mappings unavailable. Alternatively, you can click the option to create a desktop icon
to rerun the full logon script at the bottom and notify users that they can always click that instead of logging off and on.
Automatic session termination
This option simply allows you to kill sessions on a schedule. You can choose to forcibly terminate sessions. The difference is like when logging off
a desktop session. If any application prompts to save or for other reasons refuse to terminate gracefully, the force option determines, if this should be honored or not.
Advanced use (custom script)
Before we look into what a custom script can look like, if you are not using the Logon Script Builder, you need
to install the utility without the builder. This is very simple, just insert this command anywhere in prelogon.fsh:
Configuring SmartConnect
SmartConnect comes with a file called SmartConnect.xml. This XML file is the configuration file for
SmartConnect. The reason that the settings are in an XML file instead of using registry keys, is that the settings
can then be deployed along with the exe file. SmartConnect.xml is located in the fshbin folder on your netlogon share
along with SmartConnect.exe file and looks like the below by default.
Note that if you use the Logon Script Builder, most over these settings are set every time the logon script is saved.
Therefore it is not adviced to change anything, if you use the Logon Script Builder.
<SmartConnect>
<RunScript>True</RunScript>
<RunLogonScript>True</RunLogonScript>
<RunAtStartup>False</RunAtStartup>
<AutoRerun>False</AutoRerun>
<IdleHours>24</IdleHours>
<DailyRerun>False</DailyRerun>
<DailyTime>4</DailyTime>
<DailyLogoff>False</DailyLogoff>
<LogoffTime>4</LogoffTime>
<ForceLogoff>False</ForceLogoff>
<ExecDelayInSeconds>0</ExecDelayInSeconds>
<LogEvents>False</LogEvents>
<LogFile></LogFile>
<StartupMessage>RDP session started</StartupMessage>
<LogoffMessage>RDP session terminated</LogoffMessage>
<ReconnectMessage>RDP session resumed</ReconnectMessage>
<DisconnectMessage>RDP session disconnected</DisconnectMessage>
</SmartConnect>
The settings are reasonably self-explanatory, when compared to the Logon Script Builder screenshot at the top.
Below are some notes on the most important ones.
The bottom ones are for logging, when advanced logging is enabled in the script builder.
SmartConnect is then enforcing the execution of the audit logging.
|
RunAtStartup
|
Determines if the script is executed when StartConnect.exe is started.
|
|
ExecDelayInSeconds
|
The delay in seconds before executing the script. When connecting, DNS
information may not be propagated for a few seconds. The default 10 seconds is
normally a good tradeoff interval.
|
Example script 1 - printer connection through scripts
If you are starting fresh on a new logon script, you should use the Logon Script Builder as explained
here
instead of manually writing scripts. If you already have an existing logon script that is not based on the builder, or your needs cannot be covered using it, you can use a custom script.
If you are mapping printers through such a script (see examples of such on the
Logon Script examples page),
the easiest way to handle reconnection, is to simply use the very same script for both logon and reconnection. If the printer mapping snippet is put into its own
script called for example PrinterMapping.fsh, we can simply include this script both in PreLogon.fsh and SmartConnect.fsh files like this:
Include
PrinterMapping.fsh
This would require us to remember use the transparent InClientIpScope and ClientIP functionality,
so the script works both with and without RDP/ICA and desktop execution. The PrinterMapping.fsh
could for example look like this:
If InClientIpScope 172.18.0.0,172.18.255.255 Then
ConnectPrinter \\AcmeSrvHouston\AcmePrt002
ConnectPrinter \\AcmeSrvHouston\AcmePrt008
ConnectPrinter \\AcmeSrvHouston\AcmePrt018
SetPrinterDefault \\AcmeSrvHouston\AcmePrt018
End If
If InClientIpScope 172.20.0.0,172.20.255.255 Then
ConnectPrinter \\AcmeSrvSeattle\AcmePrt019
ConnectPrinter \\AcmeSrvSeattle\AcmePrt021
SetPrinterDefault \\AcmeSrvSeattle\AcmePrt021
End If
If there are shares that need to be remapped, we can include them in the script file as well.
Example script 2 - printer connection through Group Policy
If we are using Group Policies to connect printers, we still need SmartConnect.
The script below will find all Printer.xml Group Policy files and all instances of the client name and
then map the printers found. You can also call the MapPrinters command with some specific files and not use the loop.
This default SmartConnect.fsh script can also be inserted in the script editor by selecting "GPO Printer Remap" in the "New Script" window.
'' Find all Printers.XML Group Policy printer files for the dns domain of the computer.
'' If the computer is not under a found xml file, the computer would not
be in the file.
ForEach File in [SubFileTree \\[ComputerDomain]\sysvol\[ComputerDNSDomain]\Policies]
If EndsWith [Var File],Printers.XML Then
MapPrinters [Var File]
End If
End ForEach
'' Map printer from Group Policy printer xml file
Command MapPrinters(XMLFile)
ForEach Node in [XMLSubNodesXML
[Param XMLFile], Printers]
If XmlNodeExists [Var Node],SharedPrinter Then ''Collect only the ones called "SharedPrinter"
ForEach Filter in [XMLSubNodesXML
[Var Node],SharedPrinter/Filters]
Set Client = [XMLAttribute
[Var Filter],FilterTerminal,value]
If [Var Client] = [ClientName] Then
Set Printer = [XMLAttribute [Var Node],SharedPrinter/Properties,Path]
Set Default = [XMLAttribute
[Var Node],SharedPrinter/Properties,Default]
ConnectPrinter [Var Printer]
If [Var Default] = 1 Then SetPrinterDefault [Var Printer]
End If
End ForEach
End If
End ForEach
End Command
This script will find all references to the current session client name and map the matching printers.
The Group Policy XML files are normally very long. If we strip one of the information that is not used by the
script, a sample Printers.XML can look like the one below.
<?xml version="1.0" encoding="utf-8"?>
<Printers>
<SharedPrinter>
<Properties path="\\ACMESERVER01\PRINTER002" default="1"/>
<Filters>
<FilterTerminal value="ACMEPC0001"/>
<FilterTerminal value="ACMEPC0007"/>
<FilterTerminal value="ACMEPC0009"/>
<FilterTerminal value="ACMEPC0012"/>
<FilterTerminal value="ACMEPC0015"/>
</Filters>
</SharedPrinter>
<SharedPrinter>
<Properties path="\\ACMESERVER01\PRINTER005" default="0"/>
<Filters>
<FilterTerminal value="ACMEPC0001"/>
<FilterTerminal value="ACMEPC0003"/>
<FilterTerminal value="ACMEPC0004"/>
<FilterTerminal value="ACMEPC0007"/>
<FilterTerminal value="ACMEPC0008"/>
<FilterTerminal value="ACMEPC0009"/>
<FilterTerminal value="ACMEPC0010"/>
<FilterTerminal value="ACMEPC0012"/>
<FilterTerminal value="ACMEPC0014"/>
<FilterTerminal value="ACMEPC0015"/>
</Filters>
</SharedPrinter>
</Printers>