Graphical User Interfaces
The FastTrack engine (FastTrack Scripting Host) comes with a lot of Graphical User Interfaces. The purpose of this page is to give you an overview
of what the interfaces look like. Note that when "FastTrack Software" appears on the windows, this will be replaced by YOUR company name. The engine has two skins:
- Modern: This skin was introduced in version 12.0 and is inspired by Windows 10. It is default from version 12.0.
- Classic: This skin was the only skin existing up until version 12.0 and looks like Windows 7. To use it, you must use the SetSkin command.
 |
 |
| ShowMessage Command - Modern Skin |
ShowMessage Command - Classic Blue Skin |
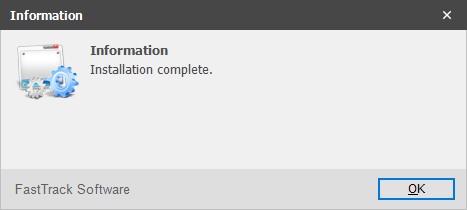
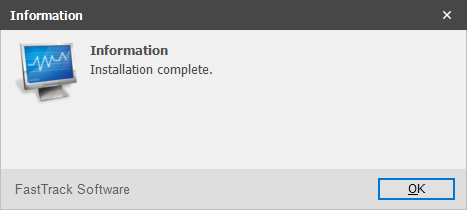
ShowMessage command
The ShowMessage command is probably the most commonly used graphical user interface and
is used to show a basic message. ShowMessage must be supplied with a message to show, and
can optionally be supplied with a header caption and an icon name. In its simplest form,
a ShowMessage script line can look like this:
ShowMessage
Installation complete.
The ShowMessage will by default have the header caption of "Information" and a default
icon is used. Our script line above will look like this:
|
| ShowMessage Command |
Icons
Most graphical user interfaces use one or more 64x64 pixel icons and each interface is using a specific one by default. The icon used can
always be overruled simply by giving the name of another icon as a parameter. The icons that are possible to use, can be seen in the script
editor by selecting the "Icon Explorer" tab that is by default located as a tab next to the Context Helper:
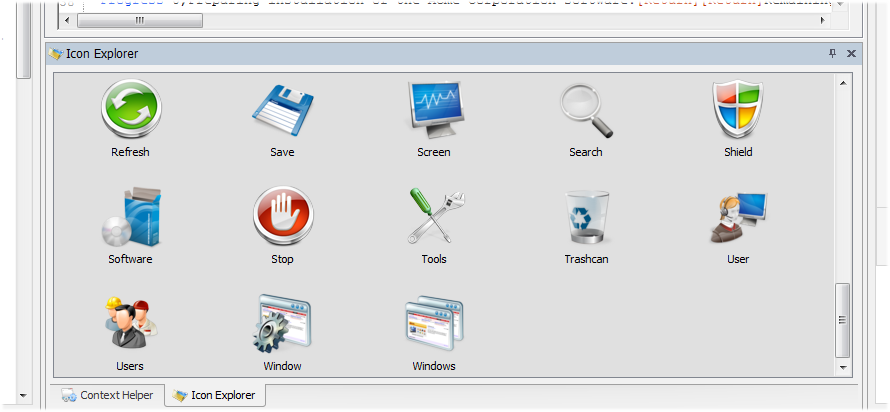
Custom icons can be included by using the AddCustomIcon command. Icons must be 64x64 pixels (or less) and preferably in png format.
In the case of ShowMessage, a third parameter can be supplied that contains the name of an icon to use instead. This means that for
instance "Screen" can be appended to our initial ShowMessage example like this:
ShowMessage
Installation complete.,Information,Screen
Our message now uses the "Screen" icon instead, as shown to the right below.
|
 |
| ShowMessage Command - Default Icon |
ShowMessage Command - With "Screen" Icon |
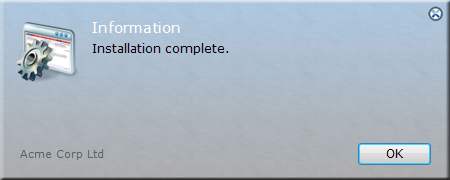
The company name and logo
Most user interfaces on this page have a company name note, as is the case above with ShowMessage.
The name "Acme Corp Ltd" is replaced with your company name, so if your company name is "Rock America",
the interfaces will have a "Rock America" note printed on them instead.
By default the company name will be the company name from your license key, but the name can be overruled with the
SetCompanyName and SetDefaultCompanyName commands. If preferred, the text can be removed in general by using the
DisableCompanyName command. Using these commands will have effect on all subsequently shown user interfaces.
The same way, commands for your corporate logo can be set by using the SetCompanyLogo command. This will use your
company logo on all user interfaces, unless another logo or icon file is explicitly used.
Customizing appearance
Apart from the ability to decide the company name displayed on the user interfaces, you can also customize just about everything
else. If you look under "Graphical User Interfaces" and "General Settings" in the script editor Engine Browser tree, you will
find an array of commands to customize the appearance of the user interfaces. You must issue one or more of these
commands prior to displaying a windows to change the default appearance. Below is a complete list of commands from version 8.2;
please consult the Context Helper in the script editor for more details on each command.
| SetSkin | Set the skin of all user interfaces. Possible values are Modern or Classic. (Default: Modern) |
| SetScaling/SetDefaultScaling | Sets a scaling percent of all graphical user interfaces. (Default: 100%) |
| EnableTopMost/DisableTopMost | Enables or disables displaying windows on top of other windows. (Default: Disabled) |
| EnableMenuSorting/DisableMenuSorting | Enables or disables sorting of menu items. (Default: Disabled) |
| EnableSplashFlash/DisableSplashFlash | Enables or disables flashing of text on Splash and SmallSplash screens. (Default: Disabled) |
| EnableCompanyName/DisableCompanyName | Enables or disables showing the company name on windows. (Default: Enabled) |
| SetAskTimeout/SetMessageTimeoue | Sets number of seconds, where default button is pressed for Ask/ShowMessage, if user does not react. (Default: 0) |
| SetScreenPos/RestoreScreenPos | Sets or restores the window position for all windows, except for message boxes. |
| SetWindowSize/SetWindowScale | Sets the size of windows. Especially useful for menus. |
| SetNextWindowSize/SetNextWindowScale | Sets size of windows, but only for the next windows that is displayed. |
| RestoreWindowSizes | Restores window sized back to default sizes. |
| SetBodyColor/SetBodyFont | Sets the color or font of body text and menu text. |
| SetMenuItemBackColor/SetMenuItemForeColor | Overrules the default colors for individual menu items. |
| SetBackgroundImage/ResetBackgroundImage | Sets or resets the background image on all graphical user interfaces. |
| SetHeaderColor/SetHeaderFont | Sets the color or font of header text. |
| SetCompanyName/SetDefaultCompanyName | Sets the company name shown on user interfaces. Is by default your licensed company name. |
| SetCompanyLogo/SetDefaultCompanyLogo | Sets the company logo shown on user interfaces. |
| SetMenuDefault | Pre-selects a menu item. Especially useful for selecting the default printer in printer menus. |
| SetMenuHeaderIcon | Overrules the icon displayed in the header of list menus. |
SetFadingWindowEffect/SetExpandingWindowEffect/
SetRollingWindowEffect/SetSlidingWindowEffect | Sets the visual effect for showing and hiding windows. By default, a 200 millisecond duration fade effect is used. The effect and duration can be set using these commands. |
| RemoveWindowEffect | Removes the visual effect for showing and hiding windows. |
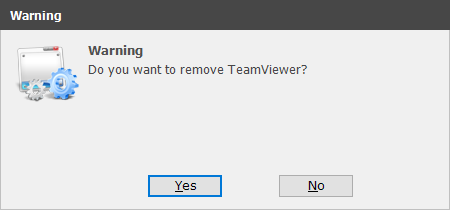
ShowErrorMessage and ShowWarningMessage command
The commands ShowErrorMessage and ShowWarningMessage are the same as ShowMessage, except that
they use a different pre-selected icon. An example could look like this:
ShowErrorMessage The installation
of Microsoft Office failed.[Return][Return]Please call the service desk.,Installation Failed
Note how the Return function is used to break the text into multiple lines.
Our example above will look like this:
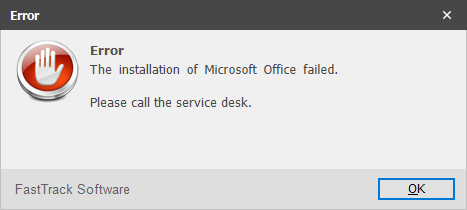 |
| ShowErrorMessage Command |
Menus
The Menu function is used to present a list of choices to the user and perform an action
based on the choice. The menu function takes a list of parameters and each parameter can
be prefixed with an icon name, in which case icon name and display value must be split by
a pipe sign. The example below is from the demo script that is located in the installation
directory of FastTrack Automation Studio. For simplicity, only the first three menu items
are included the script below.
Set WebDoc=[Menu
Select a topic of interest,Find|Documentation Overview,Getting
Started Guide,Defrag|Working With Logical Paths]
The first parameter is the caption and the next three parameters are the first three
menu items. Items one and three are prefixed with the icon names "Find" and "Defrag" before the
pipe sign to overrule the default icon. The full script line from the demo script that uses the Menu function looks like this:
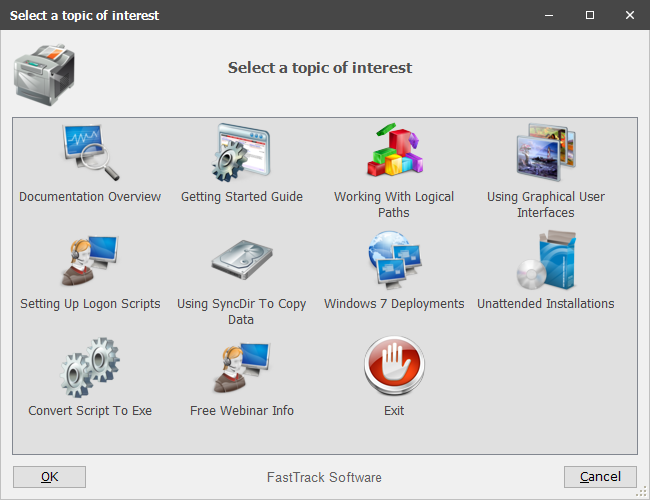 |
| Menu Function |
Another example of using a menu actively is the HelpDesk Application
example that looks as shown below. Please click
here for script details.
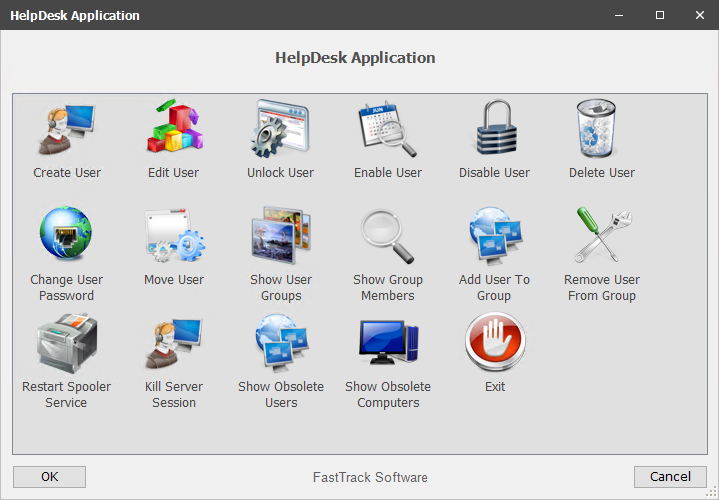 |
| Menu Function |
ListMenu function and List command
If a list is preferred over a menu with graphical icons, the ListMenu function
can be used much the same way, except that it does not have the option of icons.
The List command is the same as the ListMenu function except that is does not
return the selection.
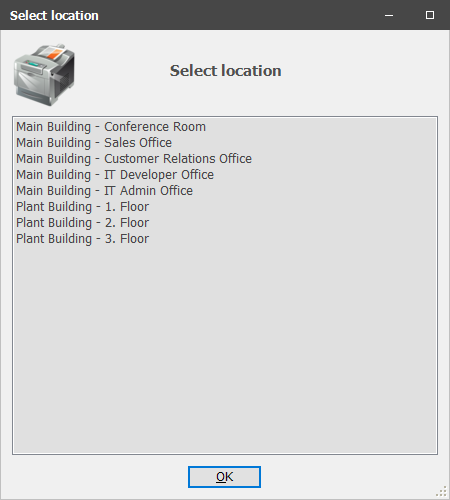
A list menu has an icon at the top, which can be overruled with the SetMenuHeaderIcon
command. In the example below, the "Printer" icon is selected to overrule the default
icon.
SetMenuHeaderIcon Printer
Set Location=[ListMenuForced Select location,Main
Building - Conference Room,Main Building - Sales Office]
The example above will display a list of printer locations and then printers should be
connected based on the selected location. Expanded a bit, the above could look
like this:
 |
| ListMenu Function |
The variable "Location" will contain the full name of the selection. When working
with the Menu function, variables will naturally be short, but when using ListMenu,
the listed options can be long and unfit as variable values. If the returned
variable value is preferred to be different than the displayed value, values can be prefixed with a variable
name and a pipe sign. If the value "Reception" was specified as "Rec|Reception", then
"Reception" would be shown, but "Rec" would be the value of the location variable, if
"Reception" is selected in the list.
The default selection can be set with the SetMenuDefault command prior to using any
type of menu. In this case, if the previous printer location was saved to registry,
then the last selected location could be selected by default. Menus are not sorted
by default, but sorting can be enabled for any type of menu with the EnableMenuSorting
command.
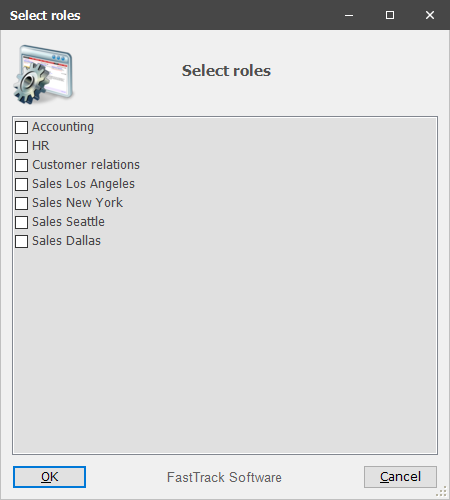
CheckListMenu Collection
If multiple items must to be selected in a list, a collection named CheckListMenu is available.
It will return the checked choices, if any. If we were creating a user in a script and we need to ask
the Help Desk employee using the script for post-adding of special groups, it could look like this:
CreateCollection Roles = Domain Admin,Accounting,Sales USA,Sales Canada,Sales Europe
ForEach Item in [CheckListMenu
Select roles,[Collection
Roles]]
ShowMessage [Var Item]
End ForEach
The script just prompts out the selections for demonstration purposes. Inside the ForEach iteration, a Switch
construct could be used. The above example looks like this:
 |
| CheckListMenu Collection |
DoubleListMenu function and DoubleList command
DoubleListMenu is similar to the ListMenu function, except that the list of values must
be in pairs of two, where the left-side value is returned as the selected value.
The first parameter is the header text and the next two parameters are the
left and right column header names. All subsequent parameters must be in pairs of two
as the list to display, meaning that every second value is displayed to the left.
The DoubleList command is the same as the DoubleListMenu function
except that is does not return the selection.
The script listed below is a modified version of the documentation menu from the demo script.
The list of choices is stripped down to the first and last option for readability.
Set WebDoc=[DoubleListMenu
Select documentation item,Name,Description,Docs,Online
documentation,Exit,Exit the demo script]
The header can be changed with the SetMenuHeaderIcon command, as explained the previous section with ListMenu.
Selecting "Documentation Overview" will thus return "Docs" in the WebDoc variable,
if selected. The full script line from the demo script looks like this:
 |
| DoubleListMenu Function |
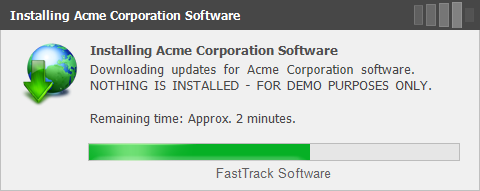
Progress command
The Progress command is used to show the progress of a lengthy process with multiple steps, for instance an installation.
The progress command is expected to be called a number of times during execution to update the percent completed and
optionally the caption and body text.
 |
| Progress Command |
Below is a slightly tweaked version of the progress lines from the demo script. The sleep statements
are there only to simulation consumption of time instead of doing actual work. The first parameter is the
only mandatory parameters and updates the progress completion percent. The rest of the parameters are for
optional updating of the header caption, body text and the displayed icon.
Progress 0,Preparing installation of the Acme Corporation software.,Installing Acme Corporation
Software
Sleep 4
Progress 20,Installing the Acme Corporation software.[Return][Return]Remaining time:
Approx. 4 minutes.
Sleep 4
Progress 60,Downloading updates for Acme Corporation software.[Return][Return]Remaining time:
Approx. 2 minutes.
Sleep 4
Progress 80,Applying updates for Acme Corporation software.[Return][Return]Remaining time:
Approx. 1 minute.
Sleep 4
Progress 100,Cleaning up...
Sleep 3
RemoveProgress
There is also a command called ProgressTo. This command will
set up a timer that will gradually increase the shown percent within a certain
timeframe. This is useful for installations, where it is possible to make a qualified
guess of the total time that will be consumed before the installation is complete.
Splash screens
A splash screen is another method of telling the user that something is going on, usable for
for instance a logon script as shown
in the movie here.
There are two splash commands: Splash and SmallSplash, as shown below.
Splash can be skinned by giving the name of an image skin file or an icon file
that must be up to 128x128.
 |
| Splash Command |
 |
| SmallSplash Command |
Ask condition
The Ask condition asks the user a question and the condition will then be entered only
if the user selects "Yes". An example Ask condition could look like this:
If Ask Would
you like to see the online documentation?,Demonstration
complete Then
The first parameter to Ask is the message/question. Header text and icon name can optionally
be supplied. In the example above, the message/question and the header text were set
and it looks like this:
 |
| Ask Condition |
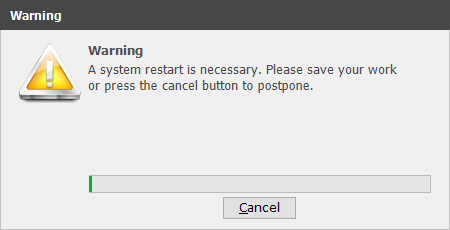
CountDown condition
The CountDown condition tells the user that an action, typically a forced reboot, is required.
If the user is not present or for other reason does not react within a defined number of seconds, the
condition is true. If the user does cancel within the number of seconds, the condition is false.
If CountDown Then RebootForced
You can enter parameters for the number of seconds, the body and header message and the icon.
If you do not enter any parameters, a reboot within a minute is assumed and
the above parameter-less condition will look like this:
 |
| CountDown Condition |
There are two similar commands that look similar: WaitForAcceptance and CloseApplication. WaitForAcceptance is used to wait the user
to accept a reboot or similar within a certain timeframe. The CloseApplication command will ensure that an application is closed. If it is not,
a progress screen looking like the one above will be shown and if the user does not close the application within a certain timeframe,
the application is forcibly closed.
Input and InputPassword functions
The Input function asks the user to enter a text string. The InputPassword function is the same
except that is hides the text entered in the text field and a different icon is shown by default.
In the demo script, the Input function is used to ask the user to enter job title:
Set Title = [Input Enter your job
title]
The header text and icon name are optional parameters and in this case we have only supplied
the body/question text and the default "Information required" is used as caption:
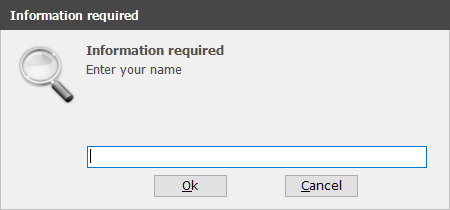 |
| Input Function |
InputText function
The InputText function is similar to the Input function, except that it allows the user
to enter multi-line text. If for example we would like to ask the user for comments
about the IT department in a login script, we could ask and the save the answer to
a text file:
Set Feedback = [InputText Please enter your feedback about the IT department,Feedback]
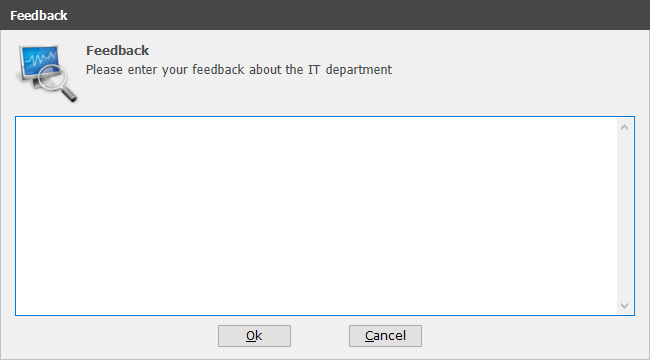 |
| InputText Function |
MultiInput command
The MultiInput command is used, when more than one value must be entered. The first parameter is the
header text and all subsequent parameters are presented as separated fields. When MultiInput is closed,
a variable will be created for each field with the caption as the variable name. If a different variable
name is preferred, the field name can be split by a pipe sign, where the left part is the new variable
name and the right part is the displayed name. If any variable contained a value at the time of MultiInput
execution, the field will be pre-filled with the current variable value. The example below is from the
HelpDesk Application example, where the UserName parameter
is split.
MultiInput New
User,UserName|User name (Initials),First name,Last name,Password
The above script line in action looks like this:
 |
| MultiInput Command |
Fields are mandatory by default, but can be overruled by using the SetMultiInputOptional command. Issuing "SetMultiInputOptional First name" before
executing MultiInput in the example above, will make the "First Name" field optional. Notice that the key is the variable name. There are are many
commands available to control apperance and behavior of MultiInput fields. Here is a complete list:
| SetMultiInputOptional | Makes one or more fields optional. |
| SetMultiInputMandatory | Makes one or more fields mandatory (default). |
| SetMultiInputCaption | Sets a caption at the top of the window. Used to pass information to user about the form. |
| SetMultiInputBackColor | Sets the background color of one or more fields. |
| SetMultiInputForeColor | Sets the foregroud color of one or more fields. |
| CreateMultiInputTextField | Makes one or more fields appear as password fields (default). Used for resetting field types. |
| CreateMultiInputMemoField | Makes one or more fields appear as a memo field (multi-line text field). |
| CreateMultiInputPassword | Makes one or more fields appear as password fields. |
| CreateMultiInputCheckBox | Makes one or more fields appear as checkboxes. |
| CreateMultiInputDropList | Makes one or more fields appear as drop-down lists; must be issued one time per field passing the list of drop-down values. |
To detect if the user clicks the cancel button, use the condition MultiInputCancelled.
A simple example of using MultiInput is the Help Desk app shown
here.
An example of advanced use using most of the above settings is the Outlook Signature App shown
here.
ShowWebPage command
The ShowWebPage is used to show a web page to the user and halts the script until the user clicks
OK. This can be used for instance in a logon script to show an intranet page to users once or
once a week. The demo script shows the documentation overview page from this web site, which
looks like this:
ShowWebPage
https://www.fasttrackscript.com/Docs,FastTrack Automation Studio
Online Documentation
This example will look as shown below - observe that the screenshot is scaled to 50%. On the
executing computer, the windows will scale to fit the screen resolution.
 |
| ShowWebPage Command |
ShowRemoteDesktop command
FastTrack can act as a remote desktop client. You can for example create a menu with choices and
then upon a valid selection show the correct remote desktop with the ShowRemoteDesktop command. Once the user
clicks the "Close" button, the script continues.
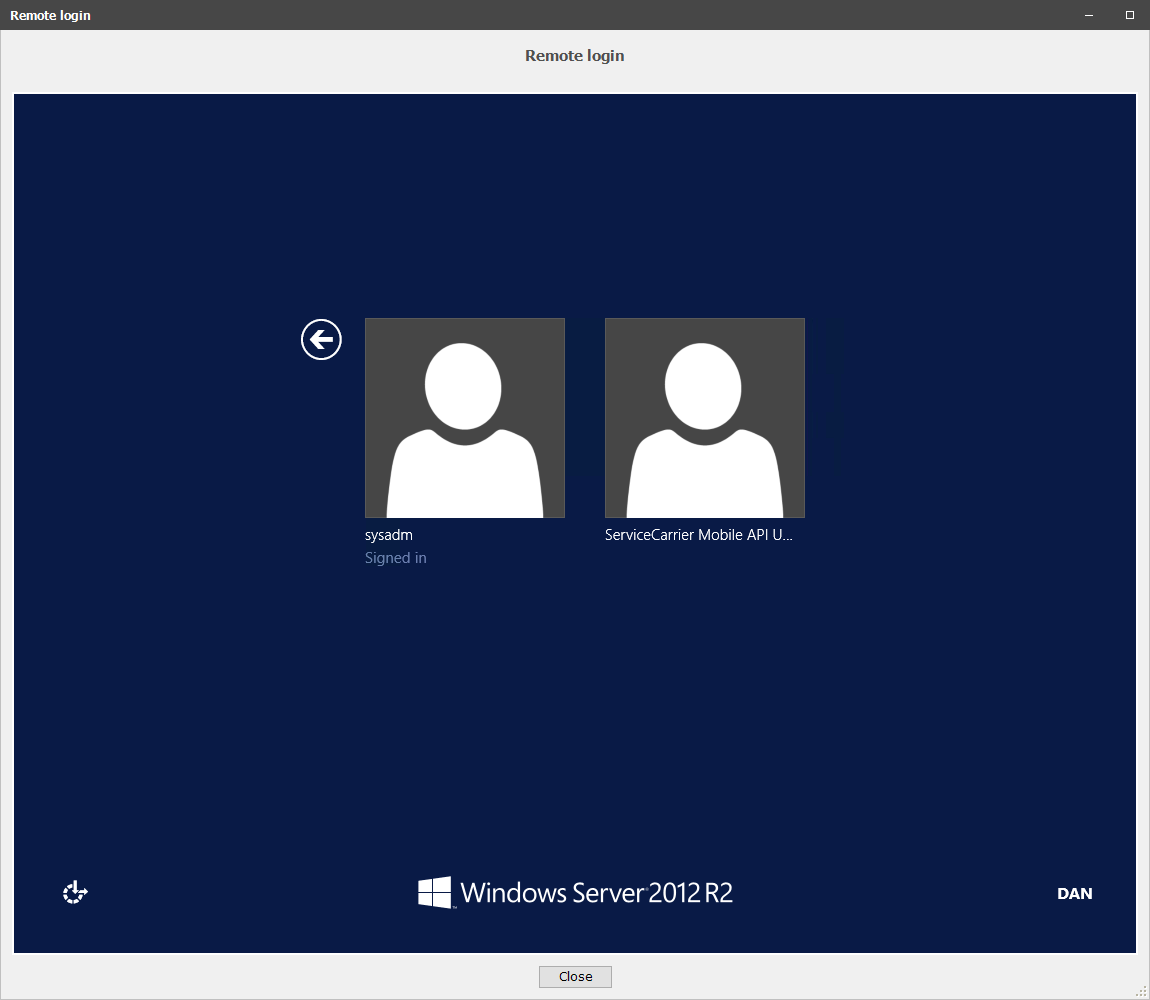 |
| ShowRemoteDesktop Command (Scaled to 50%) |
The script to produce the above result looks a shown below, where the name "FastTrackServer" is an internal server.
For a full-screen remote desktop, the ShowFullRemoteDesktop can be used instead.
ShowRemoteDesktop
FastTrackServer,FastTrack Remote
SyncDir and CopyDir commands
The SyncDir and CopyDir user interfaces are listed under "Backup and Replication" and "Directories" in the engine browser, because these
are user interfaces that are the result of I/O operations. For more information on SyncDir and CopyDir,
please click
here. The FTP counterparts SyncFTPDir/CopyFTPDir and the web counterpart DownloadFile are also using the
same user interface. SyncDir in action looks like this:
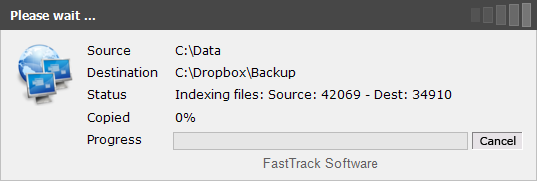 |
| SyncDir Command |
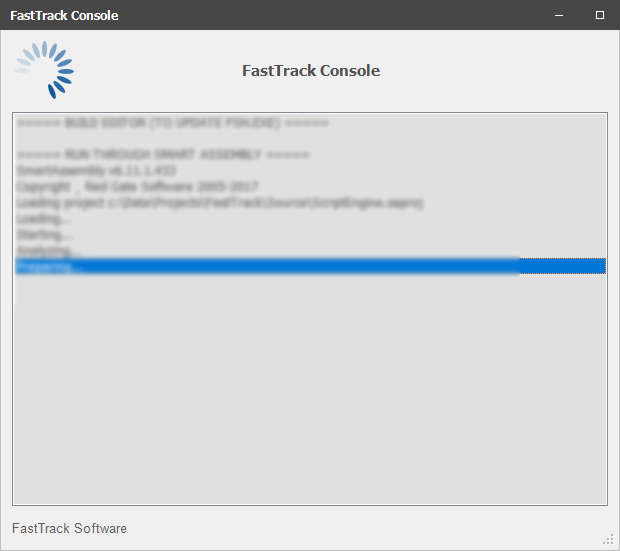
The console
When working with console applications, FastTrack has a build-in console, as shown below.
Please refer to
this page for more information.
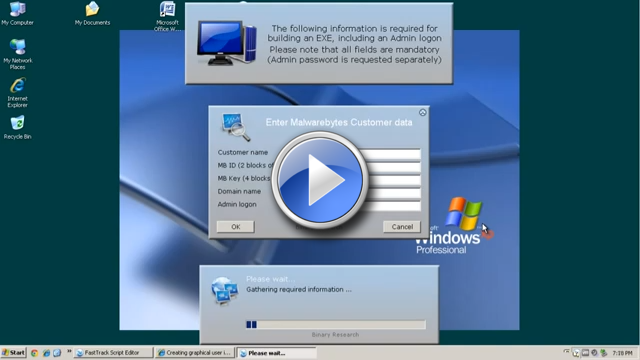
Graphical user interfaces summary
Watch Senior Technical Writer Steve Dodson from Binary Research International walk you through the
basics of the material presented on this page.