Building the Thin PC installer
The first step we need is to build an MSI package that will convert a computer into a Kiosk computer (Thin PC) upon installation, which is a simple process.
Click the "Thin PC" icon under "More Wizards" in the Home Screen and walk through the wizard.

One of the first pages in the wizard is building the menu. You can basically choose from local programs, Citrix Applications,
Remote Desktop sessions, web page views and a private browser session. The menu building page is shown below.

In some cases, what the menu builder can do for you is not enough. For example, if you would like to ask for a password before
starting a local program, this requires an additional script line. The way this scenario is handled is that when you click
next, the wizard shows you the script that it has build for you and will embed into the output MSI installation file, as shown below.
You can click the button "Continue in the Script Editor" and make all the modifications you need and then restart the wizard.
On the page before the menu page in the wizard, you can select to use a custom script instead of building a menu interactively.
You can then simply point to the script that you modified in the Script Editor and use this as the menu script instead.

Although not recommended because of the higher complexity, it is possible to skip the Home Screen method entirely and write
your own custom menu and installation script. The only advantage of this method is that the menu will be isolated from the
installation MSI file, which means that the MSI file will not be required to be updated, when the menu is changed.
Refer to
this page for more information.
Using an Organizational Unit and Group Polices to deploy
Once the wizard is completed, you have an installation MSI file. This file you can just execute on a computer to convert it into a Thin PC
and uninstall the MSI file to restore it. However, doing just this, you will miss out on the best part.
If you instead create a dedicated Organizational Unit (OU) and assign Group Policies to it, you will be able to convert computers into and away
from being a Thin PC by simply dragging computers in and out of it. Here's how you do it.
Create a new OU named for example "Kiosk Computers". Next we need to apply Group Policies that only applies to this OU.
Start "Group Policy Management" under "Administrative Tools" on a domain controller, identify the new OU and create and edit
a new policy named for example "Kiosk Policy":


Next we need to install our MSI file on all computers that are dragged into the OU.
Select a new Software installation and make sure that you set the installation
under Computer Configuration and not User Configuration:
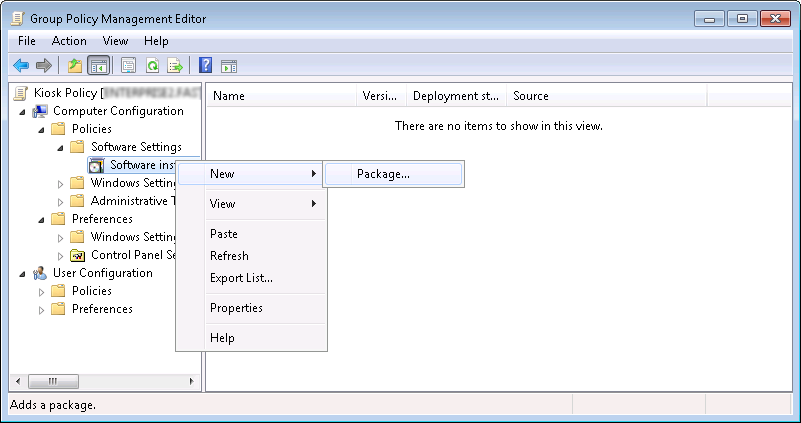
You must now place the installation MSI file in a location which can be reached from clients,
for example your netlogon share, and point the package to this file.
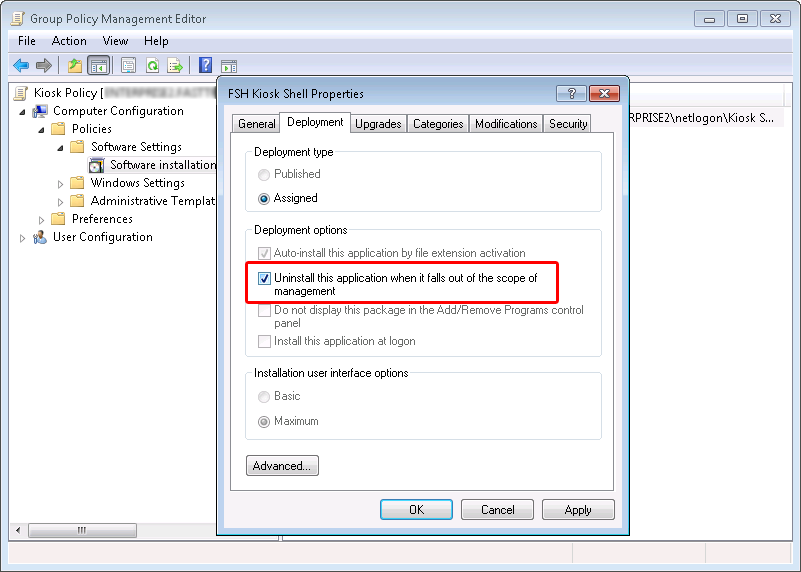
After creating the package, it is
extremely important that you open properties
on the package, select the "Deployment" tab and check "Uninstall this application when it falls out of the
scope of management" (see below). If you don't set this checkmark, the Explorer will not be restored, when you drag a computer out of the OU.
 That's it!
Now everything is set up and you can drag computers into the OU and next time they restart, the computers are Thin PCs like
the one in the movie at the top. When a computer must be restored to a normal Windows PC, you can just drag it out of the OU, as shown below.

Further lock down (optional)
When you build your MSI file with the Home Screen, expected lock downs such as blocking USB/DVD drives and removing ctrl+alt+del options are automatically set,
but it is possible to make further locking down using Group Polices. In some cases this is necessary under all circumstances, as existing Group Policies may
overrule (open) these lock downs. The solution in both cases is creating a dedicated user inside the OU, assign Group Policy settings to it and use this use
for the automatic logon.
To assign specific lock down user settings, the user needs to exist inside the same OU as the computers.
Inside this OU, create a user for example called "KioskUser", which must then be used as credentials in the Home Screen wizard (or custom script).
This user must NOT have password expiration, as automatic logon will then stop working eventually.
We will go through here how to set all lock down settings that should have automatically been set, if not overruled by other Group Policies and you
can select to make further lock downs.
If you go down the route of creating a specific user inside the OU, there is be no drawback of explicitly setting all lock downs for the OU.
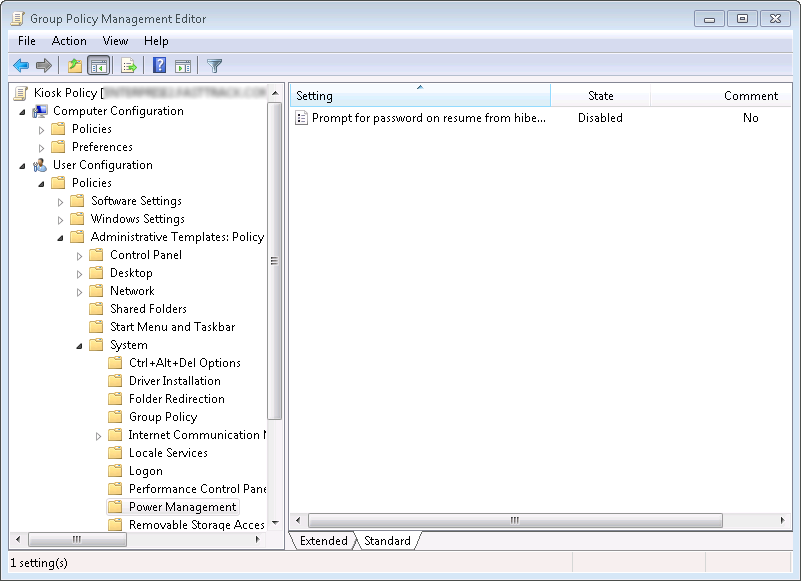
First we need to make sure that password prompt is disabled for screensavers and resume:

The next thing to do is to remove all options, when ctrl+alt+del is pressed. Normally options are available to lock the computer,
switch user, log off, change password and start the task manager. We need to disable all these settings, so when a user hits
ctrl+alt+del, no options but shutdown are offered, as shown below.


If the "KioskUser" must share a common logon script to map drives and printers, you can use "If UserIsInOU Kiosk Computers Then" condition
to differentiate the logon script for this user.