Video Version
If you prefer a video version of the material presented on this page, you can
watch Senior Technical Writer Steve Dodson from Binary Research International
walk you through the content on this page using the video link below.
Step 1 of 3: Creating a menu
The first thing we need to do is to create a menu. You can choose to use the template script below - or you can
start the Home Screen Thin PC wizard and let it generate a full menu for you. After building the menu through the wizard,
the next page offers to export the generated script. You can choose to use such a script as the template script.
At first we can just start the menu script from the script editor
for later installation through the OU Group Policies. If we just want the computer to start one specific
application, we can just write a script line to do that one thing at startup, for example starting
a published Citrix XenApp Desktop using the ShowIcaApp command followed by a ShutDown command.
In this case we will show a menu of choices.
Let us use the example from the
Citrix page as a template,
which mixes an offering of locally installed applications and Remote Desktop and Citrix XenApp remote sessions.
You can insert this example in the script editor by selecting "Thin PC Menu" in the "New Script" window.
ResumeOnError
:Restart
Set Selection=[Menu ACME KIOSK,Process|Intranet,Connected|Internet,Window|Acme ERP,User|Acme CRM,Screen|My
Remote Desktop,Stop|Exit]
Switch [Var Selection]
Case Intranet
ShowWebPage www.google.com,Acme
Intranet ''Url would be internal intranet url
Case Internet
RunMax IExplore.exe,-private
http://www.google.com
Case Acme ERP
RunIcaApp AcmeCitrix:8080,Acme ERP
Case Acme CRM
RunIcaApp AcmeCitrix:8080,Acme CRM
Case My Remote Desktop
ShowRemoteDesktop AcmeSrv,My Remote Desktop
Default
ShutDown
End Switch
Goto Restart
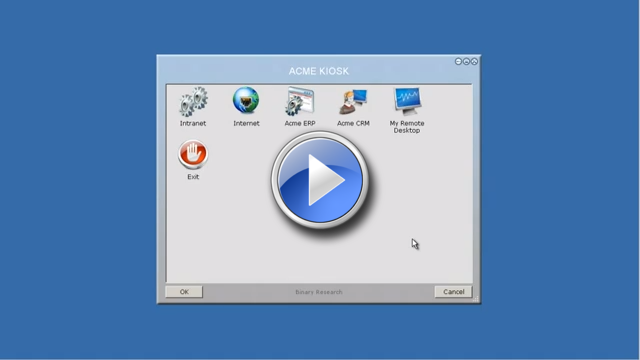
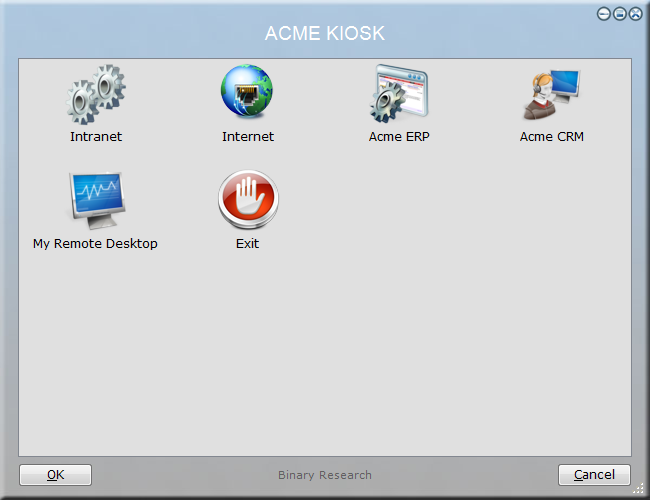
This will show the menu below. While you are testing on your own computer, you should replace the
ShutDown command with an Exit command to avoid shutting down your computer, when exiting the menu.
The initial ResumeOnError should be present, because in case of a problem launching
a menu item, the script must continue to avoid terminating the script itself and rendering
the Thin PC with no shell.
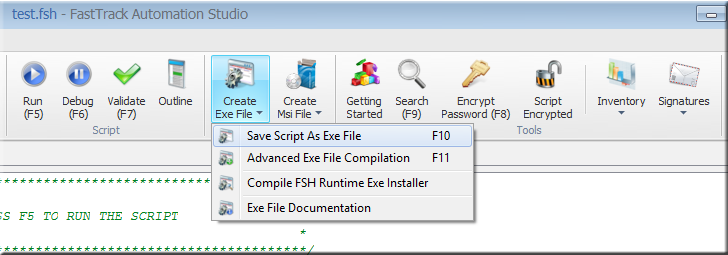
We need to compile our script into an exe file. Hit F10 or select "Create Exe File" -> "Save Script As Exe File" in the
script editor menu. Save the exe file as "FSHShell.exe" on the netlogon share.
If you need more than one type of Thin PC, you can handle it two ways. You can duplicate
the whole setup using more OUs and shell exe files, but if the Thin PCs are relatively similar,
you can use one OU and shell exe file and control the menu by computer security groups in the menu script.
An example of this can be seen on the
RemoteApp launchers page, but ComputerIsMemberOf must be
used instead of UserIsMemberOf, as this script must be based on computer groups instead of user groups.
Step 2 of 3: Creating an installation script
Now we have a shell exe file ready and the next thing we need is a script to install the shell and
make a few machine modifications. The way this script will be deployed is by compiling
it into an msi file and then set up as a software installation for the OU that we will be creating
later. The script we will use, looks like the below and is the same as the script that the Home Screen
uses as the installation script, except that it points to a local exe file instead of our netlogon share FSHShell.exe.
You can insert this example in the script editor by selecting "Thin PC Installer" in the "New Script" window.
If [CmdParam Action]=Uninstall Then
''==== UNINSTALL - ENABLE USB, CD AND
FLOPPY SERVICES - SEE http://support.microsoft.com/kb/555324 ====
WriteRegistry HKLM\SYSTEM\CurrentControlSet\Services\USBSTOR\Start,3,REG_DWORD
WriteRegistry HKLM\SYSTEM\CurrentControlSet\Services\Cdrom\Start,3,REG_DWORD
WriteRegistry HKLM\SYSTEM\CurrentControlSet\Services\Flpydisk\Start,3,REG_DWORD
WriteRegistry HKLM\SYSTEM\CurrentControlSet\Services\Sfloppy\Start,3,REG_DWORD
''==== REMOVE AUTO-LOGON ====
DisableAutoLogon
''==== RESTORE THE SHELL
(EXPLORER.EXE) ====
WriteRegistry HKLM\SOFTWARE\Microsoft\Windows
NT\CurrentVersion\Winlogon\Shell,Explorer.exe
Else
''==== INSTALL - DISABLE USB, CD AND
FLOPPY SERVICES - SEE http://support.microsoft.com/kb/555324 ====
WriteRegistry HKLM\SYSTEM\CurrentControlSet\Services\USBSTOR\Start,4,REG_DWORD
WriteRegistry HKLM\SYSTEM\CurrentControlSet\Services\Cdrom\Start,4,REG_DWORD
WriteRegistry HKLM\SYSTEM\CurrentControlSet\Services\Flpydisk\Start,4,REG_DWORD
WriteRegistry HKLM\SYSTEM\CurrentControlSet\Services\Sfloppy\Start,4,REG_DWORD
''==== SET AUTO-LOGON ====
EnableAutoLogon acme\KioskUser,KioskPass45
''==== REPLACE THE SHELL ====
WriteRegistry HKLM\SOFTWARE\Microsoft\Windows
NT\CurrentVersion\Winlogon\Shell,\\[UserDomain]\netlogon\FSHShell.exe
End If
If we look at the
MSI page, it says that when you compile
a FastTrack script into an MSI installation file, the command-line parameter "Action" is passed,
which contains either "Install" or "Uninstall", depending on the context.
When you drag a computer into the OU, the MSI file is
installed and the "Action" command-line parameter value will contain "Install".
When you drag a computer out of the OU, the script is uninstalled and the value then contains "Uninstall".
In other words, the first half of the script is executed
when a computer is removed from the OU and the second half is executed, when a computer is added to the OU.
The command EnableAutoLogon command needs credentials to log on automatically to the computers. In the last section, the
creation of the user is explained. Correct the domain "acme" to your domain and decide on a password to
use for KioskUser before saving the script.
Let us first compile the script into an MSI file to understand the context of use, before analyzing the
script further. Save the script and click the "Compile to MSI" menu or press F12.

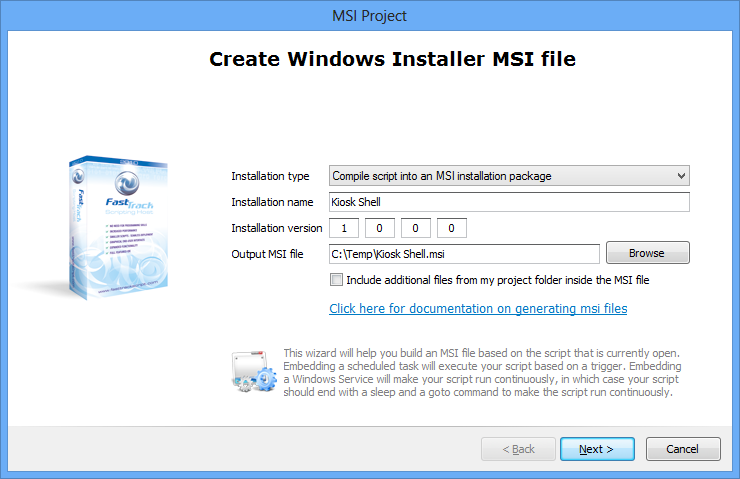
We could have embedded the FSHShell.exe file inside the MSI file by checking "Include additional files from my project folder inside the MSI file"
and embedding FSHShell.exe, but leaving it on a network location instead
allows us to change it at any time without requiring a new deployment each time.
It is important to pay attention to the version number, because in case you need to update existing computers,
you can just generate a new MSI file, increase the version number and replace the OU software package. Because the
installation name is the same, FastTrack will automatically later identify the package as the same software in an updated version,
which again will invoke what is called "major update" in Windows Installer. The "Major Update" feature ensures that existing
installations are updated instead of installing another copy. This is explained on the
MSI page.
If we go back to the script above, the script basically does this on install (and the opposite on uninstall):
- Disables the services for USB, CD-ROMs, DVDs and legacy floppy disks. While it may not be necessary,
it is still possible to open a document from a usb stick, if word or excel were offered as a menu choice.
- Sets auto logon for a specific user. This must be a user in the same OU as the Thin PCs - see next section.
- Points the shell process to FSHShell.exe on any copy of the netlogon share instead of Explorer.exe.
Step 3 of 3: Setting up the OU and GPO
The last step is mandatory and is creating an OU and Group Policies for the OU for deployment and lock down.
This part is explained on the Thin PC main page. Click
here to continue on that page.