Benefits
Here are the main reasons, you would want FastTrack Automation Studio instead of Desktop Authority (DA):
- FastTrack Automation Studio costs much times less than DA.
- FastTrack Automation Studio is even easier to configure with point and click configuration than DA (see next section).
- FastTrack Automation Studio does not require you to install and maintain a "client" - you simply use Group Policy to push logon scripts and packages.
- FastTrack Automation Studio does not require any extra infrastructure at all.
- Microsoft best practice is to use Group Policy Objects (GPO) as much as possible. FastTrack Automation Studio builds components to deploy using GPO.
FastTrack Logon and Software Deployment = DA Alternative
This page has three sections. At the bottom, you will find a FAQ to sum up questions from the first two sections. The first section below describes setting up
FastTrack Logon for desktop preparation. The second section is Software Deployment to manage software on clients. These two features combined is the DA alternative.
But not only is it an alternative - you have lots of features not available in DA and you can remove you DA infrastructure, as we require no other infrastructure
than what you already have. Download the fully functional software using the button at the top and see for yourself!
Setting up FastTrack Logon for desktop preparation
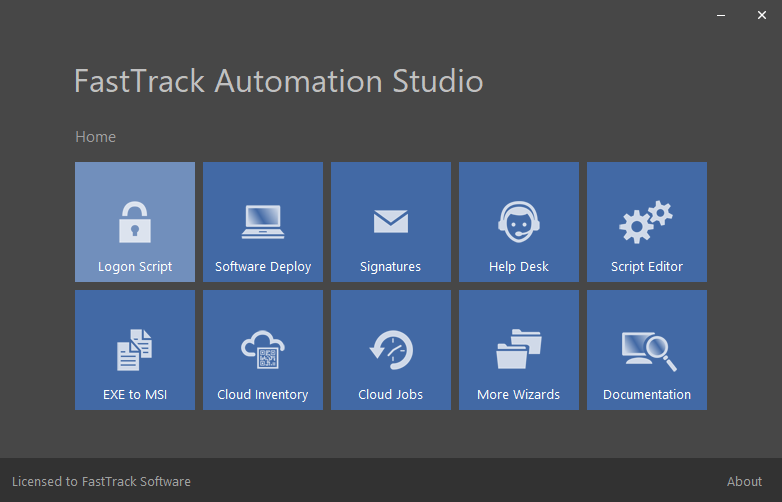
The first step is to walk through the simple FastTrack Logon Setup wizard. Click the "Logon Script" icon on the Home Screen and select "Setup New".
This is a simple process, so we will not go through the pages here - but you can watch
this video to see it done in real life.
Walking through the configuration pages
Once you completed the setup wizard, you are ready to build your configuration.
If you prefer to see a video of using the basic pages, please refer to
this video.
On the default "General" page, you define common settings,
such as splash screen text and your company name and logo that you saw in the video above.
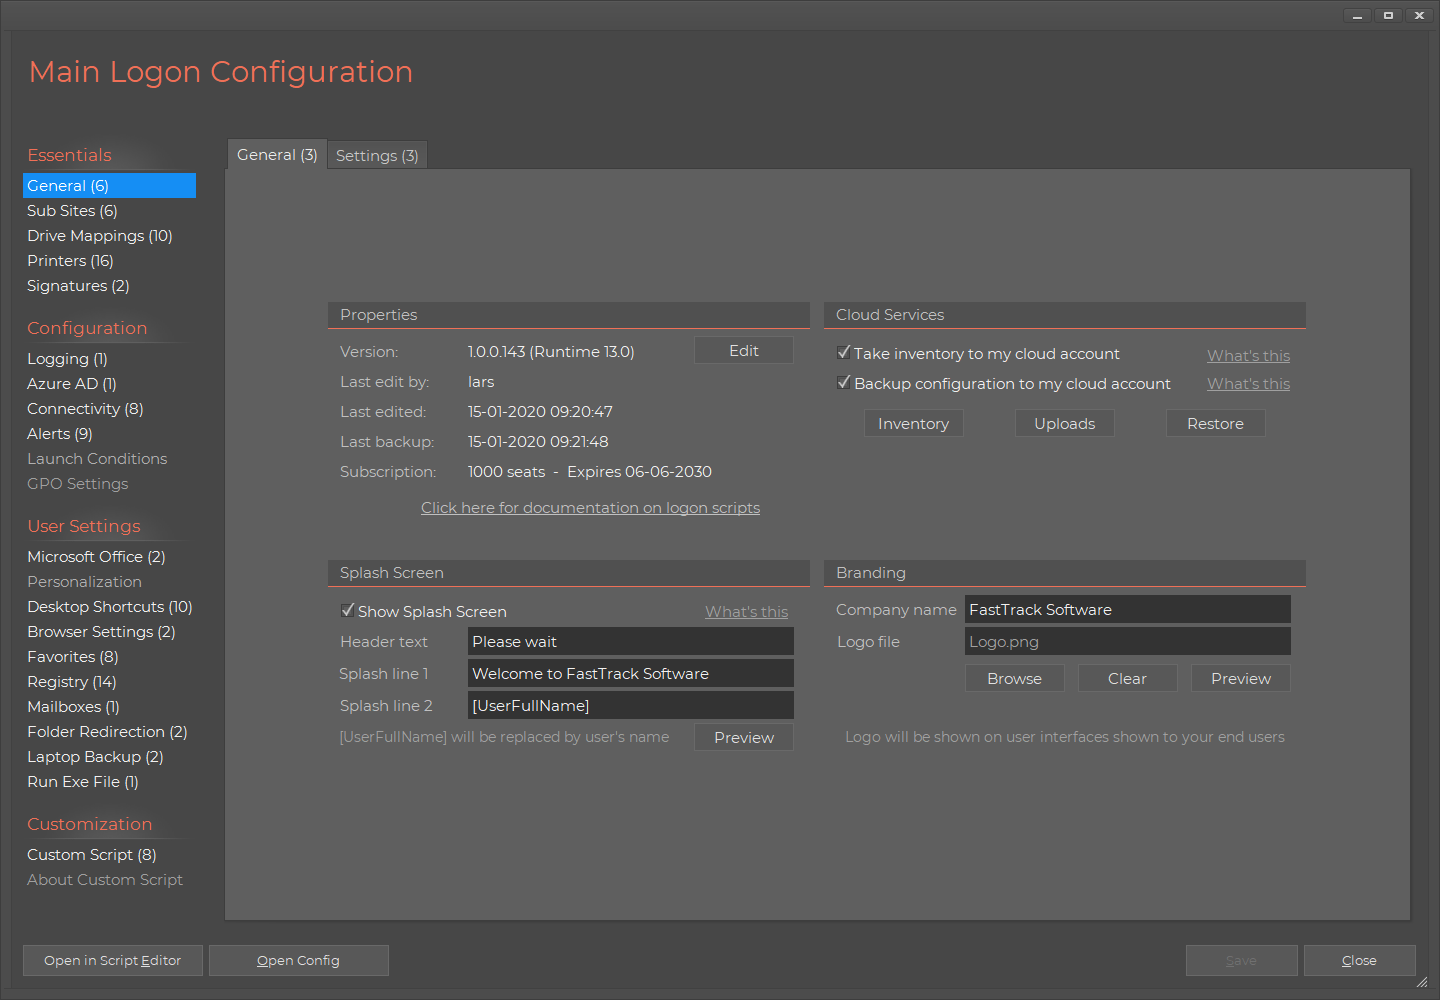
You should generally include your company logo, as this is shown on all user interfaces that the end user sees.
On the general page, you can also test-drive your logon script using the "Execute" and "Debug" buttons without actually logging on to a computer.
If you need to troubleshoot on clients, you can temporarily enable step debugging and making errors show on clients.
You can also set a user interface scaling. If your users generally have high resolution screens, you may want to make the user interfaces bigger.
User interfaces means anything the user sees, such as splash screen, printer menus, signature pop-ups and so forth.
Cloud Services
You have two cloud services that comes freely with your license, which you configure under "Cloud Services" on the "General" page shown above.
The first one is a cloud-based inventory named SkyBox, which has its separate
web site at
www.skyboxinventory.com. When you license FastTrack Automation Studio,
you automatically get a free account at this web site. All you need to do to take a hardware and software inventory of computers, is to set the checkmark.
You can read more about the inventory on
this page.
The other service you get for free with your licensing, is an automatic backup to the cloud. If you set the cloud backup checkmark, a backup of
your configuration will automatically be uploaded to the cloud for easy restore. This backup even includes previous versions, so you can restore
your configuration from a previous date in case you need to revert to a previous version. The documentation for the cloud backup can be found
here.
Sites
Note in the left menu that you have a menu called "Sub Sites". Let's say you have 4 sites in your company and you know these by IP scopes.
Then you can go two ways, either you simply merge everything into one script and use the IP scope condition - or you can use "Sub Sites" to create a logon script for each site based
on IP scopes, meaning that on a specific site, the main script is executed plus this sites' "sub logon script".
A sub site allows you to open the very same Logon Script Builder as you see here, but all settings will then only apply to the site you open.
You can also mix; for example shares could go on the main logon script and then printers could go on each sub site. As a rule of thumb, if you
have complex printer mappings that you want to handle with FastTrack, sub sites is probably the way to go, especially if you use printer menus (see further down).
Drive Mappings
On the drive mappings page, you create a list of shares to connect. You simply create a full list of all possible shares for all users
and then you set up a filter on each share, if required. You can filter on Active Directory groups and Organizations Unit of the
executing computer or logged on user. You can also filter on IP scope. If your drive mappings are complex, you use the sub sites features
to segment your list. For simplicity, here's a simple list:
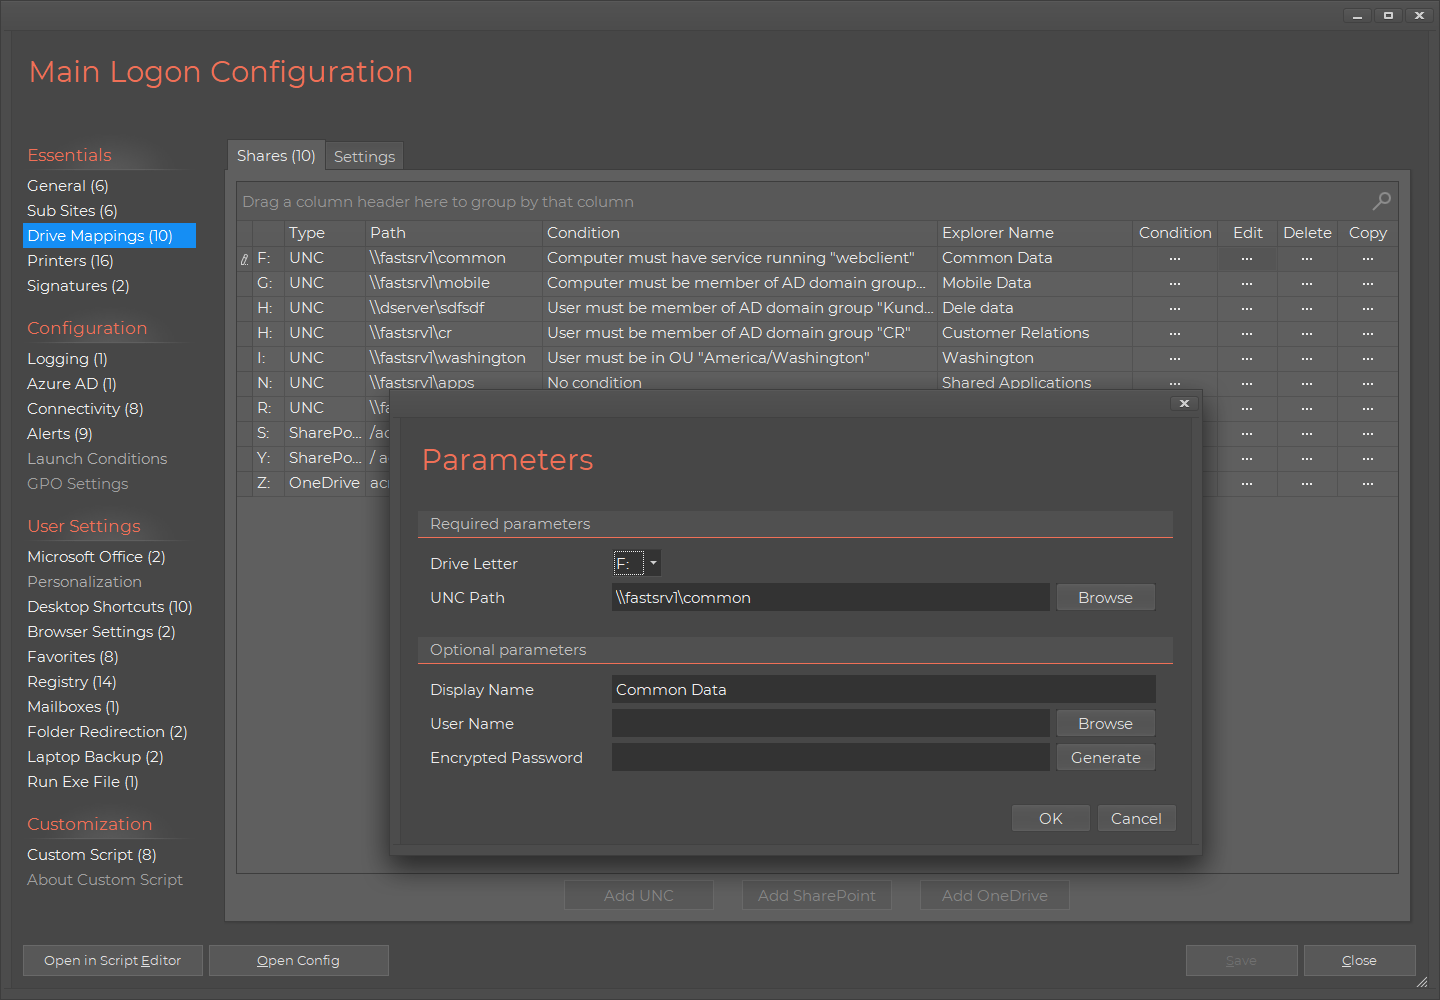
SharePoint and OneDrive
In the above share mappings, there are two buttons named "Add SharePoint" and "Add OneDrive". The first button lets you add a SharePoint folder
as a drive mapping. The way it works is that the user will be asked to log on to Office 365 as part of the logon process to establish credentials.
If you use the OneDrive button, the user's OneDrive folder will be mapped to a drive letter. Note that this is OneDrive for Business and not OneDrive
personal. If you have a fat OneDrive client installed on all computers, you should prefer this for performance reasons. The advantage of mapping to
a drive letter is that you have central control over it and also, if you have clients that do not have the OneDrive fat client, this solves the problem.
Note that under the Microsoft Office menu in the left, you can configure, if Office favors cloud storage (the fat client) or not. When mapping OneDrive
to a drive letter, Office does not see it as cloud storage.
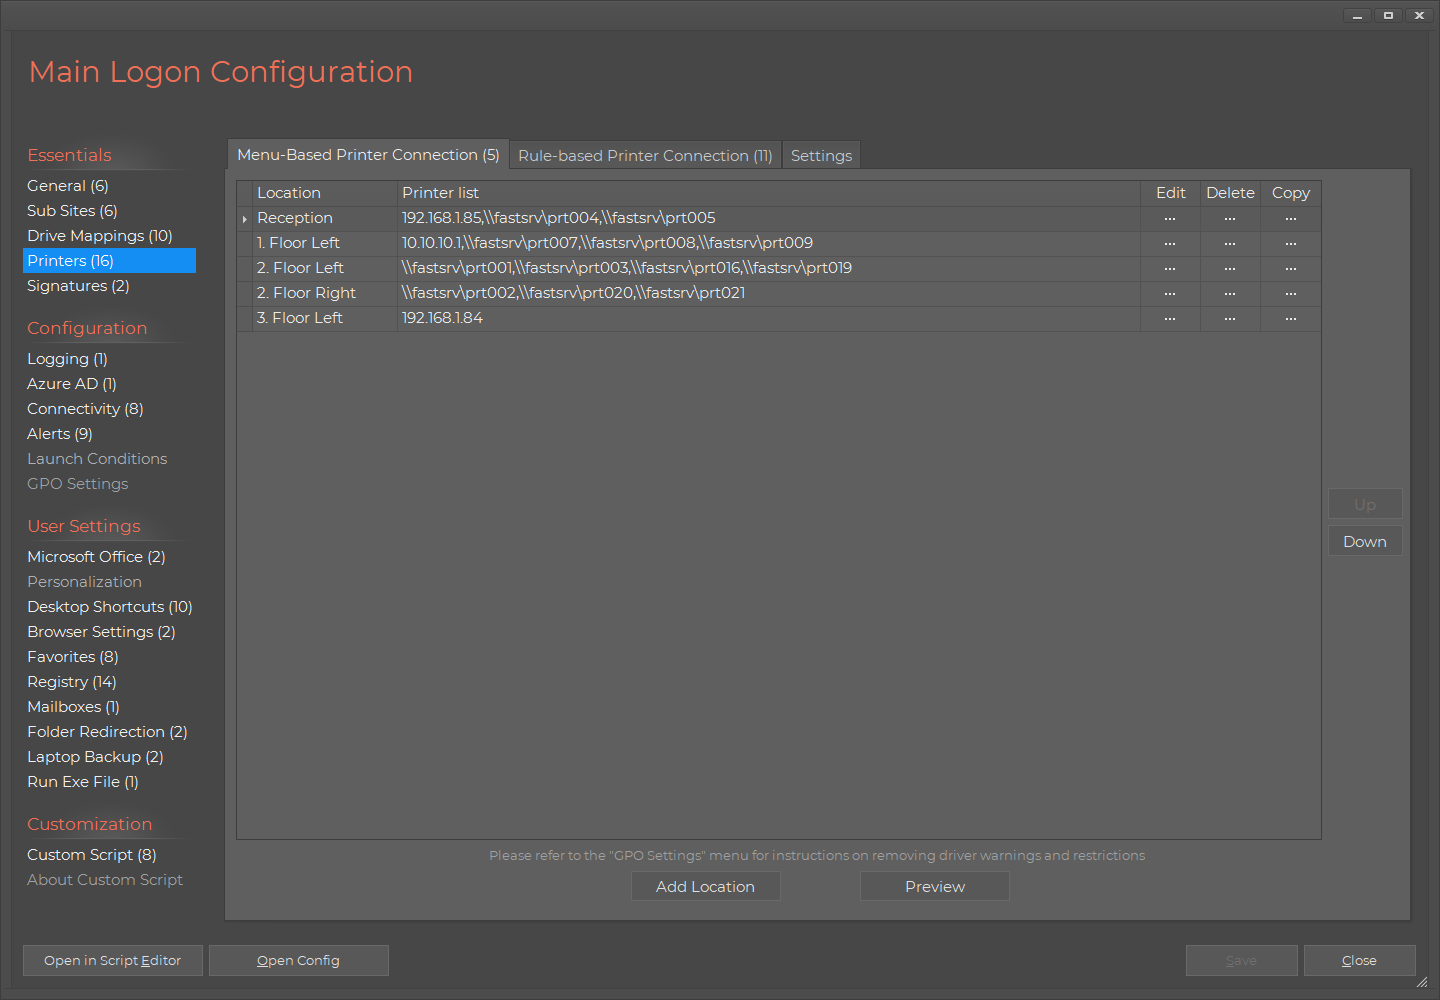
Printers
Printers you can connect in two ways. Either you can create a menu that the user will select a list of printers from,
or you can use the same logic as with shares, where you filter printers on groups, OU or IP scope. The printer menu
version is the most flexible way, because laptop users may roam around without logging on and off. And also, in many cases,
a network is not broken down to such IP scope level that it's practically possible to identify suitable printers for everyone. With the menu
version, you ask at first logon and you can create a desktop icon to show the choice of printers again. The selection will
automatically be remembered and if you change printers on a location, changes will automatically be reflected,
next time users log on.
Rule based printer connection
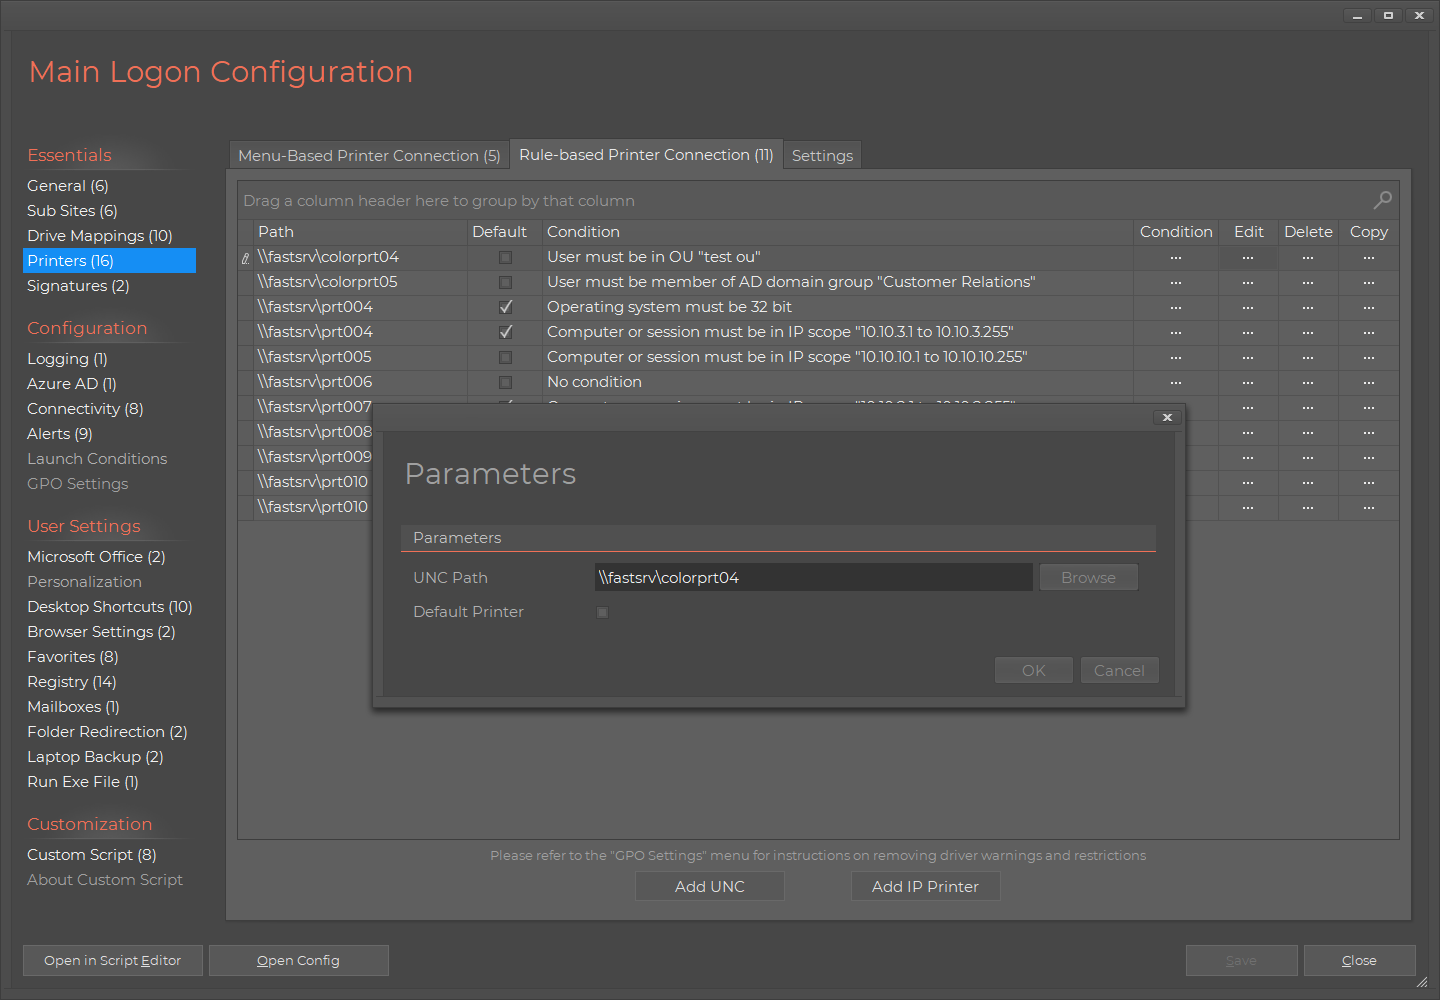
Menu based printer connection
IP Printers
In the screenshot above, you can see that there are two buttons. One for print servers (UNC) and one for IP printers. Both printer menus and AD rules
support IP printers as well as print server printers. It is just as easy to add an IP printer as it is with print server printers. Once you click the button
to add an IP printer, you will see this screen:
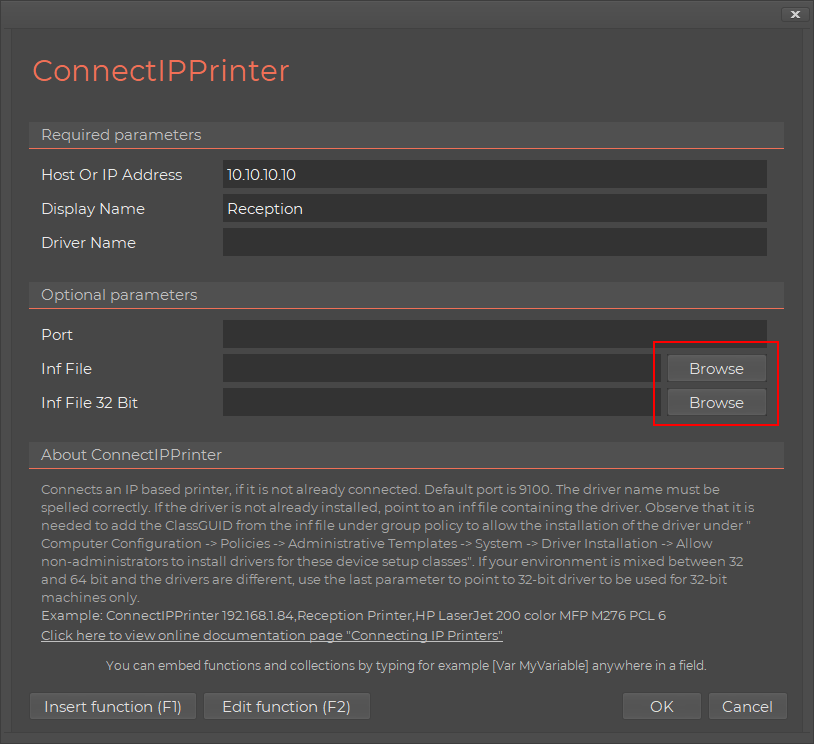
Basically you just tell the host name or IP address of the printer and then you need to say, which print driver to use, just as you would have to
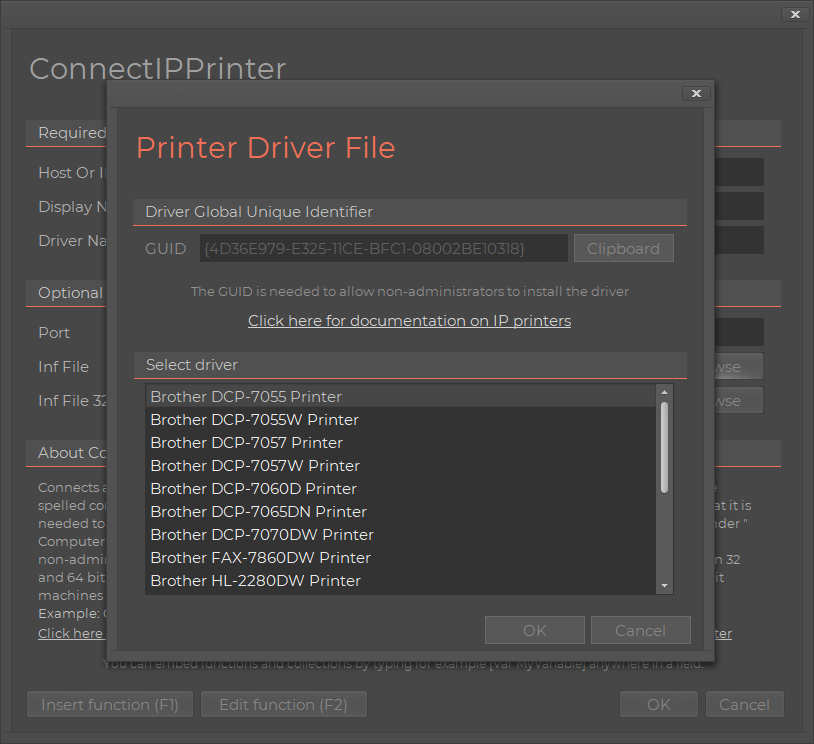
on the server-side for print servers. If the printer driver is not a standard Windows driver, you need to put the driver files on a network share and point
to it. To avoid typing the driver name wrong or point to a wrong path, it is highly recommended to use the "Browse" button shown above, because this
will pop-up a pick list of driver names in the driver inf file and fill in all information automatically, as shown below.
IP printers has a separate documentation page - please refer to
this page for more information,
if you need to use IP Printers.
Outlook Signatures
If you wish to set up one or more Outlook signatures, you can point to a Microsoft Word signature file and set options on the "Outlook Signature" page.
Signatures has its own page
here. You have the same options as you have, when
you use the Outlook Signature wizard. However, installing an Outlook Signature through a logon script has one huge advantage -
you do not need
to redeploy to update signatures. You can simply replace the signature template file on netlogon or point to a network location, where
someone from marketing can update the signature. Signatures that include marketing campaigns or similar will need frequent updates. Regardless,
signatures are never static. You will do yourself a favor to deploy through a logon script, because eventually there will be changes and you
do not need to worry about redeploying an MSI file or similar.
As is the case with the Outlook Wizard, you can install signatures once, create a desktop icon for ad-hoc update and also choose to ask the user to correct Active
Directory information, before installing the signature. This will not change your Active Directory, just the user's signature.
You can install as many signatures as you like. A typical example would be that various groups in the company must have different signatures.
In such case, simply add a group or OU check and use multiple signatures.
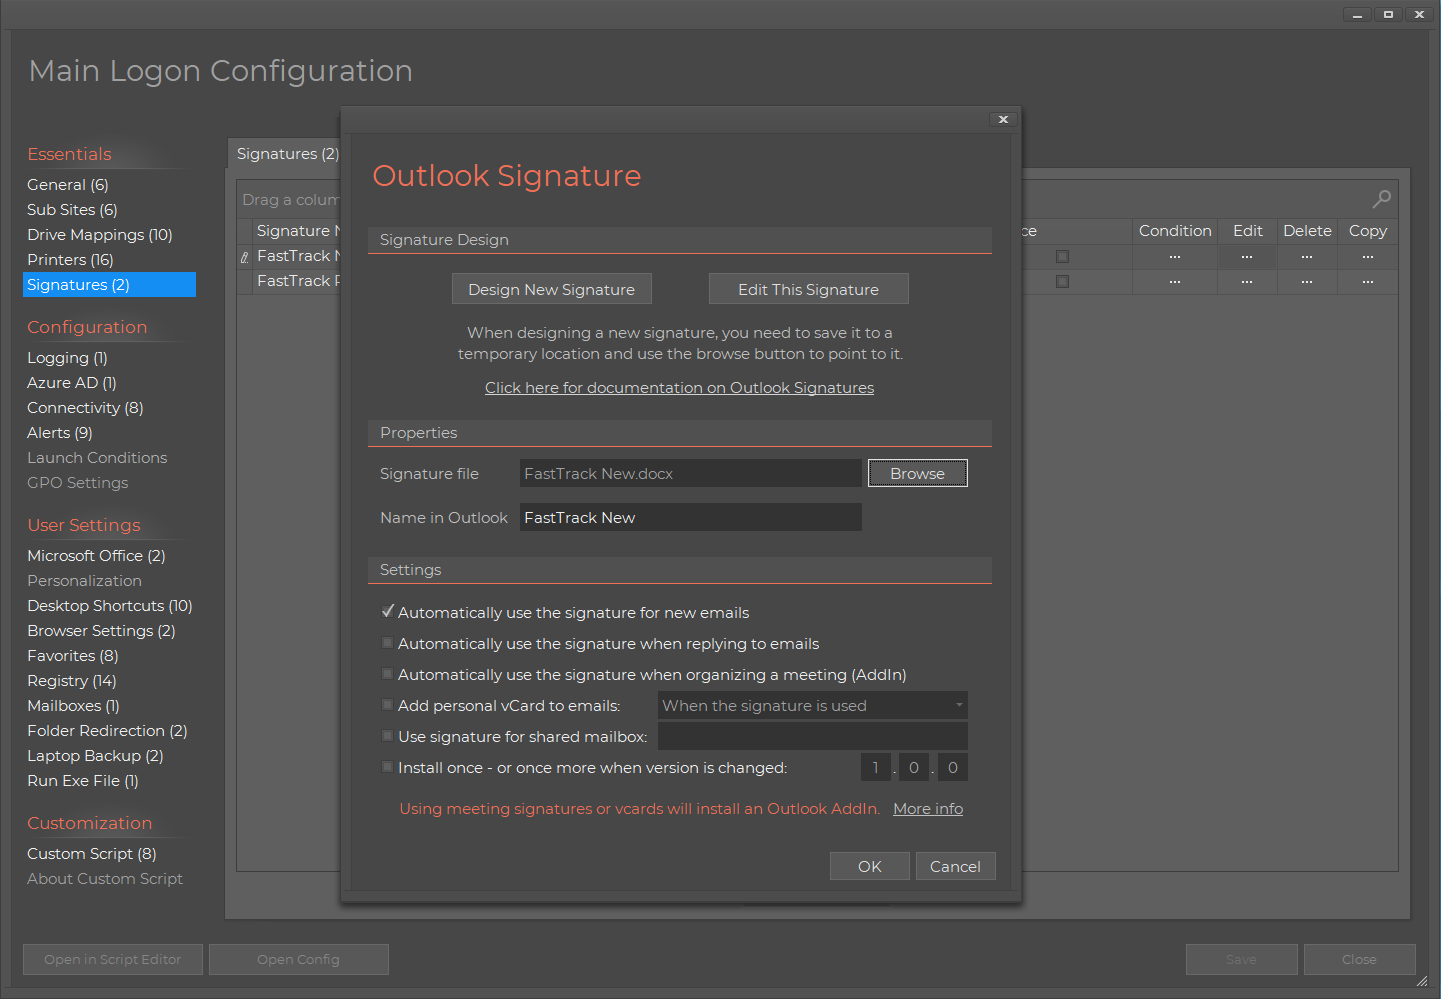
Note that you can also use a signature for meetings, meaning using a signature as a template for meetings. When the user
clicks the calendar, the signature is automatically inserted as a meeting template. You can also attach a vcard to either
all emails or new emails (versus reply emails). The vcards are much richer than the native Outlook ones and will take
the information from your Active Directory.
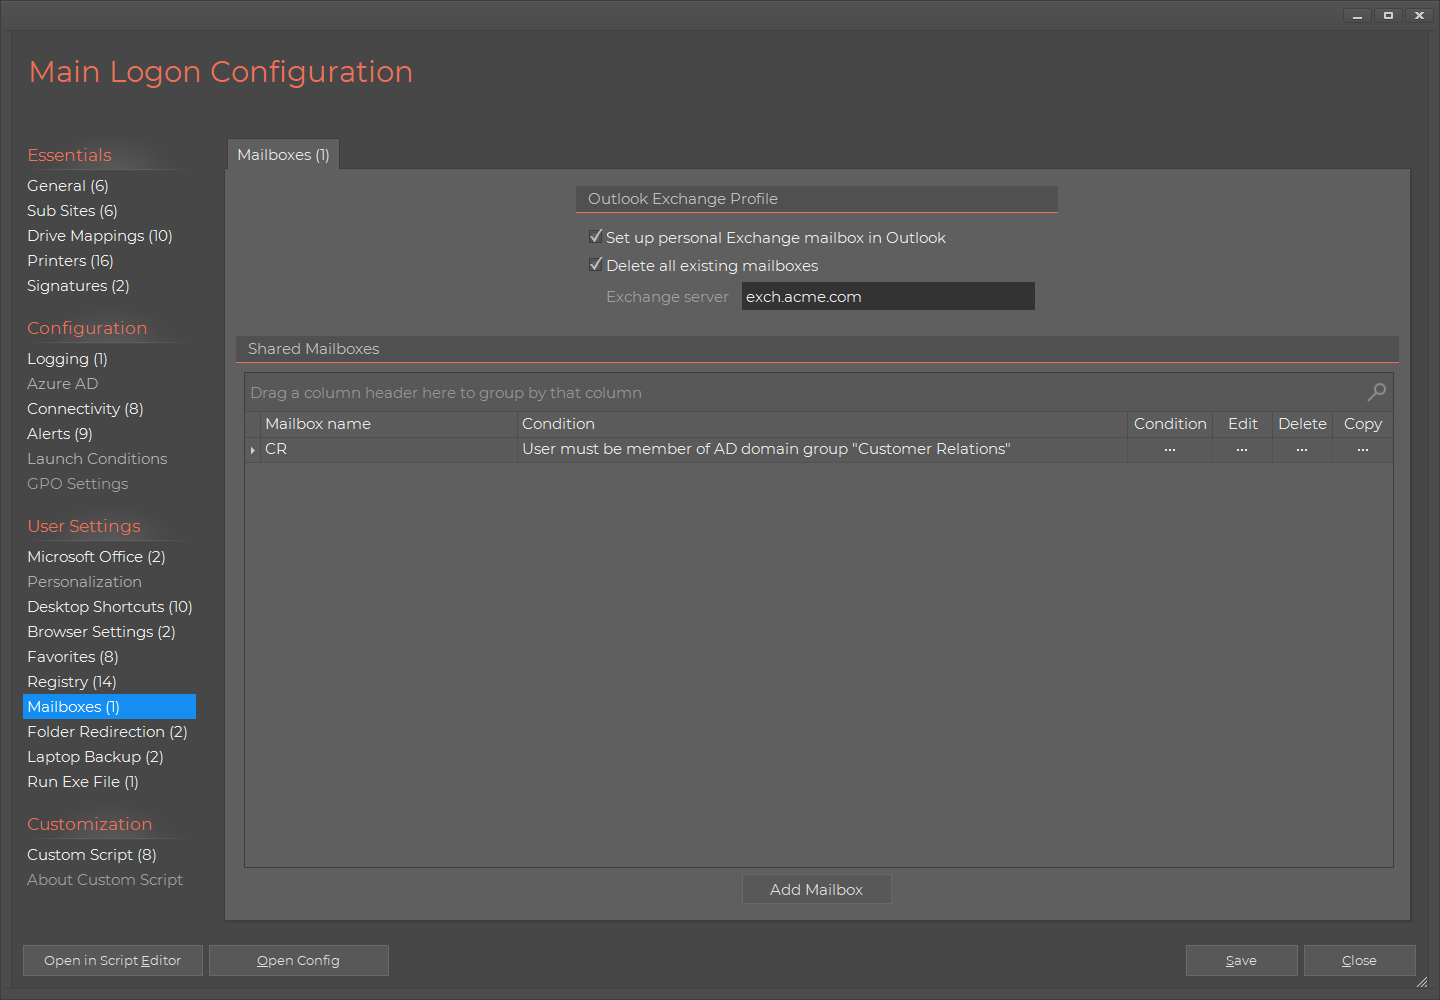
If you do not have auto-discover on or you for other reasons need to control maiboxes, you can use all the same conditions
to create
Exchange profiles:
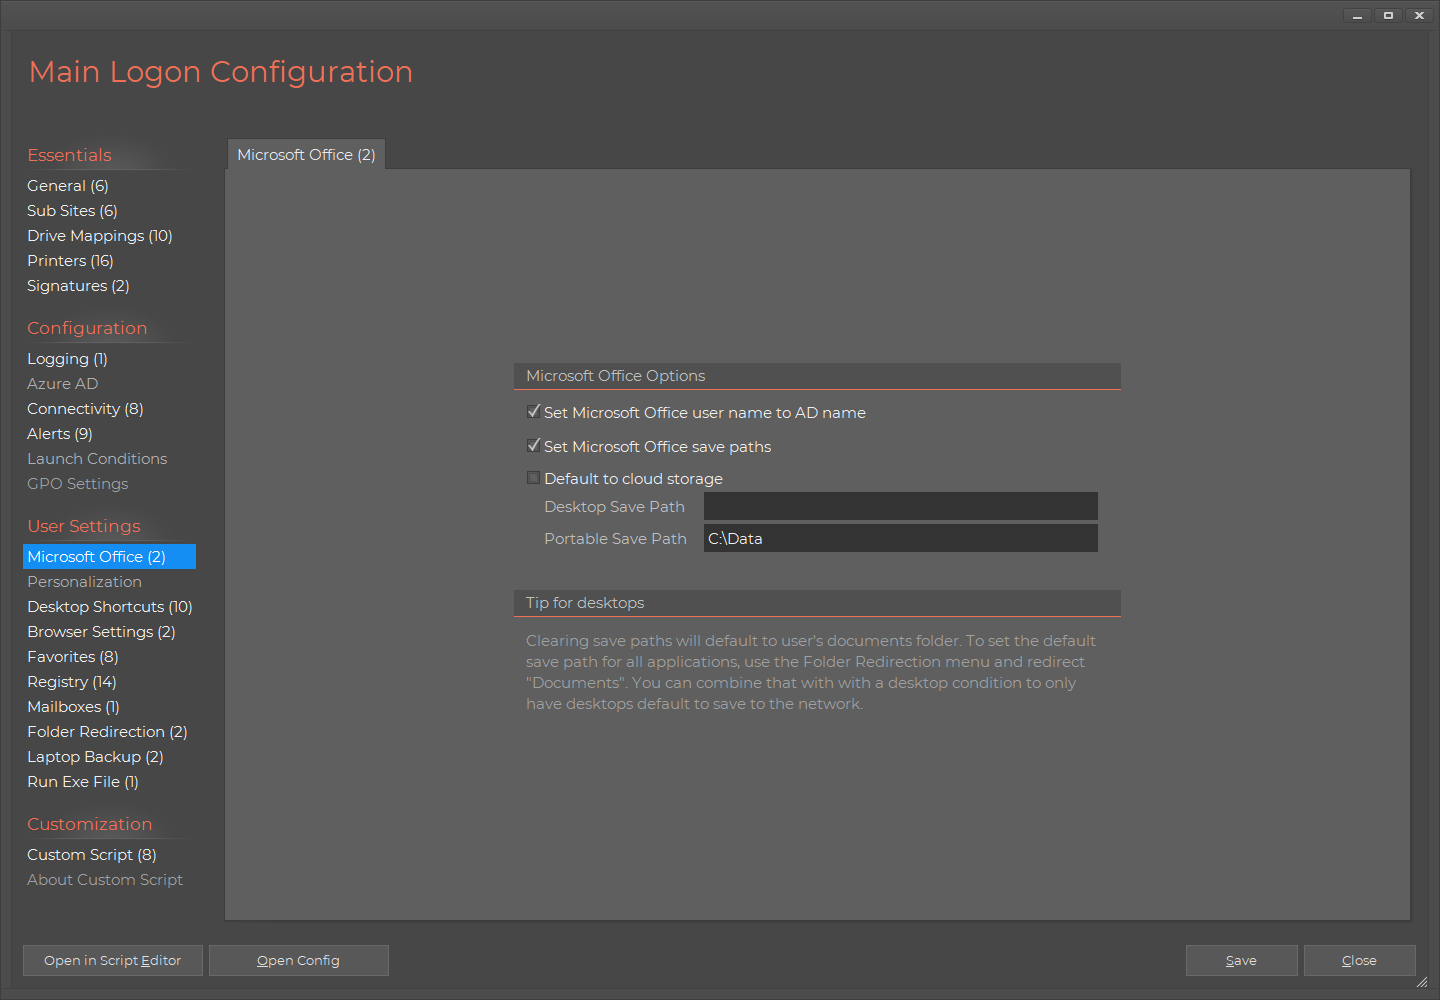
Office Settings
Under Microsoft Office in the menu, you can let the logon script set the Office user name to be the same as your
Active Directory name and initials. This is typically a good idea to avoid users being creative, ending up with
documents being stamp with names that are not recognizable. You can also overrule the default save paths for desktops
and/or laptops. If you use Folder Redirection, this option is not necessary. You can also decide, if Microsoft Office
applications default to saving to OneDrive or local disk.
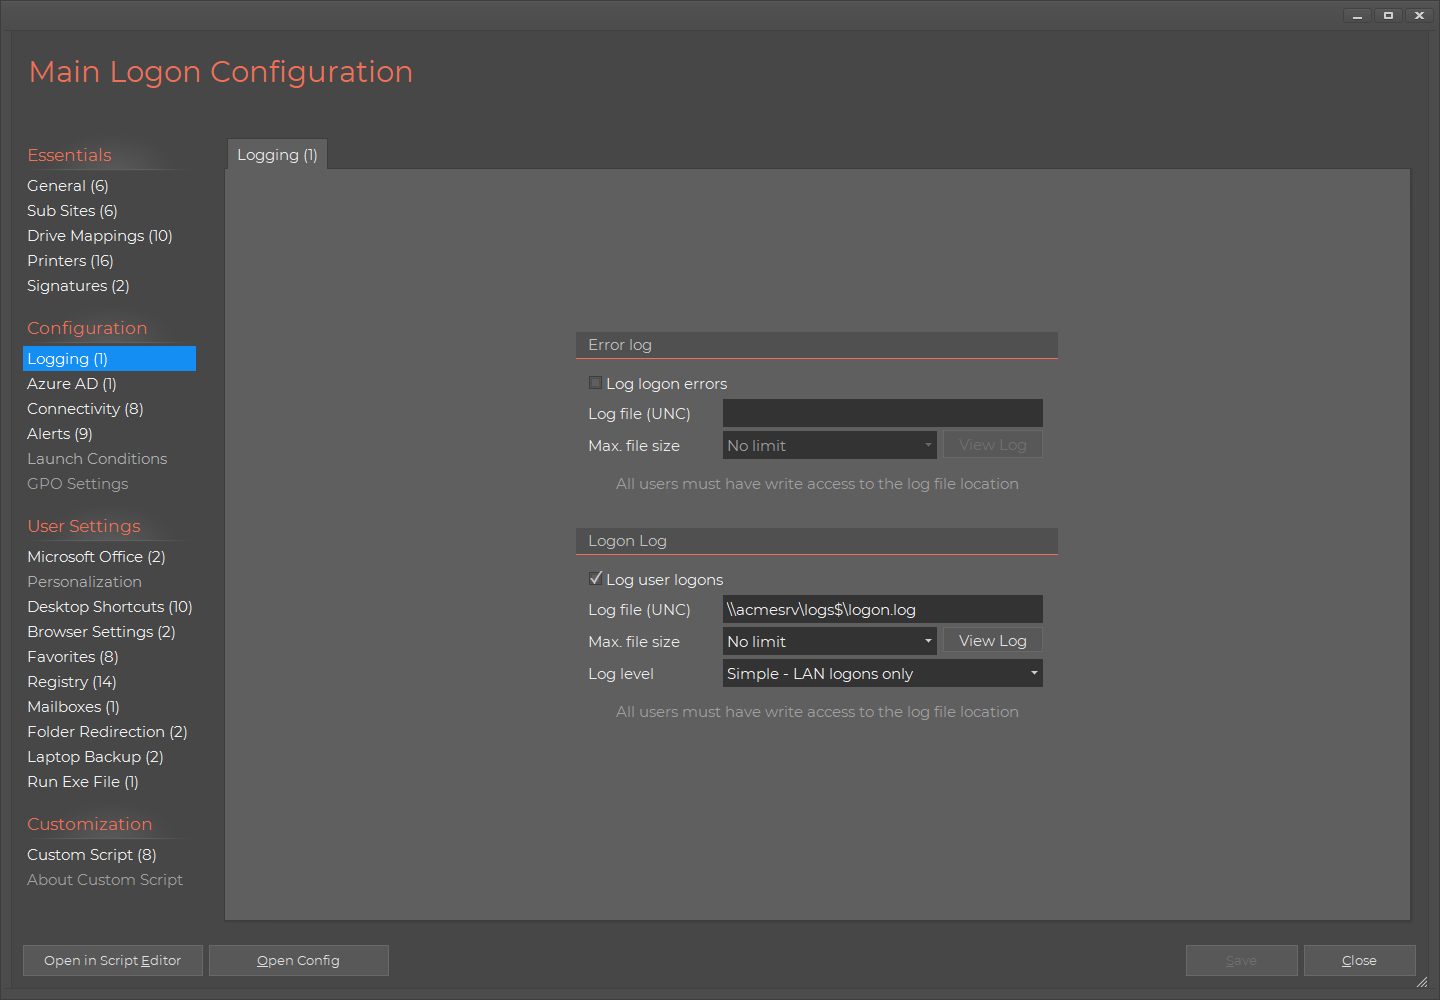
Logging
You can enable logging for user logons and errors at logon. This is a good idea to enable, as this gives you a great
overview of what's going on, especially on errors. The reason logging is not enabled by default is that you need to
provide a location on your network, where all users can write, as the logon script runs as the end user, who is typically
not domain administrator. Once you have set up logging, you can use the two log sub-menus in the Home Screen under "Logon Script".
It is highly recommended to enable the error log, as this will allow you to proactively find potential problems.
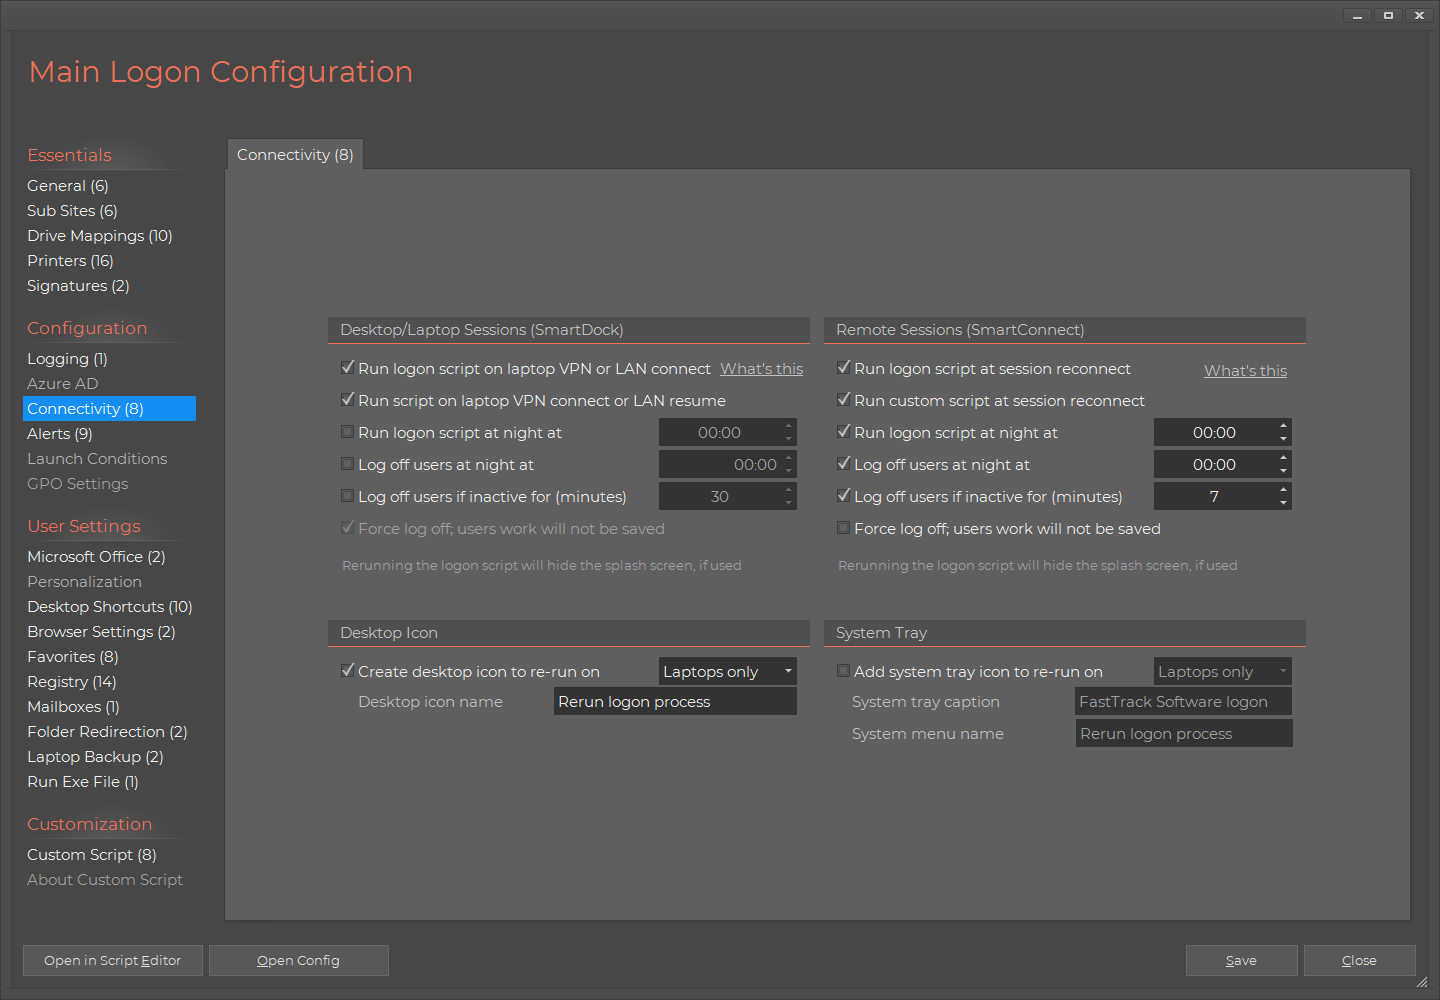
Connectivity
The connectivity menu allows you to run a background process to take some needed actions for the user to always have the
correct drivers, printers and other settings, when connecting to VPN or resuming a Citrix / Remote Desktop sessions from a different computer.
For Citrix/RDP sessions, the
SmartConnect is used and for laptops, the
SmartDock utility is used. Let us start with laptops. If you click the option to rerun the
logon script on VPN connection, the SmartDock utility will be running in the background to detect the connection. This detection
is not bound to any specific VPN software, it simply detects IP changes and executes the logon script, when it is possible. Similar,
if you enable SmartConnect for Citrix/RDS session, if the user closes the session without logoff, the SmartConnect utility will run
in the server-side user session and detect a reconnection. This way, when the user resumes a session, the logon script runs again
and as the user may now be in another subnet physically, the user may need other printers. If the printer menu is used, the user will simply
see the printer menu popup again to adjust the printers to the new client location. As a side-node, please observe the logging screenshot
above. If you enable advanced logging, the SmartDock and SmartConnect utils will run regardless, if you enable them on this page or not, as
these will be doing the actual logging other than the login.
Password and low disk space alerts
Under "User Alerts", you can set up rules for expiry warnings and optionally show a codes of conduct screen.
You can also set up a warning asking the user to clean up space or contact the IT department.
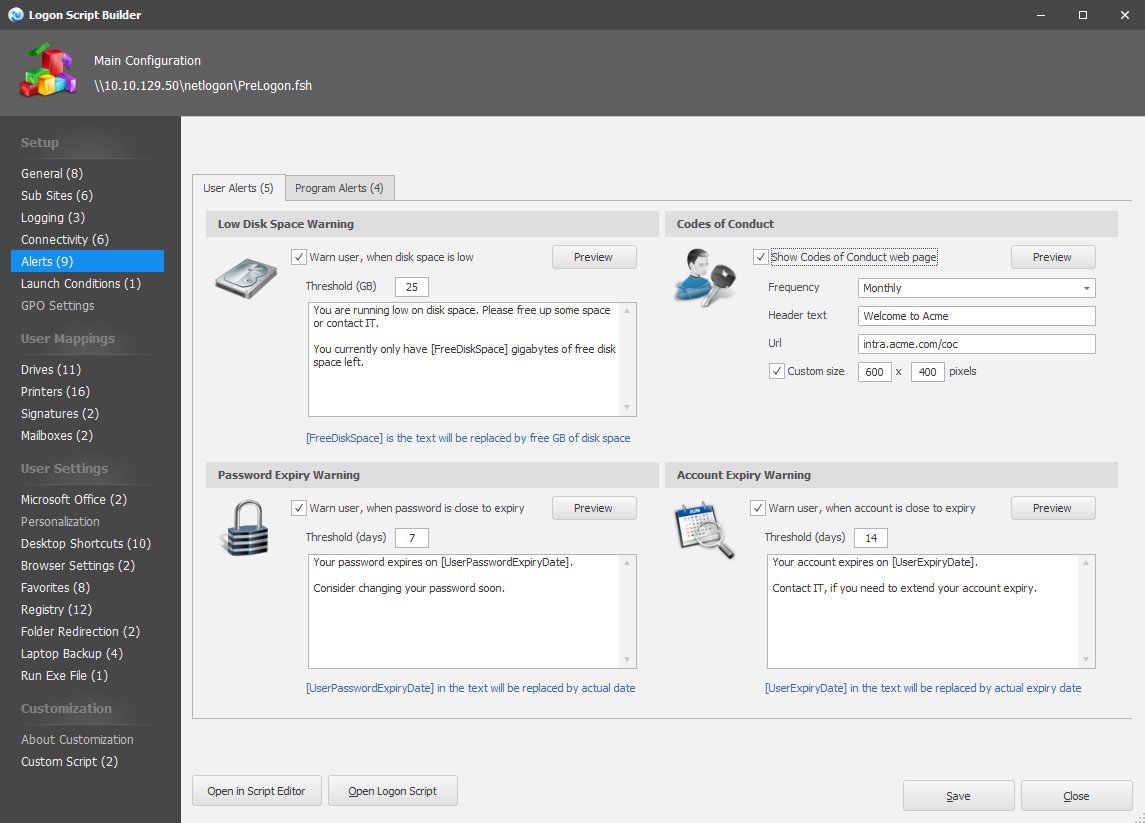
Testing for common software presence
Under "Program Alerts", you can defined logging and/or alerts to users, based on installation status
of Citrix Receiver, SCCM Client, Microsoft Office and the operating system itself:

Laptop document and PST backup
Under the "Laptop Backup" page, you can set up a backup of documents and PST files for mobile users. Note that you can use any FastTrack function in the
path, such as computer name and user's name. You can choose to take a backup at logon based on a frequency you decide, and/or you can place
a desktop icon for the user to start the backup. You can read more about backups on
this page.
Essentially backups are based on the SyncDir command of the engine that is significantly faster than any other directory synchronizer,
such as Microsoft's robocopy.

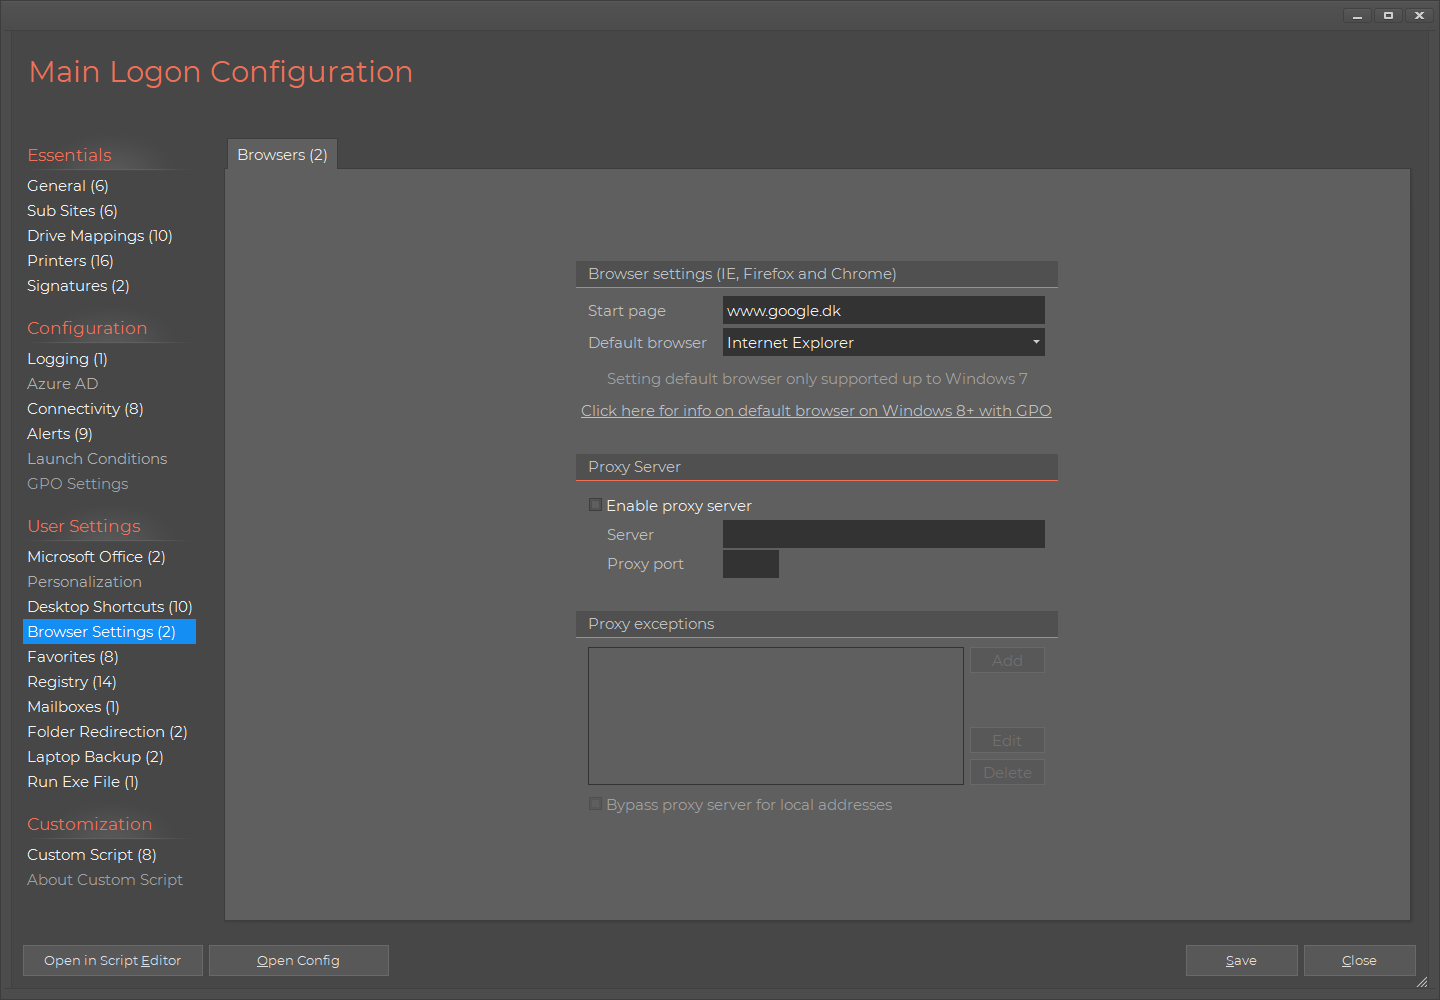
Browsers
The browsers page defines the start page of browsers and the standard browser, along with proxy settings.
Launch Conditions
Pages for "Favorites", "Desktop Shortcuts", "Favorites", "Registry Values" and "Folder Redirection" are simple and therefore not shown here,
but allow you to create favorites, desktop shortcuts, registry values and define folder redirections.
Finally, you can set up scenarios, where you do NOT want the logon script to execute. This could be relevant for virtual
machines or remote sessions.

The rest of the pages in the wizard are there to help you copy logon script files to your netlogon share
and set up group policies. Once you finished the wizard, log into any workstation in the domain as
the user, for whom you modified the login script property to test. Once the logon script is tested, you can assign the
logon script to all users; refer to the last section of this page for details.
Editing the logon script
Once you complete the wizard, you can re-open the logon script again in the Home Screen by clicking "Logon Script" and
select "Edit Logon Script". This will popup a screen that is the same as the wizard's first page. Below more shares have been added.
There is however, one difference. You will notice a "Custom Script" page. This is because the Logon Script Builder simply builds
a FastTrack script and can parse the script back into the GUI. You freely edit the script any way you want and add more script
lines to the logon script. You can also open an existing logon script that was not built using the Logon Script Builder.
Anything that the builder cannot "fit" into the GUI, it will place under the "Custom Script" page and include last in execution.
Software Deployment - keep it simple!
No new infrastructure
If you have tried to install Desktop Authority or the likes, you know that the first thing which needs to happen, is that you need to install 25-30
components for it to actually work. You need a web server, a sql server database and a heap of other system components. At this time, you are already
thinking there are so many things that can go wrong in the production environment. And also, if you just moved your infrastructure to the cloud, what
was the point, if you need to install a local management server to distribute software?
We have taken a totally different approach, because we believe simplicity is better. There IS no "management server". Instead, all the work happens
on the client and all you are seeing in the logs, are in fact clients working for you. The clever part about our approach is that when you use the
software deployment wizard that you see further down, you are not configuring settings in a database. You are in fact building a script for clients based
on our core scripting language FastTrack Scripting Host. What is really going on is, when you point and click your way to a configuration setup
and save, all you have really done is to write a FastTrack script for clients to execute that you could have written yourself in the Script Editor.
Once you edit the configuration, the wizard simply reads this script back into the GUI. If you have added something manually to this script or
modified it in a way that the GUI cannot understand, these portions will simply appear under "custom script" in the left menu and nothing is broken.
It's a contract
See the software deployment more of a contract than a one-time install job. You have 200 computers and you want to install an MSI package. Maybe 20
have the package already and maybe someone manually removes the software later on 5 computers. The way this works is a recurring comparison of installed
software. So in first push, 180 get the package and the last 20 do not error out with the software already installed. If someone removes the package,
within minutes, it just comes back. This is much more intelligent and consistent than trying to push one time.
The sky's the limit on flexibility
So you are basically "just" writing a script that runs recurrently without being directly aware of it. This opens up a whole new world of flexibility.
Our core scripting language is the largest in the world and it has a real simple syntax that you can quickly learn. So if you hit the dreaded configuration
wall and end up in a place, where the configuration GUI does not suffice, you can just tap down to the "Custom Script" left menu and write
a custom snippet. Or you can "take over" script lines built by the GUI and modify to your needs in the Script Editor. If you have trouble doing that, you can
write to our support, which is covered by your license, and we can help you.
This Farm App Deployment page covers an example of how to manually write the script to install software and unlock
all the 1500 commands of the core language.
No update of clients
We mentioned Desktop Authority in a previous section. If you have ever used it, you will know that one of the pain points of using it,
is updates. When there is a new version, you need to update all clients and often this results in manual service of some of them.
This doesn't happen here, because you NEVER need to update the clients. Push it out once using a few Group Policy clicks (explained further down)
and you never need to touch clients again. So how can we be sure of that? Simple - the clients don't really do anything. The client MSI installs
a scheduled task that synchronizes the FastTrack Scripting host engine fsh.exe and a script file from a network folder and executes the script
using this engine exe. If you upgrade FastTrack Automation Studio on your admin computer, the engine FSH.exe will automatically update on the
network folder, and therefore in turn on all clients.
Pricing
Our solution is considerably cheaper than common alternatives. And included in licensing, you get the
Logon Script Builder that works in the same way to connect shares, printers and install Outlook signatures.
You also get a free
private cloud inventory and ability to build you own custom MSI files.
Setting up Software Deployment
The first thing you need to do, is to set up a client and distribution point. You do this by clicking "Software Deploy" in the Home Screen and select "Setup New".
As said in the first section, this is an extremely thin client.
All it does, is to install a Scheduled Task that will kick off a script from your selected network share
using the engine fsh.exe and the script from this location. At this time, you need to be sure, where you would want to store the central
script to control the operation, as this is fixed in the MSI file.
When you get to the next page, you need to enter the credentials of a domain account that is going to perform the operations on the clients.
This user does not necessarily have to be a domain admin, but the user has to be local administrator and have full control over the central share
location. We recommend that you create an ordinary domain account for the purpose and use a long and complex password, because you have to
disable password expiration to avoid having to redeploy the client and put this account in the local administrators group on all clients.
Client deployment
Once you completed the wizard, you end up with an MSI file. You need to deploy this once to clients.
At initial testing, simply install the MSI file on a few test machines manually. Observe that if you
are using a trial, you will need to recompile the MSI anyway when licensed, because the trial client will
otherwise expire. So for trial usage, you should probably stick to manual installation on a few test machines.
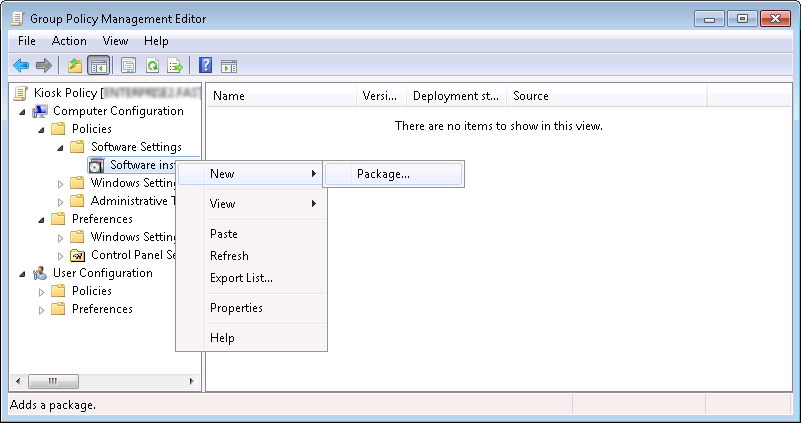
Once you have everything in place and you need to install the client on all machines. The easiest way to do that is to use Group Policy.
Locate the "Software Installation" policy, as shown below, and browse to the MSI file that you just generated.
Group Policy software deployment is not transparent. The only way you will know
that clients are actually installed, is to open the Home Screen and look at the install log under the "Software Deploy" icon in FastTrack
Automation Studio. Once a client Scheduled Task is installed through the MSI file, it will register in the central log.
Important notice if you use netlogon as the network share
Make sure you are using software installation under "Computer Configuration" and NOT "User Configuration". Also when adding the package to
"Software Installation", always use the fully qualified domain name, if you deploy from the netlogon share. In some cases when using the
NETBIOS domain name, MSI error 1612 will occur and the package will not install on clients. For example, if your domain is ft.com,
use \\ft.com\netlogon\ftclient\ftclient.msi instead of just \\ft\netlogon\ftclient\ftclient.msi. We recommend that you simply
use a different share than netlogon.
Configuration
Once you have clients in place, go to the Home Screen and click "Software Deploy" again and select "Edit Configuration".
If you are familiar with the
Logon Script Wizard, you will recognize the layout.
To the left, you see a list of overall feature categories. The first and initial category is the "General" page.
Here you decide how often clients check for new configurations and execute the script that
you are building with the wizard. For initial construction, 15 minutes is good, but once you are set in a production environment,
there is no need for checking for new software, drivers and so forth more than say once a day.
One-Time Installer vs Client MSI
The option to generate a "One-Time Installer" (a small exe file) is useful for at least two things. What is does is that it executes the
script (the entire configuration) once, when you run the exe file. This way, you could use this exe file as a startup
script instead of using the MSI file (which executes recurrently). It is also useful as part of an OS deployment, where you want
to make sure that all current software and drivers are installed before the user gets the computer;
refer to
this page for more information. The only thing you need to be sure of,
is that the central location is reachable in the context the exe file runs. For example, a startup script runs as local system account.
Cloud Services
You have two cloud services that comes freely with your license, which you configure under "Cloud Services" on the "General" page shown above.
The first one is a cloud-based inventory named SkyBox, which has its separate
web site at
www.skyboxinventory.com. When you license FastTrack Automation Studio,
you automatically get a free account at this web site. All you need to do to take a hardware and software inventory of computers, is to set the checkmark.
You can read more about the inventory on
this page.
The other service you get for free with your licensing, is an automatic backup to the cloud. If you set the cloud backup checkmark, a backup of
your configuration will automatically be uploaded to the cloud for easy restore. This backup even includes previous versions, so you can restore
your configuration from a previous date in case you need to revert to a previous version. The documentation for the cloud backup can be found
here.
Settings
Under "Settings", you decide a series of settings, such as setting the system time, threshold for minimum free diskspace and policy for laptop software deployments.
There is no point in starting an installation of Microsoft Office on a laptop, if there is 10% battery left.
On this page, there is also a setting to decide, how many computers may run installations simultaneously. Unless you have a large number of computers
and you deploy large packages, it is not necessary to use the simultaneous option. If you wonder how this can work without a central
state server, this works by clients sharing an XML state file on the network share, so each client knows how many other
clients are installing at the time, when a "slot" is needed.
Software Deployment
On the "Software Deployment" page you set up software that you would like to install on clients. You simply point to an MSI file on your network using UNC and the GUI will
automatically fill in the information. In the case below, we pointed to the Adobe Reader MSI file. Once you click "OK" you will be asked for conditions to install,
such as membership of a group or OU. Note that membership and OU here means machine security group and/or OU, as software is machine-wide, not per user.
If you select the EXE option, it works the same way, but you have to supply parameters for getting the EXE-based installer to install unattended.
If you select the FSH option, you need to point to a FastTrack Scripting Host script that you have built in the Script Editor to install the software.
For example, if you use the exe-to-msi feature in the Home Screen to repackage TeamViewer, you might as well fire that FastTrack script directly instead;
see
TeamViewer page for example.
If you use the MSI option, it is NOT a one-time install order. What it does is that when a client executes the script, it will check every time, if the MSI is installed or not, and only install it, if not.
The reason why this is important to understand is that it doesn't matter, if some clients already have the software installed, because then nothing happens. It also has two other advantages;
one is if the software is uninstalled, it will automatically be re-installed. The other advantage is that you can just update the MSI file on the file server and the version will no longer match
= all clients will automatically update to this version, without even operning the wizard again and make a change.
Software On Demand
The "Software On Demand" feature looks exactly like Software Deployment. The difference is that Software Deployment will push the software out always based on rules,
whereas Software On Demand will install a tray icon on client computers, if the list is not empty. When a user invokes the tray icon, a pick list of software will appear.
The same rules apply - you can set conditions like user must be member, computer must be a laptop, etc.
The menu that will pop up on a computer will be the sum off software in the list that is not already installed and is not rules out from conditions.
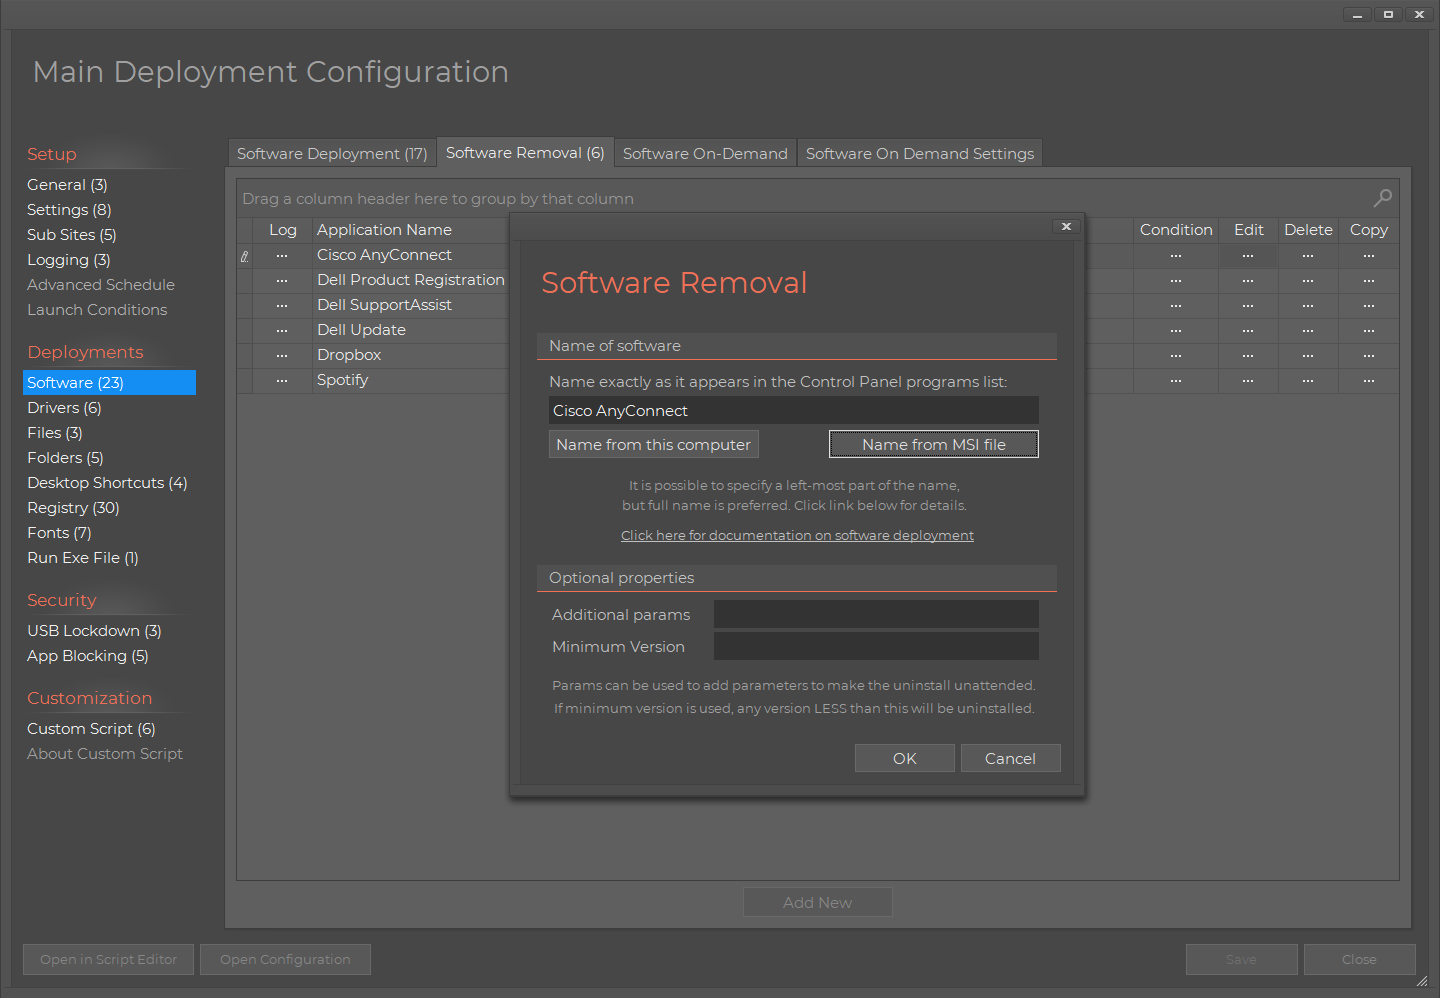
Software Removal
The "Software Removal" feature works in a similar way. It's extremely simple. Just enter the name of anything as it appears in the Windows Control Panel programs list and it will be uninstalled.
You can specify the left-most part, but the full name, as it appears in the Windows Control Panel programs list, must be preferred to ensure that nothing gets uninstalled by accident.
On the other hand, some programs like Adobe Reader postfixes the version number in the application name, in which case, this can easily be factored in by using "Adobe Reader" as program name,
in which case anything that starts with "Adobe Reader" will be unstalled.
Every time the script is executed, it will check the Windows install list for undesired software. In the case below, we do not want users to use Spotify,
so we simply add it to the removal list. If the user installs the software, next time the script is executed, it is removed. Today most users are not local administrators,
so the removal part is more useful to you for obsolete software. Let's say for example that the Cisco AnyConnect client is no longer used in the company. Then we can just add
it to the removal list, and it will be uninstalled on all clients. You can also uninstall software based on version. Let's say all administrators now use TeamViewer 11, then "TeamViewer"
can be added as program to remove and "11" can be used as "Minimum Version". In that case, computers with a lesser version than 11, will get TeamViewer uninstalled.
The rest of the menus to the left are resonably self-explanatory. Note that some non-MSI based installers do not uninstalled without user interaction. Today this would be true for
around 10% of the software out there. In such case, you need to find additional parameter for silent uninstall. A good example is TeamViewer. If it was MSI based, it would uninstall
unattended, but it will pop-up an uninstall dialog box. If you Google the subject, you will find that you can pass /S to the uninstaller to bypass it, meaning that you must enter
/S in the "Additional Params" for TeamViewer to make it work.
Drivers
On the "Drivers" page, you simply point to an .inf driver file and it will install on clients. It will be installed in the Windows Driver Store and if it
fits installed hardware, it will also update current drivers. If you want to install or update drivers for say Ricoh printers or general Intel drivers,
you simply add the driver(s) to the list and it installs on next execution on each client. The "Split" flag in the list means, if there is a different version for 32 and 64 bit.
A common situation would be to preinstall printer drivers. If you use the FastTrack Direct IP Printing feature
(click
here for more information), it is easier to just preinstall the drivers once this way.
You can - as always - add conditions, which makes even more sense with drivers than software. If you want to update for example the Dell power management
driver, you would only want to deploy it to Dell computers. It would have no effect installing it on other computers, as the hardware doesn't fit and is therefore
not used by the Windows plug'n'play architecture, but there is still no reason it. You can also point to a specific model. For example in the pop-up below,
where a driver for Dell XPS 15 computers must be deployed.
You can also deploy drivers as part of operating system deployments; refer to
this page for more information.
Sites
Note in the left menu that you have a menu called "Sub Sites". Let's say you have 4 sites in your company and you know these by IP scopes.
Then you can go two ways, either you simply merge everything into one configuration and use the IP scope condition - or you can use "Sub Sites"
to create a site configuration for each site based on IP scopes, meaning that on a specific site, the main script is executed plus this sites' "sub site script".
A sub site allows you to open the very same Desktop Deployment Builder as you see here, but all settings will then only apply to the site you open.
USB lockdown
The software deployment is the main feature of this wizard. But there are other features that can be controlled using the client. You can decide to lock
down USB devices based on the type of device. And you can use all the same conditions to filter the locking.
Application lockdown
You can also lockdown applications. If you do not want to uninstall an undesired application, you can choose to lock it down instead. For example Spotify or Dropbox.
You could uninstall it. Or you can lock it down, in case it is actually needed at a later point. This might be pretty easy to decide for Spotify, but you can
lock down anything. You can lock down Internet Explorer or another browser for being used or block starting the OneDrive fat application, to control this via the logon
script using drive mapping of OneDrive. In such cases an uninstall is not desirable or in some cases even possible.
You can also add registry keys to HEY_LOCAL_MACHINE and place desktop shortcuts on the desktop. A desktop shortcut set per-machine cannot be deleted by the
user, versus doing it from the logon script on a per-user basis, so this is typically a better option, unless there is a user condition to place it there.
Testing tip
For initial internal testing, you can avoid waiting the minimum 15 minutes for to test configuration changes. The way you can avoid this, is to select
15 minutes and then log on to any test machine after client install, and locate "FastTrack Management Client" under Scheduled
Tasks and run it manually. Setting the interval to 15 minutes disables the timespan check, as the Scheduled Task checks every 15 minutes.
When you are in a production situation and you want to remove or install new software, you can test for one specific machine, so you avoid setting up a test environment.
When you add software to remove or install, you are always asked for a condition. You can simply use the "Computer must be one specific computer" condition to make sure that while
you test, you only hit that one computer that you test on. Or you could create a computer security group for testing computers and check for that. Once everything is verified,
use the edit button and remove the condition.
Changing server location
If you need to change the server location of the central files, you can rebuild the client and redeploy. To avoid having to do that,
you can set a registry key on the machines to overrule the central location:
Post installation tasks
If there is anything you need to do after successful deployment or removal of software, such as updating an inventory you might have,
there are two files named PostInstall.fsh and PostUninstall.fsh in the bin folder on the central location. These kick off every time an
installation or uninstallation is successful. This is a normal FastTrack script that you modify in the Script Editor to your needs.
The name of the application and the version can be extracted with the functions CurrentInstallName and CurrentInstallVersion.
Frequently Asked Questions
Q: Is FastTrack Automation Studio a complete 1:1 replacement of Desktop Authority?
Yes and no. FastTrack Automation Studio was not intended as a replacement of Desktop Authority (DA).
It is the largest scripting language in the world and can be used to supplement Group Policies
into being a feature match to DA at a much lower price. Microsoft recommends using Group Policies for desktop preparation, but lacks features of DA.
These missing features can to a large extend be achieved using FastTrack. The other way around, FastTrack and Group Policies also have many features
that DA does not have, such as geographical tracking, laptop backups, travelling users support and exe building. Also, once FastTrack is licensed,
you are free to use all the 1400+ commands that FastTrack has that go way beyond just desktop preparation.
Q: What are the infrastructure requirements for using FastTrack?
None. No local server or deployment of a "client" are needed. All the infrastructure you need is already set up with your Active Directory.
You simply use Group Policies to push a logon script and also to push MSI packages, in case you do not have SCCM or similar. If you need an
inventory, a free Cloud Service comes with your license. You can opt to install a local inventory server.
Q: How long time does it take to set up?
As there are no infrastructure requirements, you simply install FastTrack on an admin machine and start running wizards. That's it.
You can have a new logon script running within half an hour.
Q: Why would I prefer Group Policies over Desktop Authority?
Group Policy does not cover all features or Desktop Authority, but the ones that it does,
are much more feature-rich. Secondly, Group Policies is the way Microsoft wants you to enforce policies on your network
and the features covered grows with every generation of Windows, giving you less and less value from DA over time.
Q: How do I match Validation Logic?
You have simple conditions in your logon script to stop execution or have a different execution based on
OS version, virtual machines, remote sessions, geographical location and so forth.
If you look futher up, you will see this as part of the Logon Script wizard.