Set up a logon script
On this page, we will assume that you have set up a logon script, as shown at
www.fasttracklogon.com.
At this point in time, you must be aware, that you do NOT necessarily need to use this page. When you set up a logon script, you can simply point and click
your way to connecting shares, printers, installing an Outlook Signature, etc. Let's look at the builder:
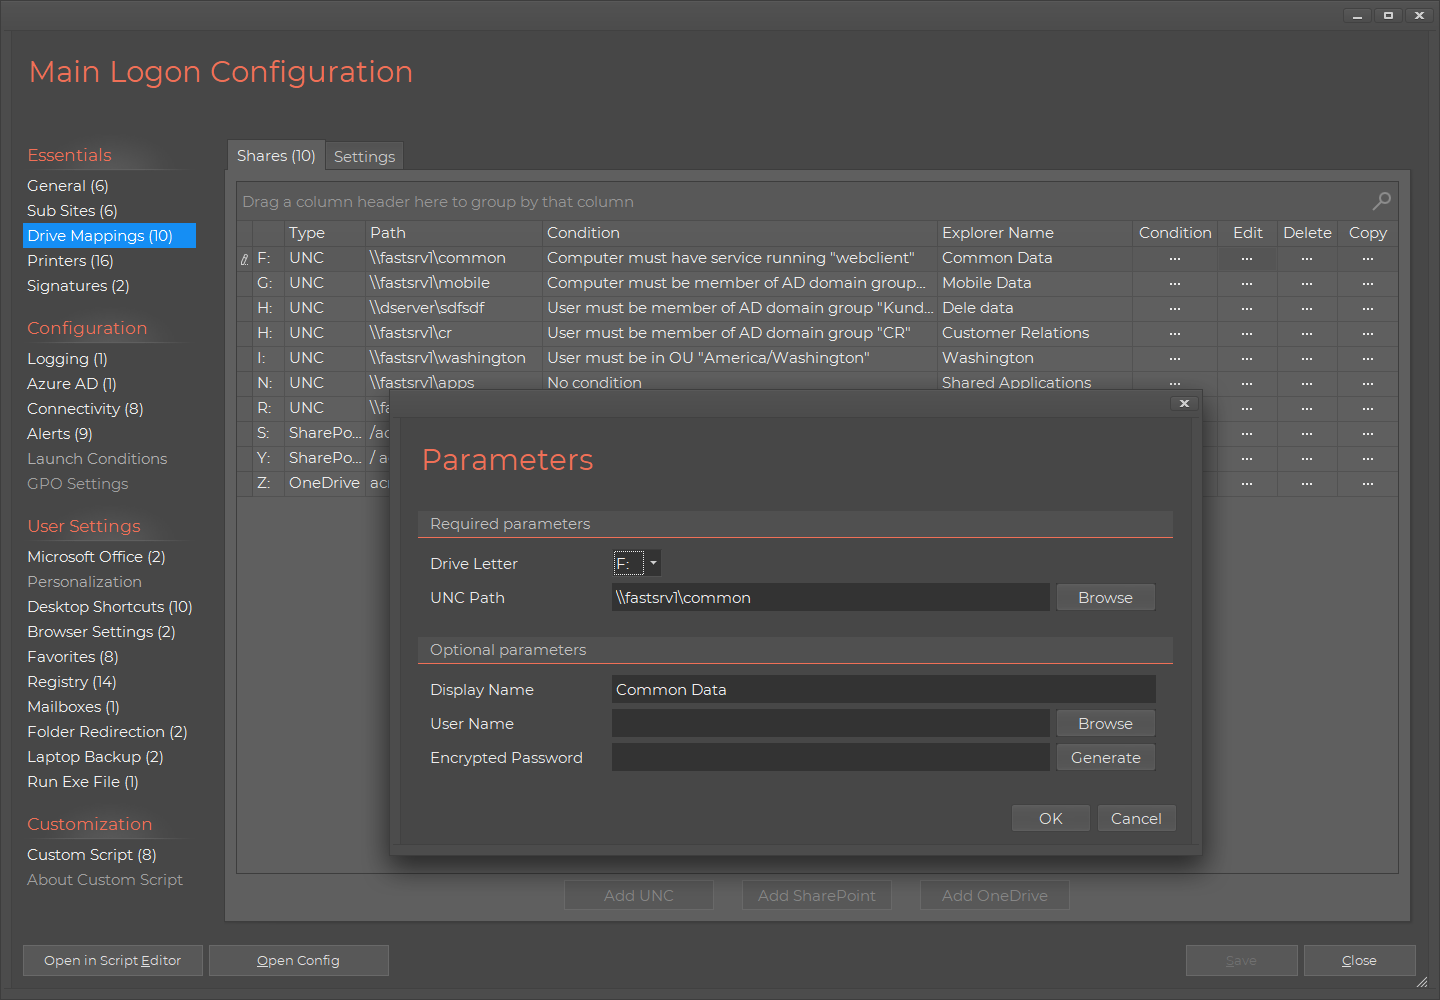
As you can see above, you only need to write a logon script yourself, if you find the builder insufficient for needs.
An example could be, if you want to show a menu for printer connections.
What is really clever about the Logon Script Builder is that under the hood, it simply builds a script that you can
"take over". If we open an existing logon script in the Home Screen, it could look like this:
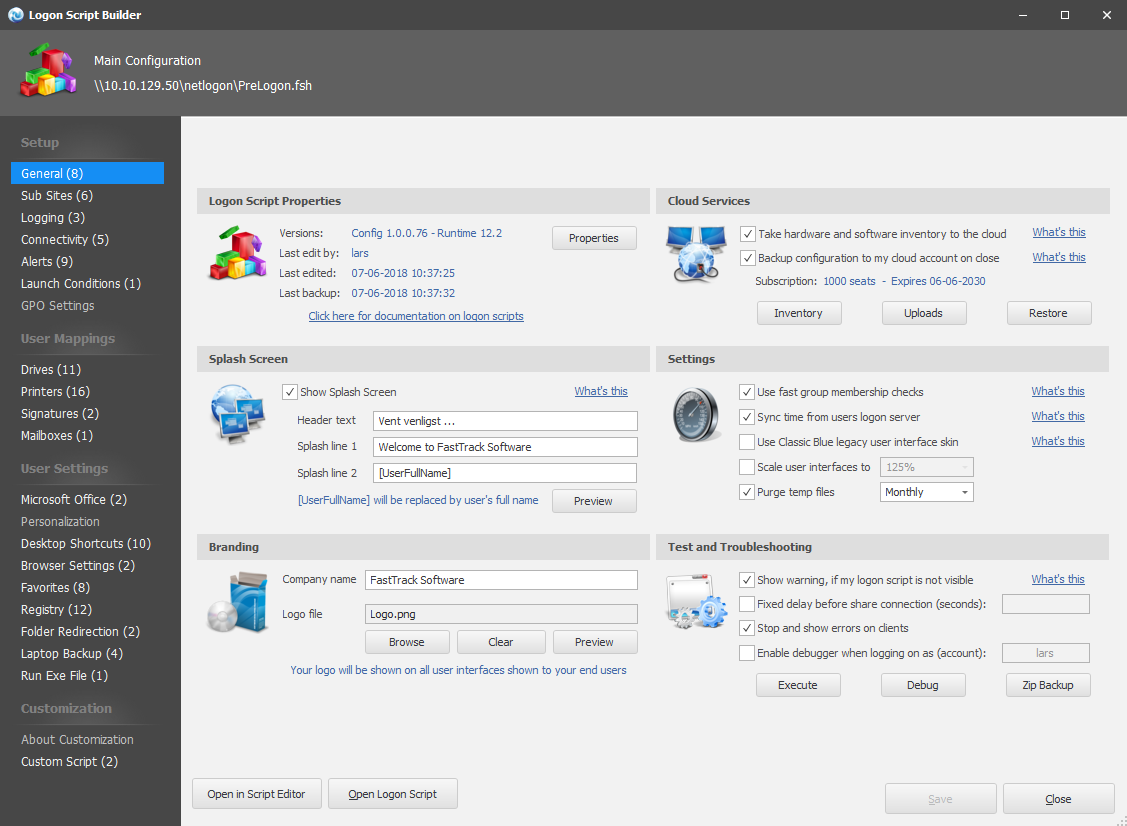
Notice the button at the bottom that lets you take over the script in the Script Editor. If you need to write you own
logon script in the Script Editor, you can do as much as you can in the Home Screen and then take it over in the Script Editor.
Simple logon script
Now let's go back to the complete basics of a FastTrack logon script and create
an extremely simple logon script from scratch that could actually work as a complete logon script for a small single office company,
just to get the basic understanding. The complete prelogon.fsh file (the main logon script file on netlogon) could look like this:
''==== SHOW
WELCOME SCREEN ====
Splash Welcome
to ACME Corporation,[UserFullName]
''====
CONNECT SHARES ====
ConnectShare J:,\\AcmeServer\CommonShare
ConnectShare [UserHomeDrive],[UserHomeDir]
If UserIsMemberOf
SalesStaff Then ConnectShare J:,\\AcmeServer\SalesShare
''====
CONNECT PRINTERS ====
ConnectPrinter \\AcmePrintServer\AcmePrt001
ConnectPrinter \\AcmePrintServer\AcmePrt002
''==== SET CLIENT TIME ====
SetTimeFromServer
With these few script lines we have:
- Displayed a nice welcome screen. Optionally, we could have provided a corporate logo as a third parameter.
- Connected a common share, the user's personal share and a common sales personnel share.
- Connected the two printers at the office.
- Synchronized the computers' time.
For most companies this is obviously not enough functionality for a logon script. In the next sections, we
will look at, how we can add more complex functionality.
Connection based on groups
If we look at a company that is slightly bigger, multiple locations will exist and we will need
more logic to determine what printers to connect. For example, if the company's office building
has multiple floors, printers must be connected at the correct floor. A logical way to determine
which printers to connect would be to put computers or users in groups based on their physical location.
As the users may roam around the floors and borrow other users' computers from time to time, we
will connect printers based on the computers' group memberships and shares based on users' memberships.
So we could expand our above logon script with something like this to connect more shares and
connect printers based on the computer's group memberships:
''=========
USER-BASED CONNECTIONS =========
If UserIsMemberOf Management Then
ConnectShare L:,\\AcmeGlobal\Management
If UserIsMemberOf SalesStaff Then
ConnectShare J:,\\AcmeGlobal\SalesShare
ConnectShare K:,\\AcmeGlobal\SalesExt
End If
''=========
MACHINE-BASED CONNECTIONS =========
If ComputerIsMemberOf HoustonPCs Then
ConnectPrinter \\AcmeSrvHouston\AcmePrt002
ConnectPrinter \\AcmeSrvHouston\AcmePrt008
ConnectPrinter \\AcmeSrvHouston\AcmePrt018
SetPrinterDefault \\AcmeSrvHouston\AcmePrt018
End If
If ComputerIsMemberOf SeattlePCs Then
ConnectPrinter \\AcmeSrvSeattle\AcmePrt019
ConnectPrinter \\AcmeSrvSeattle\AcmePrt021
SetPrinterDefault \\AcmeSrvSeattle\AcmePrt021
End If
If ComputerIsMemberOf LosAngelesPCs Then
ConnectPrinter \\AcmeSrvLosAngeles\AcmePrt024
ConnectPrinter \\AcmeSrvLosAngeles\AcmePrt026
ConnectPrinter \\AcmeSrvLosAngeles\AcmePrt027
SetPrinterDefault \\AcmeSrvLosAngeles\AcmePrt024
End If

|
For a practical example of connecting printers based on groups, please refer to
this case study, where a consultancy
company also creates a corporate Microsoft Outlook signature and installs standard applications
through a logon script.
|
A note on printer driver warnings
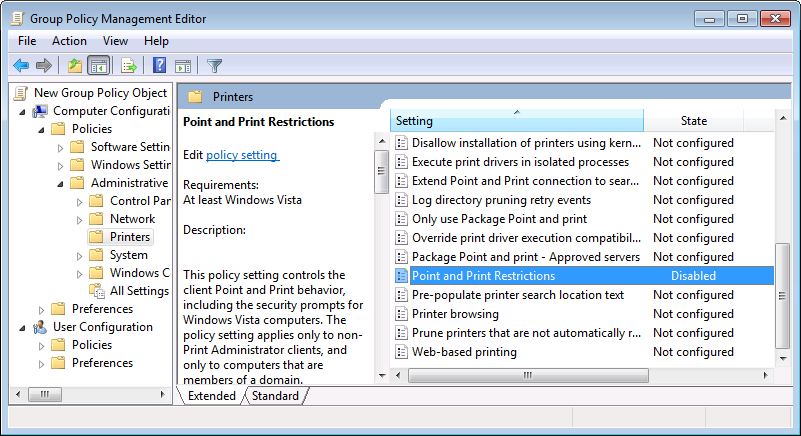
If you use the ConnectPrinter command to connect printers, you may see a security warning, when the driver is going to install.
This warning can be removed using Group Policies. Locate "Point and Print Restrictions" under
"Computer Configuration -> Policies -> Administrative Templates -> Printers"
and set to "Disabled", as shown below. Under Windows 2003, this key exists under
"User Configuration -> Policies -> Administrative Templates -> Control Panel -> Printers" instead.
Connection based on groups and included script files
If this company was much bigger, the above script will be extremely long, and thus not
very scalable. We use of Active Directory groups to connect certain shares for certain people,
but it is not too easy to get a clear picture of what is actually connected for whom. A more
scalable approach is to use the Active Directory group information to run scripts instead.
Consider this example:
Loop Group,[UserGroups]
IF FileExists GroupScripts\[Var
Group].fsh Then Include GroupScripts\[Var
Group].fsh
End Loop
These three lines will make life much easier for you. Create a directory called "GroupScripts".
For each user that logs in, it will execute all the scripts that have the same name as one of
his or her groups. Each file would then contain a "ConnectShare" script line, but you can do more,
like synchronizing document templates to the user's documents template folder, or whatever
you want done for users in a specific group.
If we want to connect printers based on computer groups, we could simply have two loops,
one for the user groups and one for the computer groups:
''=========
USER-BASED CONNECTIONS =========
Loop Group,[UserGroups]
If FileExists
UserScripts\[Var Group].fsh Then Include UserScripts\[Var Group].fsh
End Loop
''=========
MACHINE-BASED CONNECTIONS =========
Loop Group,[ComputerGroups]
If FileExists
ComputerScripts\[Var Group].fsh Then Include ComputerScripts\[Var Group].fsh
End Loop
And then the printer connection script lines would go into the per-machine group scripts.
You can also modify the above examples to do the same based on Organizational Units
using the "ComputerIsInOU" and "UserIsInOU" conditions.
Determining location
If we scale up one more time and look at a really big company, a new problem arises. Lots of people have
laptops and they roam on different locations. This would not be a problem for a single location company,
because the laptop would typically be docked at a fixed location, while at the office. But for larger companies,
laptop users may roam on different locations and only have a fixed location at the "home" location. And as the
world goes more and more mobile and most computers sold today are laptops and tablets, this "problem" is growing
all the time.
So while the Active Directory will tell us where a person or computer is
supposed to be, it does not help in this scenario.
There is only one thing that will tell us where a computer is at, when the logon script executes and that is the
IP address. So if a share is to be connected only when users are at a certain location (ip address scope),
the InIpScope condition or the IPAddressPart function can be used like this:
If InIpScope
172.18.0.0,172.18.255.255 Then ConnectPrinter
\\AcmeSrvLosAngeles\AcmePrt024
Microsoft RemoteApp and dialog boxes
When a logon script runs in the context of a RemoteApp, this is detected automatically by the scripting engine.
Any user interface that would normally be shown, is simply not, because it would stall the RemoteApp foreever.
Even if you expand the window that appears at startup, you cannot see and interact with the logon script in any way.
If you for example decide to use the option to prompt the user for Outlook Signature data, this pop-up
is simply ignored, as will all other user interfaces that requires interaction. In other words, you don't
need to handle RemoteApps in general in your logon script.
Factoring in Remote Desktop Service sessions, Citrix XenApp/XenDesktop sessions and virtual machines
A problem arises when looking at the IP address of the executing machine, because if the user
starts a session through Remote Desktop Services (RDS) or Citrix XenApp/XenDesktop, then we would
still want to do the same things, but based on the IP address of the client, not the server. There is a simple
way to fix this, simply replace the "InIpScope" condition with "InClientIpScope":
If InClientIpScope
172.18.0.0,172.18.255.255 Then ConnectPrinter
\\AcmeSrvLosAngeles\AcmePrt024
The difference between InIpScrope and InClientIpScope is that the first one simply looks
at the primary network adapter on the executing machine. The InClientIpScope condition
will try to resolve the "outer most" client. If the script is executing under an
ICA
or
RDP
session (remote session), the ip address of the client executing the session is used.
If it is not a remote session, the same IP address that InIpScope would have returned is used.
Therefore to factor in remote sessions, we can simply use InClientIpScope instead of
InIpScope.

|
This same logic to preferably get information on the executing remote client also exists for the ComputerName, IPAddress and IPAddressPart
functions. These have similar "outer most" counterparts: ClientName, ClientIP and ClientIPPart.
Please refer to this page (ICA version) or
this page (RDP version) for more information.
|
We could also choose not to handle remote sessions - and while we're at it, also not handle virtual machines.
Or it could be that parts of the logon script, we would not want to execute through remote sessions or on virtual machines,
such as software updates or backups. Anywhere in the logon script, we could insert this (or one of the conditions):
If RemoteSession Or VirtualMachine
Then Exit
If the session is a remote session (RDP or ICA) or the machine executing the session is a virtual machine
(Hyper-V, VMware or Xen hypervisor), the script is stopped at this point. The Exit command
could also be replaced by an inner script block that is ended with "End If", where for example
installations or backups would run. If only a specific hypervisor technology must be handled, the
condition HyperV, VMware or Xen can be used instead of the VirtualMachine condition.
Handling session reconnects
If a user closes a remote session and then later reconnects, this is normally not a problem. But if the user
has changed location in the meantime, the user might need another set of printers. To handle this problem,
a free utility called SmartConnect is available to fire a script on reconnection. With this script, you can
include the same script snippet you use in your logon script, or if you use Group Policy to connect printers,
you can use a script that will automatically reconnect the printers based on the new client name.
Refer to
this page for more information on SmartConnect.
Prompting the user for printers
Another approach to printer connection is to let the user handle it and aid the user in the process.
If we only want to fully automate share connections and not printer connections, we could put something
like this in prelogon.fsh (you can insert this example directly in the script editor by selecting
"Printer Prompt" in the "New Script" window):
''==== SHOW
MENU ====
SetMenuDefault [RegistryValue HKCU\Software\Acme Corp\CurrentPrinters]
Set Printers=[Menu Select
printers,Printer|1. Floor left,Printer|1. Floor right,Printer|2. Floor left,Printer|2.
Floor right,Printer|Reception]
''====
REMEMBER SELECTION ====
If Not VarIsEmpty Printers Then WriteRegistry HKCU\Software\Acme Corp\CurrentPrinters,[Var Printers]
''==== EXECUTE
CONNECTION ====
Switch [Var Printers]
Case 1. Floor left
ConnectPrinter \\AcmePrtSvr\AcmePrt022
ConnectPrinter \\AcmePrtSvr\AcmePrt024
Case 1. Floor right
ConnectPrinter \\AcmePrtSvr\AcmePrt031
ConnectPrinter \\AcmePrtSvr\AcmePrt033
Case 2. Floor left
ConnectPrinter \\AcmePrtSvr\AcmePrt004
ConnectPrinter \\AcmePrtSvr\AcmePrt058
Case 2. Floor right
ConnectPrinter \\AcmePrtSvr\AcmePrt011
ConnectPrinter \\AcmePrtSvr\AcmePrt015
Case Reception
ConnectPrinter \\AcmePrtSvr\AcmePrt001
End Switch
...then the user would see this at every logon:
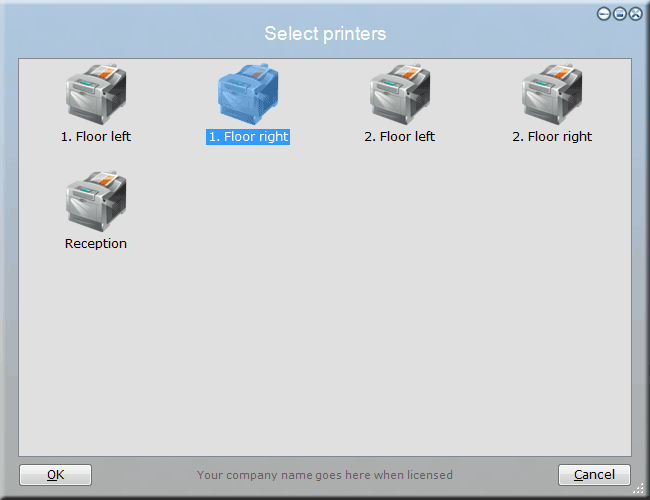
Observe how the selected choice is stored in the registry and is then fed to the
"SetMenuDefault" command, so the user could effectively just press return to keep
the current printers at logon. There are two versions of all menus, one that forces the user
to select and one that allows cancel. In case of cancel, the returned value is blank.
If the list was longer, it may be a better idea to use the ListMenu function instead of
the Menu function. To show forced input, the ListMenuForced function is used here:

Now while this is nice and simple, the user might find it a bit annoying to be asked
at every logon. So we could alternatively not ask them and place an icon on their desktop
that starts the menu on demand instead. If we instead placed the above script snippet in a new file called PrinterMenu.fsh
and placed that in the same directory as prelogon.fsh on the netlogon share, then we could
just place this line in the prelogon.fsh to install the desktop icon at logon:
CreateShortCut
[UserDesktopDir],Select Printers,[FastTrackPath]\PrinterMenu.fsh
If the user then deletes the desktop icon, then it's simply created again at next logon. You may be wondering
why the path to the script file is prefixed with the "FastTrackPath" function. We could have created a shortcut
to the netlogon location, but the FastTrackPath function will give us the location of the executing fsh.exe and
as FastTrack Logon has synchronized the needed netlogon files locally to preserve bandwidth, we might as well use the
local copy, located in the local folder pointed to by the "ClientDir" setting in FTLogon.ini.
As fsh.exe, prelogon.fsh and our PrinterMenu.fsh script are in the same directory on netlogon,
they will also be in the same directory in the client cache and thus the FastTrackPath function will give
us the directory of the local copy of the PrinterMenu.fsh file.
Further down this page there is an extended version of this script. Be warned though that that example
is very advanced and very hard to understand, if you are new to FastTrack.
SharePoint and OneDrive mapping
You can map SharePoint folders and/or OneDrive for Business as drive letters, just as you can with UNC shares.
Please refer to
this page for information on OneDrive for Business
and
this page for SharePoint folder mapping.
IP Printers
You can connect IP printers as well as print server printers. If you click the ConnectIPPrinter command in the Engine Browser tree to pop-up the Script Builder, you will see this:
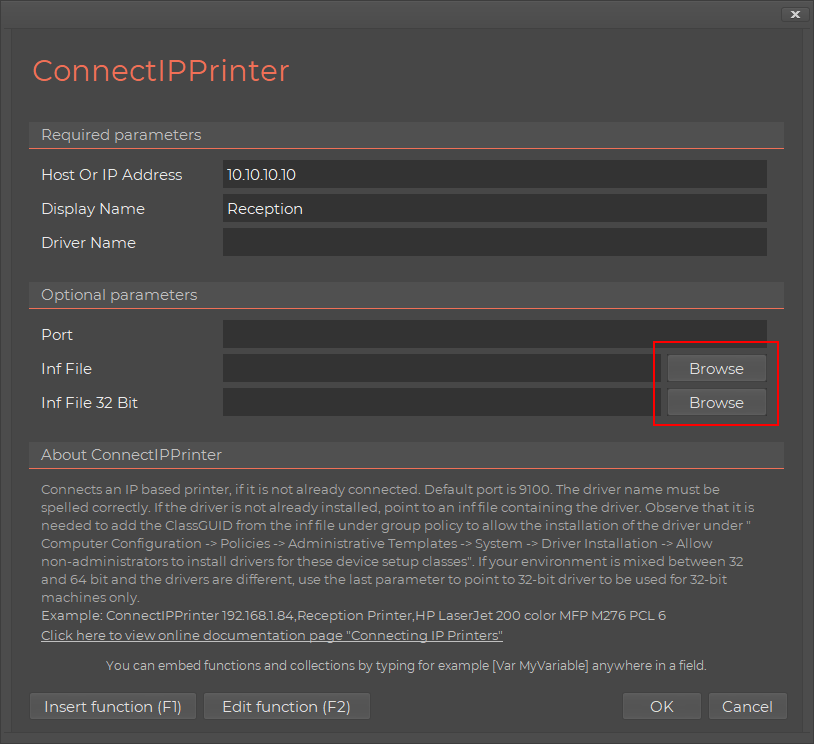
Basically you just tell the host name or IP address of the printer and then you need to say, which print driver to use, just as you would have to
on the server-side for print servers. If the printer driver is not a standard Windows driver, you need to put the driver files on a network share and point
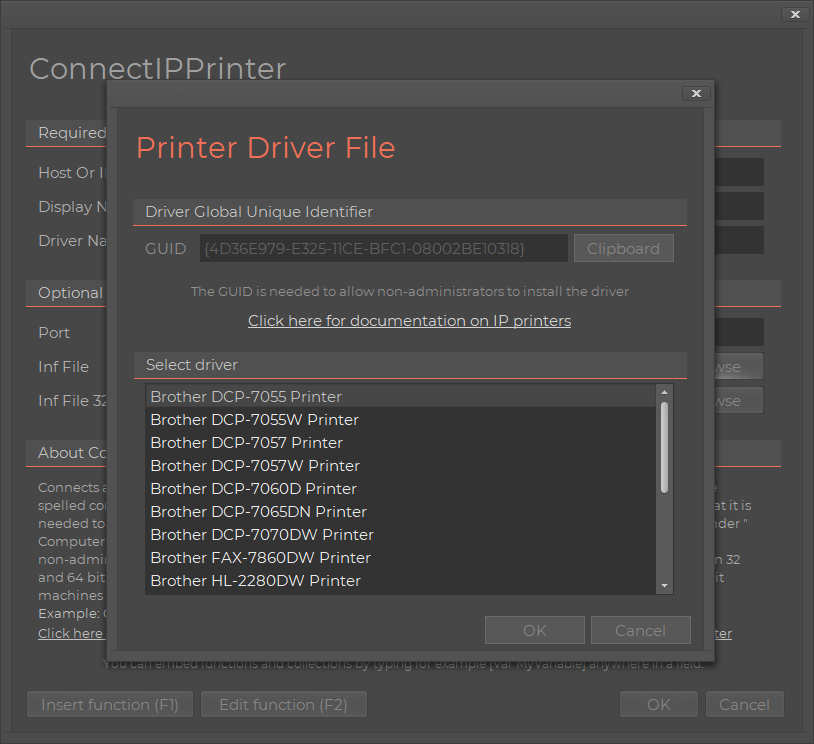
to it. To avoid typing the driver name wrong or point to a wrong path, it is highly recommended to use the "Browse" button shown above, because this
will pop-up a pick list of driver names in the driver inf file and fill in all information automatically, as shown below.
IP printers has a separate documentation page - please refer to
this page for more information,
if you need to use IP Printers.
SkyBox
If you don't have a management system, you don't know what is installed on which computers, who has what computer
or what hardware is in which computer. FastTrack comes with a cloud-based inventory system
that has no setup steps and is free for licensed customers. Simply issue this one command in your logon script:
With this one command in your logon script, you will have full hardware and software inventory of your computers.
SkyBox has no additional cost; it just requires your clients to be licensed and within
maintenance period. Refer to
this page for more
information on SkyBox.
Logon script summary
The rest of this article contains very advanced logon script functionality that is relevant only to very
large companies. If you intend to use some of the material presented further down this page, it is still
highly recommended to start by setting up a simpler logon script, based on the above information, to
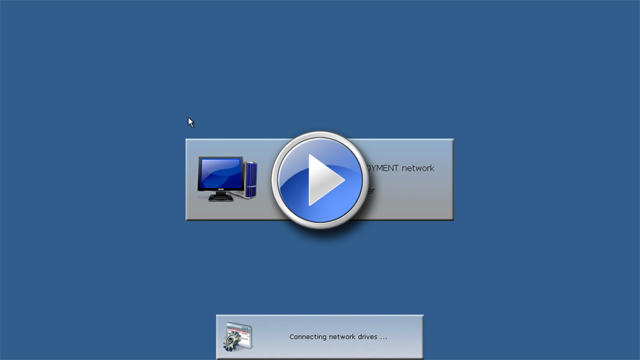
be sure that the basic setup is in order and working. In either case, the below video is highly recommended
as a sum-up of the material above. Press play below to watch Senior Technical Writer
Steve Dodson from Binary Research International walk you through the material above.
Advanced location determination - using IP tables
Let's go back to one of the previous sections, where we determined location based on IP address.
We will be using the ClientIP and ClientIPPart functions instead of IPAddress and IPAddressPart under
the assumption that remote sessions exist. If you are using a version of FastTrack
older than version 8, these do not exist and the IPAddress and IPAddressPart functions must be used instead.
We will go through an advanced version of that, where we use information
in an xml-based ip table file instead of using hard-coded ip addresses in the scripts,
which is a better solution for companies with lots of IP scopes.
A common setup is to have the same share with the same common data and
maybe some programs replicated to a server on each location. To find out which one is closest, you can of course
write more if-statements, but if you have more than a couple of locations, this is not a smart solution. Instead,
create an XML file and put it in your logon script folder with the information you need, like this:
<?xml version="1.0"?>
<Acme>
<Locations>
<Scope_172.18 Name="Houston" Server="HoustonServer" />
<Scope_172.19 Name="Dallas" Server="DallasServer" />
<Scope_172.20 Name="Los Angeles" Server="LAServer" />
<Scope_172.21 Name="San Fransisco" Server="SFServer" />
<Scope_172.22 Name="Seattle" Server="SeattleServer" />
</Locations>
</Acme>
In the logon script you can use this information to determine the location. So the first few lines
of your logon script could look something like this:
''====
DETERMINE LOCATION ====
SetVar LocationName,[XMLAttribute
Locations.xml,Acme/Locations/Scope_[ClientIPPart
2],Name]
SetVar ServerName,[XMLAttribute
Locations.xml,Acme/Locations/Scope_[ClientIPPart
2],Server]
''==== SHOW
WELCOME SCREEN ====
Splash Welcome
to ACME [Var LocationName],[UserFullName]
''====
CONNECT THE LOCAL SHARE ====
ConnectShare O:,\\[var ServerName]\Data
''==== WRITE
LOCATION BASED INFORMATION, SO OTHER APPLICATIONS CAN GET IT ====
WriteRegistry HKCU\Software\Acme\Location\Name,[Var
LocationName]
WriteRegistry HKCU\Software\Acme\Location\Server,[Var
ServerName]
This will display for instance "Welcome to ACME Los Angeles" and will then connect the Los Angeles server share, if that's where the user is.
You could extend the attributes with more information about the location in the XML file as needed, with just one extra script line being required to get each.
Automatic location based printer connection
So we have established where the user is. But people at opposite ends of a fairly large building
are not going to want to use the same printers, so we need a little help from the user, but we will only trouble
them once per location or if they want to change printers within the location.
The best way to do this requires more complex scripting. However, this is probably the most complex script you will ever need.
Firstly, we need to create a repository that contains printer information and for this we will simply expand the
XML file like as follows (the last three locations would, of course, also have printers):
<?xml version="1.0"?>
<Acme>
<Locations>
<Scope_172.18 Name="Houston" Server="HoustonServer" />
<Scope_172.19 Name="Dallas" Server="DallasServer" />
<Scope_172.20 Name="Los Angeles" Server="LAServer" />
<Scope_172.21 Name="San Fransisco" Server="SFServer" />
<Scope_172.22 Name="Seattle" Server="SeattleServer" />
</Locations>
<Printers>
<Houston>
<PrinterSite Name="Houston Building 1. Floor" Printers="\\HoustonServer\Printer01,\\HoustonServer\Printer02"/>
<PrinterSite Name="Houston Building 2. Floor" Printers="\\HoustonServer\Printer03,\\HoustonServer\Printer04"/>
</Houston>
<Dallas>
<PrinterSite Name="Dallas Building Reception" Printers="\\DallasServer\Printer01,\\DallasServer\Printer02"/>
<PrinterSite Name="Dallas Building 1. Floor" Printers="\\DallasServer\Printer03,\\DallasServer\Printer04"/>
</Dallas>
</Printers>
</Acme>
But be careful! A malformed XML file will cause runtime errors, so be careful when modifying the file.
This simplest way to test if it is malformed or not is simply to logoff and logon again on a workstation
and check that is still shows the location in the splash.
We have now defined sub-locations for each site. We now want to accomplish this:
- The first time users logs on at each location, they should be asked which printers they want.
- The user must have a shortcut in order to get the menu again and to re-select printers.
- If we change the printers in the list, we want such changes to be enforced automatically on all clients.
This is achieved in three steps; one for each of the above. The first step is to detect when a user enters
a location for the first time. If they have logged in on that location before, the changes need to be enforced.
So, in the logon script, we do this:
If [RegistryValue
HKCU\Software\Acme\Sites\[Var LocationName]\PrinterSite]=[Blank]
Then
RemoveSplash
Include PrinterConnect.fsh
Else
Include PrinterReconnect.fsh
End If
If UserOnce PrinterShortcut
Then
CreateShortcut "[UserStartMenuDir]","Select
Printers",[FastTrackPath]\PrinterConnect.fsh
End If
The first time the user logs on to the site, PrinterConnect.fsh is executed because the registry key
is unique for each location. A menu of choices will be displayed. For every user on the network
we create a shortcut to reconnect the printers that point to PrinterConnect.fsh, which will contain
these four script lines:
Set LocationName = [XMLAttribute Locations.xml,Acme/Locations/Scope_[ClientIPPart 2],Name]
Set SelectedPrinters
= [ListMenuForced
Select
location,[XMLMultiAttributes Locations.xml,Acme/Printers/[var LocationName]/PrinterSite,Name]]
WriteRegistry HKCU\Software\Acme\Sites\[Var
LocationName]\PrinterSite,[Var
SelectedPrinters]
Include Reconnect.fsh
Observe that we read the locations off the registry. This is because you don't have the variable if
you start this script from a shortcut. The last part is the actual connection of printers. It
is the same script that reconnects and connects. It is a bit tricky to get the actual information
we need (partly from the registry and partly from our xml file), so the script is a little complex:
SetVar LocationName,[XMLAttribute
Locations.xml,Acme/Locations/Scope_[ClientIPPart
2],Name]
SetVar PrinterSet,"[RegistryValue
HKCU\Software\Acme\Sites\[Var LocationName]\PrinterSite]"
SetVar XmlPath,Acme/Printers/[Var LocationName]/PrinterSite
SetVar PrinterList,"[XMLPairAttribute
Locations.xml,[Var XmlPath],Name,[Var
PrinterSet],Printers]"
SetVar DefaultPrinter,Yes
Loop Printer,[Split [Var
PrinterList]]
ConnectPrinter [Var
Printer]
IF [Var DefaultPrinter]=Yes Then
SetPrinterDefault [Var Printer]
SetVar DefaultPrinter,No
End Loop
DisconnectNonConnectedPrinters
The first printer in the list will be connected as the default printer.
Running ConnectPrinter does nothing if the printer is already connected, so we don't need to test if it
is already connected. The last line will delete all network printers that have not been through the
ConnectPrinter command in this script context, removing all printers from other sites or previous XML settings.
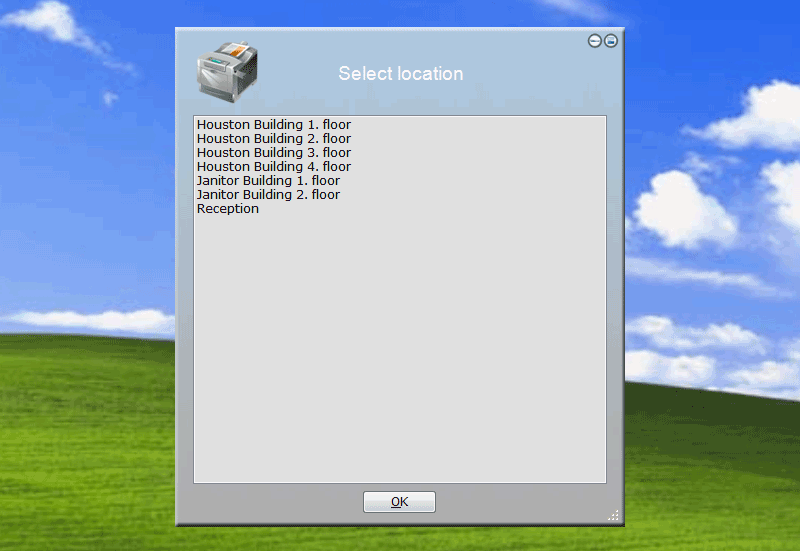
If we put a bit more data in the xml file, the user will see the following when prompted for printer location:
Advanced logon script
Putting it all together, a complete Acme Corporation logon script could now look something like the below.
Observe that the RemoteSession condition and ClientIPPart functions require version 8.
''==== CHECK REMOTE SESSIONS ====
If RemoteSession And Not UserIsMemberOf
AcmeRemoteUsers Then
ShowMessage "You are not allowed to logon through remote sessions,
please contact HelpDesk","Error"
Logoff
End If
''==== DETERMINE LOCATION ====
SetVar LocationName,[XMLAttribute Locations.xml,Acme/Locations/Scope_[ClientIPPart 2],Name]
SetVar ServerName,[XMLAttribute Locations.xml,Acme/Locations/Scope_[ClientIPPart 2],Server]
''==== SHOW WELCOME SCREEN ====
Splash Welcome to ACME [Var LocationName],[UserFullName]
''==== CONNECT THE LOCAL SHARE ====
ConnectShare O:,\\[Var ServerName]\Data
''==== WRITE LOCATION BASED INFORMATION, SO OTHER APPLICATIONS CAN GET IT
====
WriteRegistry
HKCU\Software\Acme\Location\Name,[var LocationName]
WriteRegistry
HKCU\Software\Acme\Location\Server,[var ServerName]
''==== CONNECT SHARES ====
ConnectShare J:,\\AcmeServer\CommonShare
ConnectShare O:,\\[Var ServerName]\Data
ConnectShare [UserHomeDrive],[UserHomeDir]
''==== RUN GROUP SCRIPTS ====
Loop Group,[UserGroups]
IF FileExists GroupScripts\[Var Group].fsh Then Include GroupScripts\[Var Group].fsh
End Loop
''==== SHOW LOW DISK ERROR ====
IF [FreeDiskSpace]<5 Then ShowMessage "Please contact HelpDesk, you are
running out of disk space","Warning"
''==== ENSURE MINIMUM SCREEN RES ====
IF [ScreenWidth]<1024 Then SetScreenRes 1024,768
''==== BACKUP USERDATA ON PORTABLES ====
IF
UserOnceAWeek Then
IF Portable Then
Splash Backing up documents,
please wait...
SyncDir [UserDocumentsDir],[UserHomeDir]\DocumentsBackup\
[Computername]
End If
End If
''==== SYNC COMMON ACME ICONS ====
SyncDir O:\CommonIcons,[UserStartMenuDir]\Acme
''==== SET CLIENT TIME ====
SetTimeFromServer
''==== RUN USER SETTINGS ONCE PER APPLICATION PER USER ====
Loop Application,[ApplicationsInstalled]
IF FileExists UserDataScript\[Var Application].fsh Then
IF UserSettingsOnce [Var Application] Then Include UserDataScript\[Var Application].fsh
End If
End Loop
''==== CONNECT PRINTERS ====
If [RegistryValue HKCU\Software\Acme\Sites\[Var LocationName]\PrinterSite]=[Blank] Then
RemoveSplash
Include PrinterConnect.fsh
Else
Include PrinterReconnect.fsh
End If
If UserOnce PrinterShortcut Then
CreateShortcut [UserStartMenuDir],"Select Printers",[FastTrackPath]\PrinterConnect.fsh
End If
''==== UPLOAD INVENTORY ====
UploadInventory
If you disregard the blank lines and the comments, you will see that there are very few actual script lines, but we have:
- Ensured that no one unauthorized user logs on through Remote Desktop Services.
- Determined where the user is.
- Shown a nice welcome splash screen.
- Connected a common share, the user's home share and a location-based share.
- Written registry information for other applications about the current location.
- For every group the user is a member of, we looked for a script file and include it.
- Asked the user to contact the HelpDesk if he is running out of disk space.
- Ensured that no one runs at a resolution lower than 1024x768.
- Backed up the user's personal folder on portable computers once a week.
- Once a week, cleaned up temp.
- Once a month, cleaned up temporary internet file folders.
- Synchronized the company's common icons to the user's profile.
- Applied all needed user settings based on what the user has installed.
- Synchronized the computers' time.
- Applied user settings once per user for every scripted application.
- Automatically handled connection of the user's printers.
- Uploaded inventory to the cloud-based SkyBox