Methods
When we need to install a piece of software unattended, the first thing we need to do is to determine the
method. If you have a management system, such as SCCM, you would probably install your software through that system,
but for all other scenarios, we need to establish a way to get the installation executed.
The first thing you need to do is to find out what method works best for you in your environment.
To get a quick overview of methods, consider the table below.
FastTrack's Software Deployment wizard
FastTrack Automation Studio comes with a wizard that lets you build a client once and then you can use point'n'click
to deploy software, once in place. The methodology is that the "client" is really just a Scheduled Task wrapped in an
MSI file that runs as a domain administrator and will install software based on a central configuration script.
This is explained in detail
on this page and is the recommended way of doing it,
if you do not have another management system, such as SCCM, because it gets the job done the fastest and simplest without
having any of the problems in the table above.
Logon Scripts
This was a very common way of deploying software before UAC came along. If you have UAC disabled, this is still an
option, but this sounds like a bad way to go, because eventually you would have to enable UAC and you can then not change executing user.
In this scenario (if you use FastTrack Automation Studio), you would go into the Script Editor and add script
lines to handle this on your FastTrack Logon Script.
When the user is logging on, part of the logon script checks, if one or more applications need to be installed.
If so, the executing user is changed to an administrative user (a domain admin account) and one or more
applications are installed. Before changing the executing user, we can display a splash screen (the Splash
command) or similar to show the user what is going on. This is the quickest method to set up and test, but
the drawback is that it does not work with UAC enabled (explained further down) and should therefore not be the
preferred solution anymore. Tefer to the
logon scripts page for more
information on logon scripts.
Startup Script
A startup script works in much the same way as a logon script. The drawback is that it only
executes when a computer is started and you cannot see what is going on. The user can see that "something" is going
on, as the user will see that a "startup script" is executing. The advantage is that it works with UAC,
because the script is running under the local system account, which is not under UAC control. Please refer
to the
Startup scripts page for more information on startup
scripts and the
UAC page for more information on UAC (User Account Control).
Using a Startup Script can be a quick way to install something, because you can create a small script in
the Script Editor and compile to exe. But eventually, this script would because big and hard to maintain,
so the Deployment Wizard would be a better way to go in the longer run.
GPO MSI
The last method is to install applications through Group Policies. You can install any MSI file this way.
If your installer is not in msi format, you can use FastTrack Automation Studio to repackage anything into an
msi file, as explained
here. When a GPO installation happens, it basically
works the same way as a startup script. The problem with this approach is that it is only useful in situations
where all machines must have an application installed. You can only install through GPO to a container or an
OU (Organizational Unit) and any one computer can only be located in one container or OU.
With the other three methods, you execute your own custom script, where you can control installations by
computer groups. The biggest problem with Group Policy deployment though, is the lack of transparency.
You have no clue, what is going on. If you only have a few applications to deploy, Group Policy Software
Deployment is great, because you already have everything in place. But if you need to deploy more than
a few pieced of software, you quickly pay the price of lack of transparency of what's going on on your
clients.
Feature table explained
1) Quick to set up and test
Quick is of course a relative term. None of these solutions take a long time to set up, but if you have
logon scripts in place already, it is the quickest to set up and test. The main reason is that logon scripts are the only method, whereby
the scripts start as the current user, which means that you can
enable debug mode (see
here) or insert an outer condition like
"If [UserName]=STV Then" (assuming
you are the user STV) to have the installation part of the
script only execute, when
you log on during testing.
2) Flexible
Flexible is also a relative term. By flexible we mean that the approach is to have one script block
that does all the checks and can execute a number of installations. We can edit this script block without any
deployment, when we change installation logic. With GPO installations, there is a setup step for each
application, where the other three methods use one script block for everything.
3) Easy to debug
Effectively, only logon scripts can be debugged in a classic sense. This is because logon scripts are the
only ones that start as the user logging on. With the other approaches you would need to insert some
logging statements in the scripts to debug, like AppendFile or LogEvent.
4) Controllable GUI
As logon scripts starts as the current user, you can display for example a splash screen (the Splash command)
while an installation is executing. With the other three methods, users will see either no GUI or a standard system message.
5) Controllable execution time
Only the scheduled task approach will allow you to control when installations happen during the day. With the
Logon Script and Startup Script approaches, you can write your own logic to make sure that only a certain number
of computers execute an installation at a time, but you have no control over when it happens.
6) Controllable through AD groups
You can use the ComputerIsMemberOf condition in your scripts to decide, if an application must be installed or
not. This is not possible with GPO.
7) User cannot lock files
When the user is logged on at installation time, there is a greater chance that system files may be locked.
This should not be the decisive factor, but you should be aware that it may have a minor effect on the
success rate and the likelihood of a required reboot for the application to work.
8) User does not have to wait
The drawback of installing before a user is logged on is that the user would have to wait, while the installations
execute. However, it should not be a practical problem, as installations rarely happen, but you should still factor it
into your planning.
9) Works with UAC
Because a logon script would have to change executing user in order to install software, it will not work with UAC. This is
because the system needs a confirmation that system changes are allowed to happen. But the user logging on is not the user that
is installing the software and the administrative user will be logged on with a different token and the elevation
can therefore not be confirmed. Refer to the
UAC page for more information on UAC (User Account Control).
Example
Let us use a logon script as an example. If you were to use a different method, you could use the same script block, but
as you do not need to change the executing user, you can insert the second script below, where the RunScript command is.
For a logon script, we could insert a snippet like this:
If ComputerIsMemberOf
TeamViewerComputers Then
If Not InstalledBuild TeamViewer,1 Then
RunScript \\AcmeServer\Installers$\TeamViewer\Install.fsh,AcmeDom\AcmeInstall,DCRWXKMsTt0QEo/xBdqOsw==
End If
End If
This will fire the script \\AcmeServer\Installers$\TeamViewer\Install.fsh in case TeamViewer
is not installed and only if the computer is member of the Active Directory group called
"TeamViewerComputers". The actual installation script Install.fsh could look like this:
Run TeamViewer_.Exe,/S
KillProcess TeamViewer.Exe
RegisterInstallation TeamViewer,7.0,1
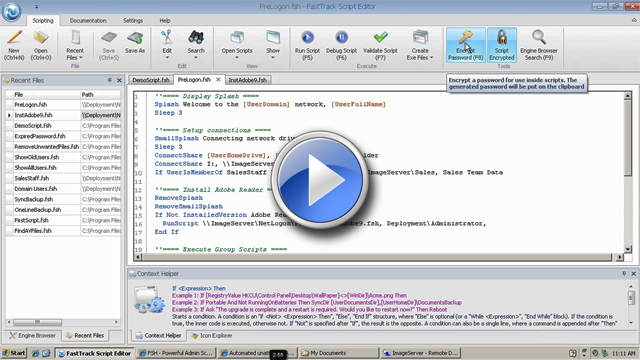
You must use credentials of a dedicated administrative user in your domain for the RunScript command.
You can encrypt the password by pressing F8 in the script editor.
This is basically all we need to install software unattended. We could create a number
of these blocks in our logon script for each application that we need to handle,
as shown in
this customer example.
If an older version of TeamViewer might be installed, you can issue the CloseApplication and BlockExecution
commands to make sure TeamViewer is not used during the installation. Refer to the
TeamViewer page for more information on TeamViewer packages.
RegisterInstallation
Let's rewind a little and look at the details of RegisterInstallation.
In the previous example, we used the command RegisterInstallation and the condition
InstalledBuild to keep track of installation status. We are doing it this way to avoid having to
rely on the Windows software installation list, because vendors may change the listed name from time
to time.
Before we continue explaining the details of RegisterInstallation, there is another important argument
for using it in general, regardless what method you chose. In many cases, we cannot just install an application
on a user's pc and hope that they like the vanilla installation. If we want to truly service our users, we would often need
to apply some default user specific settings, which means setting registry keys in each user's registry hive
(HKEY_CURRENT_USER) and we might also need to do other things that are related to each user's profile. This could be for example
where the application saves by default (local drive versus network drive), default behavior or copying files into the
profile such as template office files into the user's documents dir. The problem with that is that there is not a 1:1 relationship
between computers and users and we therefore need to be able to know at logon time, what is installed and what is not and whether
or not user settings have already been applied for the current user.
RegisterInstallation allows you to keep your own registry on each computer that you can easily query.
Let's go back to creating an installation script. Typically these are Windows Installer (MSI) packages that you
can install by using the InstallMSI command, but it could also be an internal application, where you just
need to copy some files and create a user icon. We will go through such a case where we:
- Create an installation script for a simple internal Windows based phonebook.
- Deploy it from the logon script to everyone.
- Apply default user settings.
The application itself is just a portion of files, so the script simply looks like this:
SyncDir Bin,[ProgramFilesDir]\Acme\Phonebook
CreateShortcut [ProgramsDir],Acme Phonebook,[ProgramFilesDir]\Acme\Phonebook\Phonebook.exe
RegisterInstallation Acme Phonebook,1,1
RegisterInstallation and UnregisterInstallations are the key elements to understand. They store the information that
an application is installed for the purpose of later querying from scripts.
Now let's deploy the application through the logon script. Since everyone needs this application, we can simply put a few lines into the logon script:
If Not
InstalledBuild Acme Phonebook,1 Then
RunScript \\AcmeServer\Installers$\Phonebook\Install.fsh,
AcmeDom\AcmeInstall,"<encryptedpassword>"
End If
As we know that the script will issue a RegisterInstallation command on success, we can simply ask at logon time, if the
computer has the installation or not. We could also add more logic to the condition like for example checking, if the
computer is in a specific Active Directory group.
We use the "InstalledBuild" instead of the simpler "Installed" condition in the example above. This is because in case there is a later correction
or expansion to the script, the build can just be changed and this would trigger a re-install on all computers, because the build number
installed is different than the build number in the condition and the script. The third parameter for RegisterInstallation is a build number that you control.
Let's apply some user settings for the phonebook. Let's say that our Windows Phonebook application lets the user add comments and pictures to people in the phonebook and we want to store
these on the user's personal share. Our application will read this location off the registry in the HKEY_CURRENT_USER\Software\Acme\Phonebook\FilePath key and default to
the documents folder, in case the registry key does not exist.
If we assume the logon script maps O: as the personal share, we can run this
snippet as part of our logon script:
If
UserSettingsOnceABuild Acme Phonebook Then
MakeDir O:\PhonebookData
WriteRegistry HKCU\Software\Acme\Phonebook\FilePath,O:\PhonebookData
End If
If 10 users over time log on to a specific computer that has the phonebook, then this condition will run
10 times through the logon script on this computer. And every time we change the script build,
the settings are applied again once per user.
If you want to do the same for applications that are not based on FastTrack scripts, you can use the UserSettingsProgramOnce for a program
that is listed in the programs list in the control panel to get the same "Run Once Per User" functionality like this:
If
UserSettingsProgramOnce Adobe Reader Then Include Settings\ReaderSettings.fsh
This would find "Acrobat Reader 9" in case of Acrobat Reader 9 and include a file called ReaderSettings.fsh once per
user per computer. If you later upgrade Acrobat Reader, the Once mechanism will run again when the text changes in the programs list.
You can find the RegisterInstallation command and related features under "Installations - Internal" in the Engine Browser tree in the script editor.
Under "Installations - Windows" in the script editor's "Engine Browser" tree, you can find the same functionality based on the Windows programs list.
It might seem like a good idea to use this instead, but then you have to understand the pros and cons. The main reason why FastTrack Scripting
Host keeps its own list of installed software based on the RegisterInstallation and UnregisterInstallation commands is simply that the Windows
installation list is unreliable, because software vendors tend to change the listed names from version to version. On the other hand, if you need
to set user settings for installations that are not scripted with FastTrack, this is the best alternative.
For an example of installing applications based on the Windows installation list, please refer to
this case study.
Common install scripts
Most installers use MSI (Windows Installer), which allows you to run the installation itself quietly through the InstallMSI command. But you can install anything, as long
as you know the unattended switches for the setup program. The only criteria we have for the installer is that it can run without user intervention and preferably
also without any GUI. If you look hard enough, you will learn that any installer can actually run quietly or silently with the right switches.
If you run into an installer that you think that you cannot run without user intervention, you should search the internet. There
is always a hidden switch. You must find this instead of being tempted to use one of the snapshot-based re-packagers that are available.
Repackaging is a dirty way of solving the problem, because it requires a common starting point. Let's say an application installer sets 100
registry keys and on the snapshot machine, it captures 98, meaning two are not in the new package. This is probably because those
two are almost always set, but if they are missing on a few of the machines you deploy the package to, the installation is not
complete. And a new version of Windows might break your scripts this way, because maybe these two keys are no longer set by default.
Good examples are
TeamViewer and
Malwarebytes,
where the switches can be found by doing a little detective work with Google.
Another classic problem is when the real installation files are wrapped in a single exe file, which is the case for Adobe Reader for example.
Let's create an install script for Acrobat Reader 9.0.
Run the setup exe file and observe that it starts by unpacking the actual installation files. When the installation
prompts for start, you need to locate the real installation files. In this case they will be located under
"Local Settings\Application Data\Adobe\Reader 9.0\Setup Files" in your profile. Copy these files and close the installer again,
which removes the installation files again. In your copy of the files, you can see, that the "Reader9" directory is the actual installer
and that it is in fact MSI. So scripting Acrobat Reader is now no different than all other MSI packages such as Microsoft Office.
Now that we have the actual installer files, let's wrap them in a script that can both install and uninstall.
We will assume that you copied the "Reader9" files to a subdirectory called "Bin".
If you want an uninstall script also, it is up to you, whether you want to use the same script for installation and uninstallation or you want to
use two separate scripts. If you use one script, you can use a command-line parameter to
control which one is actually executed, as shown below. You can use the /p switch to pass a command-line
parameter to the script, which is extracted with the CmdParam function. So in this case, specifying "/p action=uninstall"
will run an uninstallation and anything else will run the installer.
If [CmdParam Action]=Uninstall Then
UninstallMSI Bin\AcroRead.MSI
UnregisterInstallation Acrobat Reader
Else
InstallMSI Bin\AcroRead.MSI
RegisterInstallation Acrobat
Reader,9.0,1
End If
As in the first example, you might deploy it to everyone from your logon script and apply some default settings. In the
case of Acrobat Reader, the language of the GUI is a per-user registry key, which you could set from your logon script too.
You might do some more work with it like deleting the desktop shortcuts and such, but this can be used as a generic
template for MSI packages, like Microsoft Office and all other Microsoft products.
Interacting with the user
If you are deploying while a user might be logged on and even using an older version of the application, you can interact with the user.
Consider this expanded version:
CloseApplication AcroRd32.exe,Acrobat Reader
DisableShutdown
BlockExecution AcroRd32.exe
If [CmdParam Action]=Uninstall Then
Progress 0,Please wait while
uninstalling Acrobat Reader
ProgressTo 100,300
UninstallMSI Bin\AcroRead.MSI
UnregisterInstallation Acrobat Reader
RemoveProgress
WaitForAcceptance 30,The uninstallation is complete.
Else
Progress 0,Please wait while
installing Acrobat Reader
ProgressTo 100,300
InstallMSI Bin\AcroRead.MSI
RegisterInstallation Acrobat Reader,9.0,1
RemoveProgress
WaitForAcceptance 30,The installation is complete.
End If
The CloseApplication command ensures that the application is closed before proceeding
and the BlockExecution command will ensure that the user cannot start the application
at all, while the installation is in progress. A nice progress window is shown while
the installation is executing. For more information on the visual components, please
visit the
Graphical User Interfaces page. If the
installation requires a restart, consider using the WaitForAcceptance for gracefully
notifying the user of the restart and then use RebootForced in the next line.
The DisableShutdown command makes sure that the user does not shutdown, restart,
hibernate or puts the computer into sleep mode, while the installation is running.
Installations summary
If you are uncertain about the mechanisms discussed in the previous sections, consider watching the video below before reading on.
Senior Technical Writer Steve Dodson from Binary Research International walks you through installing a Windows
Installer (MSI) package through the logon script.
Installations without a management system
Common applications can be installed with just one line in your logon script as shown in the previous examples.
To handle installations for a subset of computers, it is recommended to do this based on Active Directory computer groups.
If, for some reason, you do not like this approach, you could create an XML file to handle this logic.
The XML file could look like this:
<?xml version="1.0"?>
<Acme>
<Applications>
<AcrobatReader Name="Acrobat Reader" InstallPath="\\AcmeServer\Install$\AcrobatReader\Install.fsh">
<ACMEPC0054 Install="Yes"/>
<ACMEPC0134 Install="Yes"/>
<ACMEPC0334 Install="Yes"/>
</AcrobatReader>
<Office Name="Microsoft Office" InstallPath="\\AcmeServer\Install$\Office\Install.fsh">
<ACMEPC0111 Install="Yes"/>
<ACMEPC0855 Install="Yes"/>
</Office>
</Applications>
</Acme>
Then in the logon script, we can write just a few lines to handle it:
Loop Application,[XMLSubNodes
Applications.xml,Acme/Applications]
If [XMLAttribute Applications.xml,Acme/Applications/[var
Application]/[ComputerName],Install]=Yes Then
SetVar Name,[XMLAttribute
Applications.xml,Acme/Applications/[var Application],Name]
If Not Installed [Var
Name] Then
SetVar Path,[XMLAttribute
Applications.xml,Acme/Applications/[var Application],InstallPath]
SmallSplash "Installing
[Var Name] ...
please wait!"
RunScript [Var Path],
AcmeDom\AcmeInstall,"<encryptedpassword>"
End If
End If
End Loop
The script looks through the XML file for nodes under the "Application" node and then if the current computer needs
an application, it is installed. In this case, if ACMEPC0111 does not have Microsoft Office installed when
someone logs in, they will see this splash screen while the installation runs unattended in the background:

Once you have established this mechanism to distribute software, imagine how easy it would be to create an intranet
application where people can request certain software. All the intranet application needs to do is to insert one
line into the xml file!
Inventory
If you don't have a management system, you don't know what is installed on which computers.
FastTrack comes with a cloud-based inventory system that has no setup steps and is free for licensed customers. Simply issue
one command in your logon script, and you have full hardware and software inventory of your computers.
SkyBox has no additional cost; it just requires your clients to be licensed and within
maintenance period.
Refer to
this page for more
information on SkyBox.
Installations with a management system - generating MSI files
If you do have a management system to distribute software, you may have run into the problem being that some
management systems can only distribute Windows Installer (MSI) files. If for example the software your company
has selected as their VPN solution is not Windows Installer based, you may not be able to distribute it through your
management system and/or group policies. But we can script any installation with FastTrack, as long as
we know the command-line switches to do so and then FastTrack can build a single self-contained
MSI package based on any script and installation files, so you can simply script your VPN software installation and let FastTrack Scripting
Host build an MSI files around it all to make it distributable. Please refer to
this page for more
information on building MSI files.
Post-installation notifications
If you install some applications with your management system and some through the logon script, you might need to
report to your management system that you have installed an application. For this, you can use the FastTrack install
handlers: If there is a script file named "PostInstall.fsh"
or "PostUninstall.fsh" in the executing FSH.exe directory, they are executed any time the script runs into commands RegisterInstallation,
RegisterUninstallation, InstallMSI, UninstallMSI or UninstallProgram. This will enable you to inform your management system about installations. And you
can of course also use these for anything else you want to happen when an application gets installed or uninstalled. Inside the script,
you can write whatever is needed to inform the management system. Often this will involve creating an XML file in a specific format
on a specific network location. The name of the application and the version can be extracted with the functions
CurrentInstallName and CurrentInstallVersion.
Creating off-line installers - repackaging into a single exe file
For offline computers, it is possible to package your script and installation files into one
single exe file that can be placed in a public location. There are a number of advantages to
this over all other alternatives: First of all, the users cannot get a copy of the actual installation files and also
the credentials and serial numbers to install the software can be safely included in the script, because the
user will never be able to see them. If you are not familiar with creating exe files with FastTrack Automation Studio,
please refer to
this page for more information on how to compile your script and
installation files into one single exe file.
If an exe file is put in a public location, we need to protect it
from abuse. We could get by this by simply asking for a password that internal users get
from an admin or a Help Desk. If we inserted this at the top of the script before getting
to the script lines that actually perform the installation:
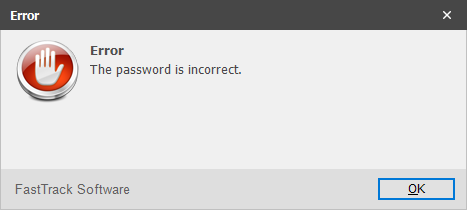
If Not [InputPassword
Enter
installation password]=Sesame Then
ShowErrorMessage The password is
incorrect.
Exit
End If
Then the user will see this, when running the exe file:

If the user did not enter "Sesame" in this case, then the user gets an error and the exe
file exits.
If the offline users are local administrators, we can continue to the actual
installation script lines that execute the installation.
If the local user may be under User Account Control, we might need to
elevate the user to be able to actually execute the installation. To
handle this, we simply need to insert one script line before we
start the installation:
Please refer to the
User Account Control page for
more information on the ElevateUser command.
If the user is not local administrator, but we know the name and password of a local
administrator account that is not under User Account Control, we can simply change the
executing user before doing anything that requires administrative privileges:
ChangeUser LocalInstallUser,6orateocIkCmGChbGYLg0w==
What is important to understand is that all this will be compiled into a single
executable file and the executing user will have no ability to get any information
from inside the script. Using the above "start password" example, the user does not
know any account passwords. The output exe file can be put in a public location
and the url and start password can be handed out. If you want to sign your output
exe file in such a scenario, please refer to
this page
for more information on creating exe files and signing exe files.
Exe compilation example
This example is an extract from the
Compiling your script into an exe file page,
where a complete installation script and the installation files are compiled into one single custom exe file.
The movie below shows an example of converting the above Acrobat Reader example into one single exe file with a few mouse-clicks. The scenario is this:
- The network administrator wants to create a pool of common applications that users can install themselves without consulting the IT department.
- Any one installation must be one executable file to avoid users copying the installation files.
- Executing users are not administrators.
- The process must be completely automatic without requiring user interaction, except asking to install or not.
- There is a local administrator account on all computers that have the same password known only to the network administrator.
- Executing users must not be able to get credentials of the local administrator account executing the installation.
In the example below, a single 90mb exe file is produced that will install Adobe Reader using a custom administrator account.