MSI compilation in greater detail
This page an extension of the general MSI page
here and assumes that you have read that page first.
Compiling a custom software installation MSI file
When a script is open in the Script Editor, clicking "Compile Script To MSI File" will start the wizard and show the screen below.
The output MSI file is compiled from this script.
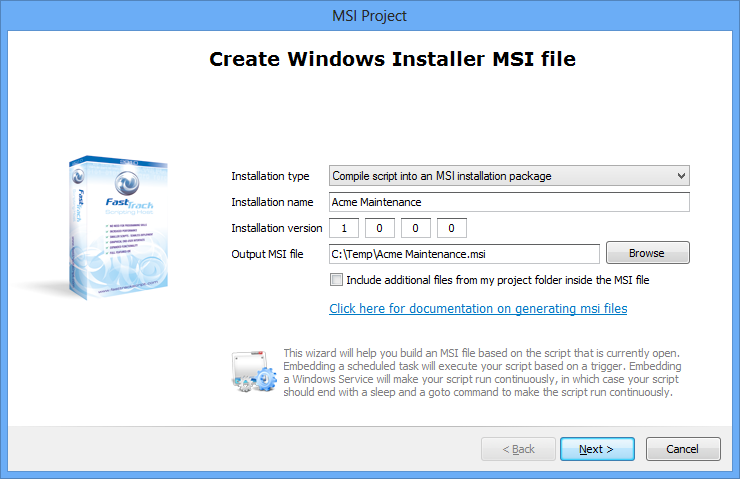
The installation name and version are the information shown in the Windows programs list in the control panel. The reason
the version is not auto-generated is that you can use the version to actively re-install packages.
If you increment the version and re-install, the "Major Upgrade" feature of Windows Installer is used and that means running
the installation again will not fail, but automatically run the uninstaller of the old package and the installer of the new package. This is usable
if you update a maintenance script and want to re-deploy it, because then you do not need to worry about whether the target machine already had
the package in an older version or not.
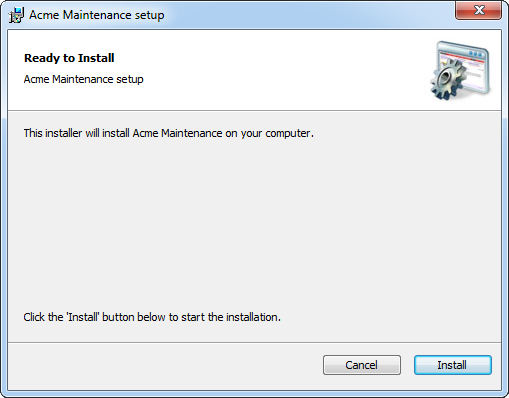
Running the output Windows Installer file will show a welcome dialog (see below) and a complete dialog. When you install the packages
through group policies or a management system, the installation will run in unattended mode and these dialogs will never be shown.
A good reason to use the Windows Installer generation is to wrap installations that are not already in Windows Installer format,
if you want to deploy through group policies or a management system. As mentioned earlier, if you need to re-package, give some
thought to whether you are using the right strategy or not.
Assuming there is a need to re-package, let's assume you need your VPN software as an MSI and it comes with a different installer.
You cannot just deploy it through group policies or a management system. Often snapshot technologies are used to convert a proprietary installer
into Windows Installer format, but this is an approach that must be avoided at all costs - especially when it includes drivers, firewall rules and other
low-level elements. It will never work on a hundred different machines, especially if they are not all the same operating system.
You are bypassing the installation logic of the vendor with snapshots and it's impossible for any snapshot software to "discover"
all the rules behind the installation logic.
If you know that you can just run "Setup.Exe /Quiet" or similar, it is frustrating to not be able to deploy it through group policies.
But this is now possible with the MSI generator of FSH. Basically
you can just put your setup.exe in a directory and create a script file in the same directory that just issues for example
"Run Setup.Exe,/Quiet" and then clicking the MSI project button will generate an .MSI file. That's it, no additional steps needed.
Another scenario could be applications that are made in-house that you want to wrap.
Let us try an example that can be reproduced without any third party installation files. Let us assume we wanted to use
SmartDock, but we do not use
FastTrack Logon
for logon scripts, so we need another way to deploy it. We would then need to deploy the fsh.exe engine file, our license file and the
SmartDock files and finally set SmartDock to run for everyone that logs on.
To accomplish this, we will create a new folder with a script file and a sub-folder named "Bin".
In the bin folder we need a copy of 5 files, making our complete project directory structure look like this:
- SmartDock Runtime.fsh (The installation script that we create next)
- Bin\Fsh.Exe (Fsh engine)
- Bin\Fsh.Lic (Your license key)
- Bin\SmartDock.Exe
- Bin\SmartDock.Fsh (The script that SmartDoc executes)
- Bin\SmartDock.Xml (SmartDock configuration)
The main script that we called "SmartDoc Runtime.fsh" could look like the script below. When we select the "Compile Script To MSI File",
this script must be open, as MSI packages are created based on the open script.
Set InstallDir=[ProgramFilesDir]\Acme
Corporation\FastTrack Scripting Host
If MSIInstallContext Then
CopyDir Bin,[Var InstallDir]
Run [Var InstallDir]\Fsh.Exe,/Associate
SetStartupItem SmartDock,[Var InstallDir]\SmartDock.Exe
Else
KillProcess SmartDock.Exe
Run [Var InstallDir]\Fsh.Exe,/Unassociate
DeleteDir [Var InstallDir]
RemoveStartupItem SmartDock
End If
Observe how there is a check for a condition called "MSIInstallContext". You have to factor in
that your package can be uninstalled. If you are thinking that it never will, remember upgrading will also trigger uninstall with the old package
script and install with the new script. If you do not "react" to uninstallation and just include an installation part, effectively your script will
also runs the installation, when asked to uninstall.
As is also the case with project exe files, the location of the additional files, which are unpacked to a temporary installation directory before execution,
cannot be known up front and will vary from client to client. Therefore all references to files and folders must be relative, as it is also the case
with the bin folder in the example script.
Now we need to compile the script and the additional files in the "Bin" folder.
Click the "Compile to MSI" menu item or press F12:

This will pop up the MSI wizard to generate the MSI file.
Fill in the basic properties on the first page and make sure the
"Include additional files from my project folder inside the MSI file" is checked.
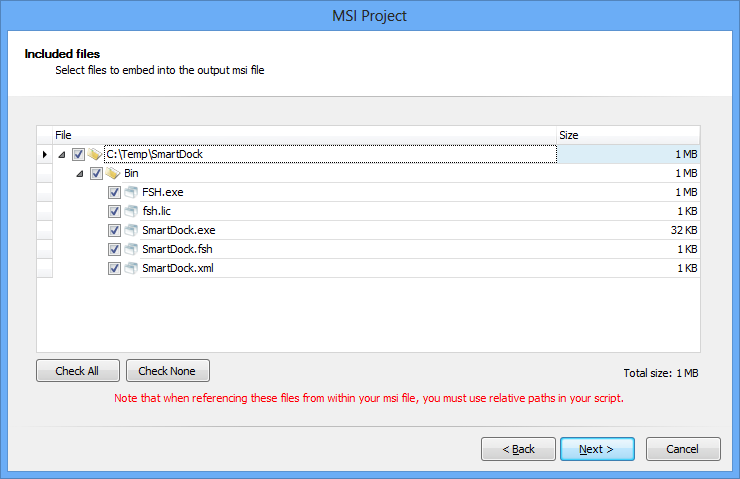
The second page in the wizard will allow you to select the files to include, as shown below. Observe that
when selecting project generation, all files in the script folder and all sub-folders
are included with the option to un-check files to exclude.
Now that we have a single MSI file, we can deploy with for example Microsoft System
Center. As not everyone has Microsoft System Center, in this case we will just deploy our MSI through regular Group Policy
deployment:
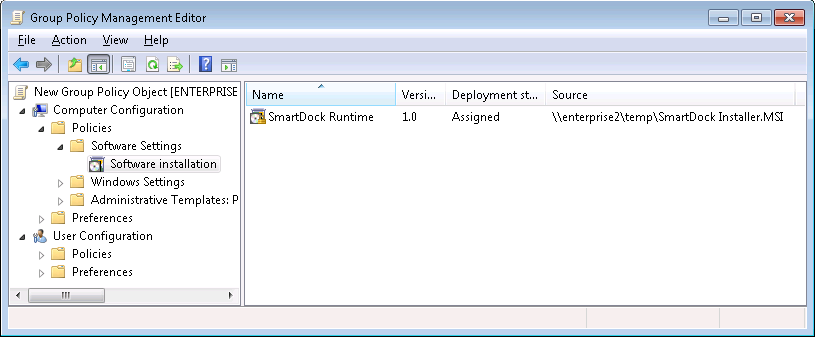
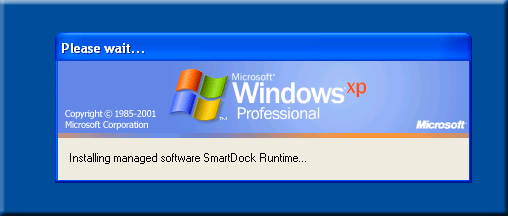
When we log on to a computer that is under the control of the above group policy,
the MSI file is installed on system startup as shown below with a Windows XP client.
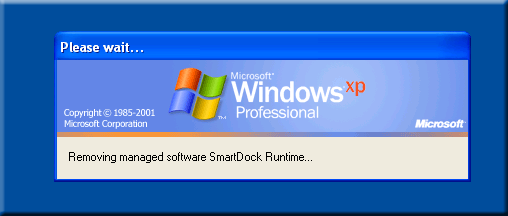
And if we chose to remove the MSI file from the Group Policy, the uninstaller
runs as shown below on the same Windows XP client.
TeamViewer example
A common example of re-packaging is TeamViewer. You can download a single TeamViewer.exe that will install the software
and then start it. If you run the installation package, you will find two files are unpacked in the temp folder.
If you copy the TeamViewer_.exe file from the temp folder, it can be run using /S to install silently. But it will still start the program
after installation. The script below will install the software and kill the process after installation. Put the
TeamViewer_.exe in the same directory as the script and compile into an MSI project, and you have a fully unattended
MSI version of the TeamViewer installation - without using snapshots.
Run TeamViewer_.Exe,/S
KillProcess TeamViewer.Exe
When to use MSI files for installations
Using scheduled tasks inside MSI files serves a specific purpose. These are not for installation of a specific piece of software, but
may be a controller for other installations. The MSI is in this case merely a container for distributing the scheduled task.
But speaking of MSI packages for installation of specific software, the most important thing to think about is, do you
actually need them to be in MSI format at all, if they ship with something else. If you know the unattended switches, doing MSI repackaging
only makes sense to address a technical limitation.
Generally speaking, there are two very different scenarios. For servers it natural to deploy software packages or scheduled task controller
scripts through group policies, as no one logs on to these machines. If you chose the scheduled task option (see the
server farm deployment example), there is no reason to not just use the native installer. If
you for example want TeamViewer on a number of servers, it does not make sense to repackage it. Why not just go "Run TeamViewer_.exe,/S" in a
script (see example further down)? If you're repackaging something so low-level as TeamViewer using a snapshot, it is downright dangerous
to the target server and you could effectively destroy things like registry driver chains, worst case resulting in a server that can no
longer boot. If you have to distribute non-MSI based software for servers, consider either the server farm deployment example
or repackaging a native installer without using snapshots (see further down).
For workstations, it is a little more complicated. The optimal way to handle installations is not to just add MSI installations to your
group policies, as there is no control over the distribution process.
Even if you have only say 100 computers and your installation package is large, it is already undesirable to
just let all computers install at the same time with group policies. In such a case you would need to factor in things
like network peak hours, simultaneous installs and maybe even computer types and other conditions. And when you have more than
a couple of installation packages, group policy installations become unscalable, because you would not have a policy for
each group of computers that need a certain installation package. Group policy installations are in general usable only for
servers or small packages that all computers or users must have.
In such a scenario, it is recommended that you run your workstation installations through your
logon script,
startup script or a scheduled task controller script contained
inside an MSI (see further down), where your actual installation files in all these scenarios are on a network share and you
can control which computers get which software, for example by using computer domain groups.
In such a setup, it is not required to use MSI packages, as long as you know the unattended switches for your
setup files. Please consult the
installations page for general information on scripting
installations. Once you control the launch of the actual installer from your own script, you can make a simple simultaneous counter
to avoid flooding or you can use the scheduled task option to spread the load automatically.

|
A tip to get software distributed to offline computers: You can generate a self-contained exe file that
includes installation files and your credentials to allow the installation to be performed.
Please consult the exe files page for more information on generating exe files.
|
Scheduled task inside an MSI package
As explained earlier, you can embed a scheduled task inside the MSI file, as shown below.
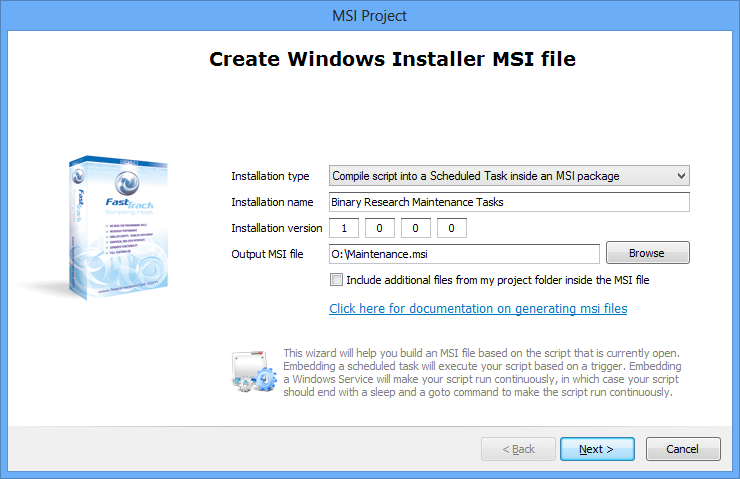
Selecting "Compile script into a Scheduled Task inside an MSI package" in the "Installation type" dropdown list inserts two more pages into the wizard flow upon clicking "Next".
The first one configures the scheduled task, as shown below, and the second one is for optional overrule of credentials.
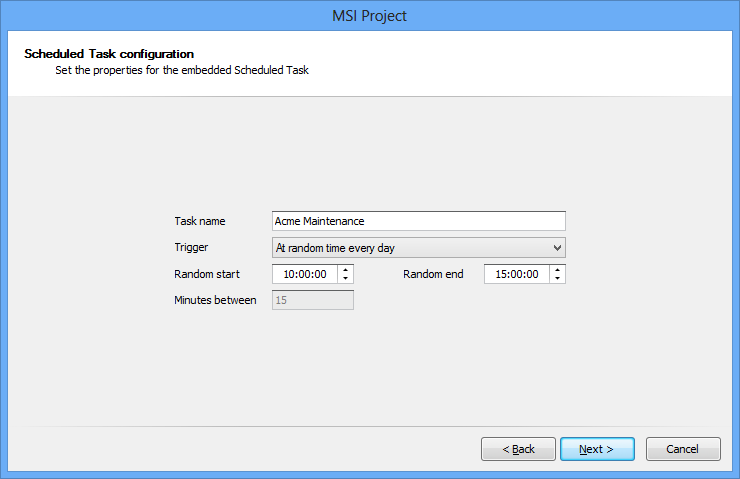
Your script does not get executed, when you install the MSI package with the scheduled task option. Instead the MSI installation process
installs a scheduled task, which runs your script or project as a single compiled executable. When a computer installs the output MSI
for example through group policies, the default trigger is a random time between the random start and end times once a day.
The default is between 10am and 3pm, because if you use it for workstations and you have thousands of computers, no computer gets the task triggered at typical
logon hours and all computers' trigger times are spread over these 5 hours. This is ideal to make sure that there is no network congestion while for example
installing an updated Microsoft Office. For servers it would be natural to change the random start hours to for example between 2am and 5am. If we pull down the
"Trigger" dropdown list there are more trigger types:
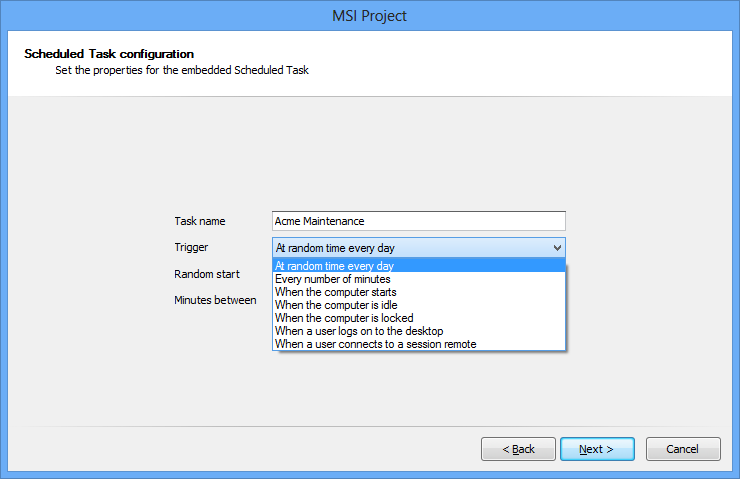
The most common trigger is the daily trigger, but you can select another one, if needed. Note that if you are considering the "Every number of minutes"
trigger, in most cases a Windows Service compilation is better. The choice between one over the other would typically depend on, if you need
a fixed break between execution of a fixed time between triggering, in case the script task takes more than a few seconds.
For a script of this type to be flexible, it would be a good idea to not let the scheduled task contain the installation logic
(like determining if an installation must happen or not), but instead simply include a script on the network.
So the script inside the MSI may even look as simple as this:
Include \\AcmeServer\Install$\InstallationLogic.fsh
Assuming the task is installed with domain credentials, this will basically just run another script off the network, which avoids the need to
update the scheduled task frequently, because it contains no logic itself.
Another example is a maintenance task that has to happen daily. The maintenance task could cleanup temporary files, verify free disk space or
check that no unauthorized user is a member of the local administrators group and send an email to the administrator or log an online event,
in the event any of these conditions are not met.
A third example is that if you have a large number of computers, you may have concerns uploading inventory information from computers within the logon
hours. In this case, you could create a script containing only the inventory command, as shown below and compile that into an MSI scheduled task.
It has to be pointed out that the bandwidth consumed for inventory upload is marginal, even with a large number of machines.
If this package is then deployed to a thousand computers, statistically only 200 computers would actually run the
script per hour and never outside the 10am to 3pm non-peak window. As no information is typically changed from one run to the next,
the uploaded information per minute becomes marginal.
Scheduled tasks for servers
Note that random start and stop hours can be set through the random start and end input fields on the generation screen. If you
prefer another interval other than the default 10am to 3pm, you can set different start and stop time. This would be relevant, if
you wanted to distribute a server-only maintenance script through GPO to handle backups, reboots and other maintenance tasks.
Setting both values to the same value sets a fixed time.
Note that there are no options to use a scheduled task trigger other than a daily trigger. This is because you can insert logic to
exit at the start of the script on certain days or other conditions. If you want to run a script multiple times a day, you can create
a loop using SleepUntil and exit after the last execution of the day.
Refer to the
Deploying applications to server farms as an example of using scheduled tasks inside MSi files for servers.
Command line compilation
It is possible to compile scripts from command line. A tool called Build.Exe is located in the installation directory of FastTrack Automation Studio,
which can be called to compile script files into exe and MSI files without using the script editor. Start Build.exe without parameters to see a
complete list of parameters. For example to compile a script into MSI, the typical syntax is:
Build.Exe /Quiet /ScriptFile <Input Script File> /MSIFile <Output MSI File> /MSITitle <Installation Name> /MSIVersion <Installation Version>
Remember to quote parameters that have spaces, which would typically be the case for the installation name. If you want to create the MSI as a scheduled task,
include the /MsiScheduledTask switch.
If the /Quiet switch is specified, the successful conversion message will not be shown. In case of an error, an error message will always be displayed.
MSI Compilation summary
Watch Senior Technical Writer Steve Dodson from Binary Research International walk you through the
basics of the material presented on this page.
